(Originally posted on Saturday, 19 April 2025)
2025 World Snooker Championship starts today!
Last year the winner was Kyren Wilson. Congratulations!
I would be very happy if the winner this year is one of these players (ordered according to the tournament ladder):
Kyren Wilson
Neil Robertson
David Gilbert
Mark Selby
Barry Hawkins
Mark Williams
Ding Junhui
Shaun Murphy
Judd Trump
My dream final would be Kyren Wilson vs. Shaun Murphy!
Saturday, 19 April 2025
Tuesday, 8 April 2025
NBA 2025 MVP race – part 1
(Originally posted on Tuesday, 8 April 2025)
Part 1 ends with games played on 6 April 2025. Only 4 games left (more or less), so these results are almost final results.
All the statistical data I used I found on this site:
http://www.basketball-reference.com/
I described my way of calculating the MVP and the MFP values in these posts:
Comparing NBA MVPs
Most frustrated NBA players
Before the 2024-25 season is over I have to make mathematical projections of the MVP and the MFP values. The assumption behind the projections is that every player and every team will play exactly the same way they have been playing so far (the numbers of projected team wins are rounded to whole numbers).
With the assumptions described above, the current NBA 2025 MVP race list is this:
1. Shai Gilgeous-Alexander: 2866.3 (projected team wins: 67)
2. Nikola Jokic: 2146.2 (projected team wins: 49)
3. Jayson Tatum: 2066.4 (projected team wins: 61)
4. Donovan Mitchell: 1845.8 (projected team wins: 65)
5. Karl-Anthony Towns: 1784.6 (projected team wins: 53)
6. Evan Mobley: 1738.1 (projected team wins: 65)
7. Darius Garland: 1711.3 (projected team wins: 65)
8. Jalen Williams: 1710.3 (projected team wins: 67)
9. Jarrett Allen: 1685.8 (projected team wins: 65)
10. Giannis Antetokounmpo: 1637.2 (projected team wins: 46)
11. Anthony Edwards: 1603.6 (projected team wins: 48)
12. LeBron James: 1566.1 (projected team wins: 50)
13. Derrick White: 1505.9 (projected team wins: 61)
14. James Harden: 1498.2 (projected team wins: 48)
15. Alperen Sengun: 1495.9 (projected team wins: 54)
16. Tyrese Haliburton: 1441.6 (projected team wins: 49)
17. Jalen Brunson: 1427.3 (projected team wins: 53)
18. Josh Hart: 1405.0 (projected team wins: 53)
19. Ivica Zubac: 1394.8 (projected team wins: 48)
20. Pascal Siakam: 1382.5 (projected team wins: 49)
Shai Gilgeous-Alexander will be the winner of the race – the remaining few games won't change anything in this regard. There are many new faces on the list (when compared to previous seasons), but to me the most surprising one is Josh Hart! Respect to all of them!
With the same assumptions (described above) the current NBA 2025 MFP list is this:
1. Jordan Poole: 927.1 (projected team wins: 18)
2. Miles Bridges: 903.1 (projected team wins: 20)
3. Tyrese Maxey: 799.8 (projected team wins: 24)
4. Walker Kessler: 788.8 (projected team wins: 17)
5. Keyonte George: 768.3 (projected team wins: 17)
6. LaMelo Ball: 764.7 (projected team wins: 20)
7. Collin Sexton: 754.2 (projected team wins: 17)
8. Trey Murphy III: 746.6 (projected team wins: 22)
9. Devin Booker: 713.9 (projected team wins: 37)
10. Tyler Herro: 706.5 (projected team wins: 37)
11. CJ McCollum: 705.0 (projected team wins: 22)
12. Cameron Johnson: 655.6 (projected team wins: 26)
13. Kevin Durant: 651.3 (projected team wins: 37)
14. Scottie Barnes: 650.2 (projected team wins: 30)
15. Bub Carrington: 649.1 (projected team wins: 18)
16. Trae Young: 645.8 (projected team wins: 39)
17. Bam Adebayo: 641.2 (projected team wins: 37)
18. Alex Sarr: 635.2 (projected team wins: 18)
19. Lauri Markkanen: 624.4 (projected team wins: 17)
20. Yves Missi: 611.3 (projected team wins: 22)
There is not a single player in the top-20 both on the MVP list and on the MFP list.
Monday, 27 January 2025
I LOVE the Miami Heat front office!!!!!!!!!!!!!!!
(Originally posted on Monday, 27 January 2025)
I have just learned that Miami Heat suspended Jimmy Butler indefinitely! Reportedly he walked out of a shootaround after learning that he would be coming off the bench from now on.
I hope that no team will trade for him and that he will waste the rest of this season without pay! In that case it would be VERY interesting if he would opt-in to his player option for the next season.
I LOVE the Miami Heat front office!!!!!!!!!!!!!!!
Monday, 1 July 2024
The Last Frontier – a thought-provoking spy-thriller
(Originally posted on Sunday, 8 June 2014)

My rating: 9/10
I have already written about The Last Frontier in this post:
Alistair MacLean best novels
Please read it first.
Just like in The Golden Rendezvous, the main characters in The Last Frontier are very lively and memorable. But there is one big difference: in the first novel the main characters were people with non-fighting jobs (mostly seamen) and in this novel the main characters are involved in secret-agent/spying/underground activities. All of them.
The Last Frontier is a page turner. It’s basically a thriller about a secret agent on a mission behind the Iron Curtain. There is lots of action and lots of plot twists. The best parts are those based on confrontations, usually between two people. And all kinds of confrontations are great in this book: melee-fights, long-range shootouts, false-papers bluffs, interrogations of captured men, negotiations with enemies and even good-guys animosity about a girl. Don’t worry about the last one – it’s a tiny, almost non-existent side-topic, which is done very well nonetheless.
There is some humour in this book, but much less than in The Golden Rendezvous. Obviously the topic connected with a totalitarian system was not helpful in this case.
I must also point out that the places of action in The Last Frontier are much more varied than in The Night Without End (Greenland ice-sheet) and The Golden Rendezvous (a sea ship). I can’t name them, because it would be like giving spoilers, but believe me there are many memorable settings. Alistair MacLean was really an artist as far as short-but-good-and-climatic descriptions were concerned.
All the action takes places in Hungary, but two most important people in the Hungarian underground who are friends and who help Reynolds in his mission are a Ukrainian and a Pole. I have no idea if MacLean did it on purpose, but it was fitting perfectly to the message of the book. Poland and Ukraine have some very difficult history behind them, considering especially what happened in Volhynia and Eastern Galicia during World War II (Ukrainians massacred around 100 000 Poles, including women and children), but I believe that young generations should not be blamed for what their ancestors did. The message of the book is perfectly fitting to my beliefs. Or maybe my beliefs are based on the message of this book? I have read The Last Frontier for the first time when I was a teenager and it may have had some kind of influence on the way I look at such things.
Well, I have to write a little about negatives. First of all, some things were too easy for Reynolds (the secret agent from the West). I was especially surprised how easily he entered a heavily-guarded hotel to contact a particular person and how easily he left it. I was also disturbed by things like hotel-fire escapes connected to hotel-bathrooms, not only in the hotel I mentioned, but also in another one. Maybe such things were common in the 50s in the West, but I doubt they were common behind the Iron Curtain then, even in Budapest. Fortunately there were few such things in the book, but when they did happen they were very striking, at least to me.
The main problem with this book were numerous historical inaccuracies especially about the World War II. MacLean wrote about those times to give a background for one of the characters, but exaggerated some facts and simplified others. At first I wanted to correct all the inaccuracies but there were too many of them. Moreover it would only distract you from the positive message of the book and its overall great value. There was a seed of truth in everything MacLean wrote, but don’t take this book as a precise historical account. Concentrate on the enjoyable action and on the message.
Below there are some spoiler-free quotes to give you some idea about what message this book contains. The construction of the main plot makes it impossible to quote anything about it without spoilers, but the bulk of the book is fast and enjoyable action. The message however is true even today. The Last Frontier was not well received in 1959 – at the peak of the Cold War and I wonder how it would be judged today. The parts that I quote below are only a part of the overall message and they can be fully appreciated only after reading the whole book (with all the tragic history of the main characters from beyond the Iron Curtain and tough decisions they have to make while helping Reynolds). Enjoy!
(…) Again, the emotional colourings which would normally accompany the thought of the potentialities of a successful mission or the tragic consequences of failure had no part in his racing mind as he lay there in the freezing snow, thinking, calculating, planning, assessing chances with a cold and remote detachment. ‘The job, the job, always the job on hand’ the colonel had repeated once, twice, a thousand times. ‘Success or failure in what you do may be desperately important to others, but it must never matter a damn to you. For you, Reynolds, consequences do not exist and must never be allowed to exist, and for two reasons: thinking about them upsets your balance and impairs your judgement – and every second you give up to thinking along these negative lines is always a second that should and must be used to working out how you’re going to achieve the job on hand.’
‘By all the gods!’ (...) slapped his hand on his thigh. It’s magnificent, it’s really magnificent. My professional jealously is aroused. To have a Britisher or an American – British, I think, the American intonation is almost impossible to conceal – talk Hungarian with a Budapest accent as perfectly as you do is no small feat. But to have an Englishman talk English with a Budapest accent – that is superb!’
‘Their barbarities, their enslavement and their massacres don’t steam from world conquest?’ The fractional lift of Reynolds’ eyebrows was its own sceptical comment. ‘You tell me that?’
‘I do.’
‘Then from what in the world –?’
‘From fear, Mr Reynolds,’ Jansci interrupted. ‘From an almost terror-stricken fear that has no parallel among governments of modern times.
‘They are afraid because the ground lost in leadership is almost irrecoverable: Malenkov’s concessions of 1953, Kruschev’s famous de-Stalinization speech of 1956 and his forced decentralization of all industry were contrary to all the cherished ideas of Communist infallibility and centralized control, but they had to be done, in the interest of efficiency and production – and the people have smelled Freedom. And they are afraid because their Secret Police has slipped and slipped badly: Beria is dead, the NKVD in Russia are not nearly so feared as the AVO in this country, so the belief in the power of authority, of the inevitability of punishment, has slipped also.
‘These fears are of their own people. But these fears are nothing compared to their fears of the outside world. (…) They cannot recognize enemies, and they can only be safe, only feel safe, if all the peoples of the outside world are regarded as enemies. Especially the west. They fear the west and, from their point of view, they fear with every reason.
‘They are afraid of a western world that, they think, is unfriendly and hostile and just waiting its chance. How terrified would you be, Mr Reynolds if you were ringed, as Russia is ringed, with nuclear bomb bases in England and Europe and North Africa and the Middle East and Japan? How much more terrified would you be if, every time the world tensions increase, fleets of foreign bombers appear mysteriously on the far edge of your long-distance radar screens, if you know, beyond any reasonable doubt, that whenever such tensions arise there are, at any given moment of the day or night anywhere between 500 and 1,000 bombers of the American Strategic Air Command each with its hydrogen bomb, cruising high in the stratosphere, just waiting the signal to converge on Russia and destroy it. You have to have an awful lot of missiles, Mr Reynolds, and an almost supernatural confidence in them to forget those thousands hydrogen bombs already airborne – and it only requires five per cent of them to get through, as they inevitably would. Or how would you, in Britain, feel if Russia were pouring arms into Southern Ireland, or the Americans if a Russian aircraft carrier fleet armed with hydrogen bombs cruised indefinitely in the Gulf of Mexico? Try to imagine all that , Mr Reynolds, and you can perhaps begin to imagine – only begin, for the imagination can be only a shadow of reality – how the Russians feel.
‘Nor does their fear stop there. They are afraid of people who try to interpret everything in the limited light of their own particular culture, who believe that all people, the world over, are basically the same. A common assumption, and a stupid one and dangerous one. The cleavage between western and Slavonic minds and ways of thinking, the differences between their culture patterns are immense and alas, unrealized.
‘Finally, but perhaps above all, they are afraid of the penetration of western ideas into their own country. And that is why the satellite countries are so invaluable to them as a cordon sanitaire, an insulation against dangerous capitalist influences. And that’s why revolt in one of their satellites, as in this country two years last October, brings out all that is worst in the Russian leaders. They reacted with such incredible violence because they saw in this Budapest rising the culmination, the fulfilment as one and the same time of their three nightmare fears – that their entire satellite empire might go up in smoke and the cordon sanitaire vanish forever, that even a degree of success could have touched off a similar revolt in Russia and, most terrible of all, that a large-scale conflagration from the Baltic to the Black Sea would have given the Americans all the excuse or reason they ever needed to give the green light to the Strategic Air Command and carriers of the Sixth Fleet. I know, you know, that idea’s fantastic, but we are not dealing with facts, only with what the Russian leaders believe to be facts.’
Jansci drained his glass and looked quizzically at Reynolds. ‘You begin to see now, I hope, why I was neither advocate of nor participant in the October rising. You begin to see, perhaps, why the revolt just had to be crushed, and the bigger and more serious the revolt the more terrible would have to be the repression, to preserve the cordon, to discourage other satellites or any of their own people who might be having similar ideas. You begin to see the hopelessness – the fore-doomed hopelessness – of it, the disastrous ill-judged futility of it all. The only effect it had was to strengthen Russia’s position among the other satellites, kill and maim countless thousands of Hungarians, destroy and damage over 20,000 houses, bring inflation and an almost mortal blow to the country’s economy. It should never have happened. Only, as I say, the anger of despair is always blind: noble anger can be magnificent thing, but annihilation has its – ah – drawbacks.’
(…) ‘Sorry to have been so long, Jansci.’
‘Not at all,’ Jansci, assured him. ‘Mr Reynolds and I have had the most interesting discussion.’
‘About Russians, inevitably?’
‘Inevitably.’
‘And Mr Reynolds was all for conversion by annihilation?’
‘More or less.’ Jansci smiled. ‘It’s not so long since you felt the same way yourself.’
‘Age comes to us all.’ (…)
‘Then what the devil am I supposed to have done?’
‘Nothing. That’s the whole point. It’s not what you do, it’s what you don’t do, it’s what you don’t show. You show no feelings, no emotions, no interest or concern in anything. Oh, yes, you’re interested enough in the job to be done, but the method, the how of it is a matter of absolute indifference, just as long as the job is done.
‘The Count says you’re only a machine, a mechanism designed to carry out a certain piece of work, but without any life or existence as an individual. He says you’re about the only person he knows who cannot be afraid, and he is afraid of people who cannot be afraid. Imagine! The Count afraid!’
‘Imagine,’ Reynolds murmured politely.
‘Jansci says the same. He says you’re neither moral nor immoral, just amoral, with certain conditioned pro-British, anti-Communist reactions that are valueless in themselves. He says whether you kill or not is decided not on a basis of wrong or right but simply of expediency. He says that you are the same as hundreds of young men he has met in the NKVD, the Waffen SS and other such organizations, men who obey blindly and kill blindly without ever asking themselves whether it is right or wrong. The only difference, my father says, is that you would never kill wantonly. But that is the only difference.’
‘I make friends wherever I go,’ Reynolds murmured.
Jansci was wandering, not arguing, and he drifted from his own people to his youth amongst them. The transition seemed pointless, inconsequential at first, but Jansci was not an aimless wanderer, almost everything he did or said or thought was concerned with reinforcing and consolidating, both in himself and all his listeners, his almost obsessive faith in the oneness of humanity. When he spoke of his boyhood and young manhood in his own country, it could have been any person, of any creed, remembering with a fond nostalgia the happiest ours of a happy land. (…)
‘Mad?’ Reynolds swore. ‘He’s an inhuman fiend. Tell me, Jansci, is that the sort of man you call your brother? You still believe in the oneness of humanity?’
‘An inhuman fiend?’ Jansci murmured. ‘Very well, let us admit it. But at the same time let us not forget that inhumanity knows no frontiers, no frontiers in either time or space. It’s hardly the exclusive perquisite of Russians, you know. God only knows how many thousands of Hungarians have been executed or tortured till death came as a welcome release – by their fellow Hungarians. The Czech SSB – their secret police – were on a par with NKVD, and the Polish UB – composed almost entirely of Poles – were responsible for worse atrocities than the Russians had ever dreamed of.’
(…)
‘(…) And to all of that you might say: It is all one, it is all communism. And you would be right, my boy.
‘But what would you say if I reminded you of the cruelties of Falangist Spain, of Buchenwald and Belsen, of the gas chambers of Auschwitz, of the Japanese prison camps, the death railways of not so long ago? Again you would have the ready answer. All these things flourish under a totalitarian regime. But I said also that inhumanity has no frontiers in time. Go back a century or two. Go back to the days when the two great upholders of democracy were not quite as mature as they are today. Go back to the days when the British were building up their Empire, to some of the most ruthless colonization the world has ever seen, go back to the days when they were shipping slaves packed like sardines in a tin, across to America – and the Americans themselves were driving the Indian off the face of their continent. And what then my boy?’
(…)
‘(…) As to what I was saying, I fear that I talk too much and at the wrong time. You don’t feel even a little more kindly disposed towards our worthy commandant?’
‘No!’
‘Ah, well,’ Jansci sighed philosophically. ‘Understanding the reasons for an avalanche does not, I suppose, make one any more grateful for being pinned beneath it.’
‘It is essential, I think, to hammer home the idea of peace, the idea of disarmament, to convince the Russians, above all things, of our peaceful intentions. Peaceful intentions!’ Jansci laughed without mirth. ‘The British and the Americans filling the armouries of the nations of Western Europe with hydrogen bombs – what a way to demonstrate peaceful intentions, what a way rather to ensure Russia will never relax its grip on the satellites it no longer wants, what a way to drive the men of the Kremlin, scared men, I tell you, inexorably nearer the last thing in the world they want to do – sending the first intercontinental missile on its way: the last thing they want to do, because they know better than any that, though in the deep cellars in Moscow they may survive the retaliation that will surely come, they will never survive the vengeful fury of the crazed survivors of the holocaust that will just as surely engulf their own nation. To arm Europe is to provoke the Russians to the point of madness: whatever else we may not do, it is essential to avoid all provocation, to keep the door of negotiation and approach always open, no matter what the rebuffs may be.’
‘It is essential to watch ‘em like hawks, I would say,’ Reynolds commented.
‘Alas, I thought we had made him see the light,’ the Count mourned. ‘Perhaps we never will.’
‘Perhaps not,' Jansci agreed. ‘But he’s right, all the same. In the one hand the big gun, in the other the olive branch. But the safety-catch must always be on, and the hand of peace always a little in advance, and you must be endlessly patient – rashness, impatience could bring the world to catastrophe. Patience, endless patience. What matter a blow to your pride when the peace of the world is at stake?’
(…)
Jansci paused and wearily shook his head. ‘The governments of the world may not be mad, but they are blind and their blindness is but one step removed from insanity. The desperate, most urgent need this world knows or will ever know, is the need for an effort without parallel in history to get to know ourselves and the other people of the world even as well as we know ourselves, and then we will see that the other man is just as we are, that right and virtue and truth belong to him as much as to us. We must think of people not as conglomerate mass, not conveniently, indiscriminately, as a faceless nation: we must always remember that a nation is made of millions of little human beings just like we are, and to talk about national sin and guilt and wickedness is to be wilfully blind, unjust and un-Christian; and while it is true that such a nation may go off the rails, it never goes off because it wants to, but because it couldn’t help it, because there was something in its past or in its environment that inescapably made it what it is to-day, just as some forgotten incidents, some influences that we can neither recall nor understand, has made each one of us what we are to-day.’
(Sunday, 8 June 2014)
Sunday, 23 June 2024
The Chicago Bulls front office impressed me again
(Originally posted on Sunday 23 June 2024)
The Chicago Bulls front office impressed me again and this is NOT sarcasm! I really mean it. I loved their decision to stand pat at the last trade deadline and I love their decision to now trade Alex Caruso away as quickly as possible.
I think that before the last trade deadline some of the other teams claimed that they were interested in Zach LaVine, but in fact wanted Caruso just as much as LaVine FOR THE SAME TOTAL PRICE. I think it was the reason why the Chicago Bulls front office didn't do ANYTHING at the last trade deadline – they didn't want to give Caruso away “for free”.
Now they traded Caruso away as quickly as possible and it feels like showing a finger to all those other teams that wanted to fleece them. Now the other teams that claim they are interested in Zach LaVine have to come up with a good offer just for LaVine. Do you want (just) Lavine? Then prove your real interest by giving a good offer!
The same thing applies to the LaVine's agent – do you claim you can find a good trade for (just) LaVine? Then prove it!
I have to add that I am devastated that some Internet sites that “seem to be all about Chicago Bulls” constantly criticize the Chicago Bulls front office, blindly repeating all kind of crap being spread by the other teams that want to fleece the Chicago Bulls.
In a recent article about the Caruso trade I found a quote that suggested that the Chicago Bulls front office wanted (at the last trade deadline) as many as 4 first-round picks for Caruso. This is BULLSHIT. I am 100% sure that it was the price for both LaVine and Caruso, so quoting such a misleading claim is completely pathetic.
On the same (supposedly “all about Chicago Bulls”) site I found an even worse thing – one of the proposed trades (after the Caruso trade) was this: LaVine (to 76ers) for a single SECOND round draft pick! A player like LaVine just for a single SECOND round draft pick! What a fucking disgrace proposing such a deal!
The Chicago Bulls front office impressed me by trading Caruso away as quickly as possible and I firmly believe that they won't “trade” LaVine away for such a pathetically low price. Good job, guys!
Monday, 22 April 2024
2024 World Snooker Championship has just started!
(Originally posted on Monday 22 April 2024)
2024 World Snooker Championship has just started and already there were 5 results that I liked very much! These players already advanced to the second round:
David Gilbert
Stephen Maguire
Shaun Murphy
Judd Trump
Stuart Bingham
There are several other players I like very much who can still advance to the second round, so it can get only better. Something tells me it will be a truly great tournament overall!
Saturday, 13 April 2024
NBA 2024 MVP race – part 3
(Originally posted on Saturday 13 April 2024)
Part 3 ends with games played on 12 April 2024. Only 1 game left, so these results are almost final results.
All the statistical data I used I found on this site:
http://www.basketball-reference.com/
I described my way of calculating the MVP and the MFP values in these posts:
Comparing NBA MVPs
Most frustrated NBA players
Before the 2023-24 season is over I have to make mathematical projections of the MVP and the MFP values. The assumption behind the projections is that every player and every team will play exactly the same way they have been playing so far (the numbers of projected team wins are rounded to whole numbers).
With the assumptions described above, the current NBA 2024 MVP race list is this:
1. Nikola Jokic: 2524.9 (projected team wins: 57)
2. Shai Gilgeous-Alexander: 2215.9 (projected team wins: 57)
3. Jayson Tatum: 2188.8 (projected team wins: 64)
4. Luka Doncic: 2172.5 (projected team wins: 51)
5. Giannis Antetokounmpo: 1995.3 (projected team wins: 50)
6. Anthony Edwards: 1800.8 (projected team wins: 57)
7. Anthony Davis: 1755.5 (projected team wins: 47)
8. Domantas Sabonis: 1699.4 (projected team wins: 46)
9. Jalen Brunson: 1694.7 (projected team wins: 50)
10. Kevin Durant: 1658.0 (projected team wins: 49)
11. Chet Holmgren: 1598.8 (projected team wins: 57)
12. Jaylen Brown: 1590.6 (projected team wins: 64)
13. LeBron James: 1543.6 (projected team wins: 47)
14. Damian Lillard: 1490.1 (projected team wins: 50)
15. Kawhi Leonard: 1480.1 (projected team wins: 52)
16. Derrick White: 1478.1 (projected team wins: 64)
17. Paul George: 1477.6 (projected team wins: 52)
18. Devin Booker: 1475.2 (projected team wins: 49)
19. Rudy Gobert: 1470.6 (projected team wins: 57)
20. Stephen Curry: 1449.9 (projected team wins: 46)
Nikola Jokic will be the winner of the race. One (last) game of the season won't change anything in this regard. Towards the end of the race Shai Gilgeous-Alexander suffered an injury, which ruined his chances. Otherwise he would be very close to winning. Jayson Tatum's team has the best record, but Tatum's per-game value is too low. It doesn't matter because his team is focused on winning the NBA championship. Luka Doncic's team record is too low plus he missed 11 games (13.4% of the season, which is 1/7.5th) and this is why Doncic is only 4th.
With the same assumptions (described above) the current NBA 2024 MFP list is this:
1. Victor Wembanyama: 1170.0 (projected team wins: 21)
2. Kyle Kuzma: 1085.5 (projected team wins: 15)
3. Cade Cunningham: 1019.9 (projected team wins: 14)
4. Miles Bridges: 962.2 (projected team wins: 20)
5. Deni Avdija: 952.3 (projected team wins: 15)
6. Jordan Poole: 902.6 (projected team wins: 15)
7. Jalen Duren: 875.5 (projected team wins: 14)
8. Devin Vassell: 845.0 (projected team wins: 21)
9. Scottie Barnes: 817.0 (projected team wins: 25)
10. Tyus Jones: 810.9 (projected team wins: 15)
11. Jaden Ivey: 807.6 (projected team wins: 14)
12. Brandon Miller: 789.1 (projected team wins: 20)
13. Corey Kispert: 762.7 (projected team wins: 15)
14. Jaren Jackson Jr.: 742.8 (projected team wins: 27)
15. Keldon Johnson: 719.2 (projected team wins: 21)
16. Mikal Bridges: 706.5 (projected team wins: 32)
17. Deandre Ayton: 704.1 (projected team wins: 21)
18. Dejounte Murray: 696.5 (projected team wins: 36)
19. Tre Jones: 688.4 (projected team wins: 21)
20. Collin Sexton: 679.9 (projected team wins: 31)
Victor Wembanyama is at the top of the MFP list. I bet many people thought he would make a great turnaround for the Spurs, like David Robinson did in his rookie year. Well, Robinson had also Willie Anderson (10th pick from the previous draft) and Sean Elliot (3rd pick from the current draft), while he was 1st pick from the draft 2 years before (he had to serve 2 years of military service), so such expectations for Wembanyama were clearly unfair. But Gregg Popovich didn't help with achieving a better team record either.
There is not a single player in the top-20 both on the MVP list and on the MFP list.
Saturday, 17 February 2024
NBA 2024 MVP race – part 2
(Originally posted on Saturday 17 February 2024)
Part 2 ends with games played on 15 February 2024.
All the statistical data I used I found on this site:
http://www.basketball-reference.com/
I described my way of calculating the MVP and the MFP values in these posts:
Comparing NBA MVPs
Most frustrated NBA players
Before the 2023-24 season is over I have to make mathematical projections of the MVP and the MFP values. The assumption behind the projections is that every player and every team will play exactly the same way they have been playing so far (the numbers of projected team wins are rounded to whole numbers).
With the assumptions described above, the current NBA 2024 MVP race list is this:
1. Shai Gilgeous-Alexander: 2436.5 (projected team wins: 56)
2. Nikola Jokic: 2340.9 (projected team wins: 54)
3. Jayson Tatum: 2295.2 (projected team wins: 64)
4. Giannis Antetokounmpo: 2178.5 (projected team wins: 51)
5. Luka Doncic: 2013.3 (projected team wins: 48)
6. Anthony Edwards: 1819.0 (projected team wins: 58)
7. Donovan Mitchell: 1794.9 (projected team wins: 56)
8. Karl-Anthony Towns: 1793.8 (projected team wins: 58)
9. Kawhi Leonard: 1781.7 (projected team wins: 56)
10. Domantas Sabonis: 1778.0 (projected team wins: 47)
11. Kevin Durant: 1688.6 (projected team wins: 49)
12. Anthony Davis: 1654.7 (projected team wins: 44)
13. Jalen Brunson: 1633.0 (projected team wins: 49)
14. Paul George: 1618.0 (projected team wins: 56)
15. Chet Holmgren: 1604.7 (projected team wins: 56)
16. Jaylen Brown: 1602.6 (projected team wins: 64)
17. James Harden: 1584.5 (projected team wins: 56)
18. Joel Embiid: 1560.0 (projected team wins: 49)
19. Damian Lillard: 1547.4 (projected team wins: 51)
20. Rudy Gobert: 1535.0 (projected team wins: 58)
Shai Gilgeous-Alexander is the leader of the race! Respect! However, if I had to guess I would say that the race will be won by Jayson Tatum. We'll see.
With the same assumptions (described above) the current NBA 2024 MFP list is this:
1. Victor Wembanyama: 1243.4 (projected team wins: 16)
2. Kyle Kuzma: 1207.7 (projected team wins: 14)
3. Cade Cunningham: 1076.5 (projected team wins: 12)
4. Tyus Jones: 1035.6 (projected team wins: 14)
5. Scottie Barnes: 1011.7 (projected team wins: 28)
6. Deni Avdija: 1011.1 (projected team wins: 14)
7. Devin Vassell: 997.0 (projected team wins: 16)
8. Miles Bridges: 936.9 (projected team wins: 20)
9. Jalen Duren: 901.0 (projected team wins: 12)
10. Keldon Johnson: 899.7 (projected team wins: 16)
11. Jaden Ivey: 849.1 (projected team wins: 12)
12. Jerami Grant: 822.0 (projected team wins: 23)
13. Jordan Poole: 799.8 (projected team wins: 14)
14. Trae Young: 783.8 (projected team wins: 36)
15. Jeremy Sochan: 769.4 (projected team wins: 16)
16. Jaren Jackson Jr.: 769.2 (projected team wins: 29)
17. Mikal Bridges: 764.5 (projected team wins: 32)
18. Brandon Miller: 741.5 (projected team wins: 20)
19. Alperen Sengun: 740.1 (projected team wins: 36)
20. Ausar Thompson: 721.0 (projected team wins: 12)
Victor Wembanyama is at the top of the MFP list. What a terrible season by the San Antonio Spurs, but it's obviously not the fault of Wembanyama.
There is not a single player in the top-20 both on the MVP list and on the MFP list.
Sunday, 21 January 2024
This is a brave man! Respect!
(Originally posted on 21 January 2024)
This is a brave man! Respect!
This is the full interview with no censored speech (the same fragment starts at 16:30).
This is a brave man! Respect!
This is the full interview with no censored speech (the same fragment starts at 16:30).
Tuesday, 26 December 2023
NBA 2024 MVP race – part 1
(Originally posted on Tuesday 26 December 2023)
Part 1 ends with games played on 23 December 2023.
All the statistical data I used I found on this site:
http://www.basketball-reference.com/
I described my way of calculating the MVP and the MFP values in these posts:
Comparing NBA MVPs
Most frustrated NBA players
Before the 2023-24 season is over I have to make mathematical projections of the MVP and the MFP values. The assumption behind the projections is that every player and every team will play exactly the same way they have been playing so far (the numbers of projected team wins are rounded to whole numbers).
With the assumptions described above, the current NBA 2024 MVP race list is this:
1. Joel Embiid: 2701.7 (projected team wins: 59)
2. Giannis Antetokounmpo: 2537.9 (projected team wins: 62)
3. Nikola Jokic: 2455.1 (projected team wins: 56)
4. Shai Gilgeous-Alexander: 2338.5 (projected team wins: 55)
5. Jayson Tatum: 2217.6 (projected team wins: 64)
6. Damian Lillard: 2089.5 (projected team wins: 62)
7. Tyrese Maxey: 2089.1 (projected team wins: 59)
8. Luka Doncic: 2078.1 (projected team wins: 48)
9. Karl-Anthony Towns: 1990.0 (projected team wins: 64)
10. Anthony Edwards: 1831.1 (projected team wins: 64)
11. Domantas Sabonis: 1717.3 (projected team wins: 50)
12. Jaylen Brown: 1715.4 (projected team wins: 64)
13. Rudy Gobert: 1647.8 (projected team wins: 64)
14. Anthony Davis: 1621.0 (projected team wins: 44)
15. Chet Holmgren: 1616.1 (projected team wins: 55)
16. Derrick White: 1571.0 (projected team wins: 64)
17. Jalen Brunson: 1561.8 (projected team wins: 47)
18. Kawhi Leonard: 1543.1 (projected team wins: 48)
19. LeBron James: 1528.9 (projected team wins: 44)
20. De'Aaron Fox: 1482.0 (projected team wins: 50)
Early results are always too optimistic, but very interesting nevertheless. To me the most notable things are that Shai Gilgeous-Alexander is 4th and Tyrese Maxey is 7th.
With the same assumptions (described above) the current NBA 2024 MFP list is this:
1. Cade Cunningham: 1435.2 (projected team wins: 6)
2. Kyle Kuzma: 1291.2 (projected team wins: 15)
3. Victor Wembanyama: 1229.3 (projected team wins: 12)
4. Keldon Johnson: 1142.3 (projected team wins: 12)
5. Desmond Bane: 1057.4 (projected team wins: 26)
6. Scottie Barnes: 989.8 (projected team wins: 31)
7. Tyus Jones: 967.4 (projected team wins: 15)
8. Zach Collins: 946.7 (projected team wins: 12)
9. Trae Young: 935.6 (projected team wins: 34)
10. Ausar Thompson: 926.0 (projected team wins: 6)
11. Jaren Jackson Jr.: 914.8 (projected team wins: 26)
12. Daniel Gafford: 890.2 (projected team wins: 15)
13. Devin Vassell: 885.9 (projected team wins: 12)
14. Jerami Grant: 874.5 (projected team wins: 21)
15. Deni Avdija: 867.7 (projected team wins: 15)
16. Isaiah Stewart: 853.4 (projected team wins: 6)
17. Pascal Siakam: 827.1 (projected team wins: 31)
18. Jordan Poole: 822.1 (projected team wins: 15)
19. Terry Rozier: 777.0 (projected team wins: 21)
20. Jeremy Sochan: 771.2 (projected team wins: 12)
Victor Wembanyama is 3rd on the MFP list, mostly because his team won only 4 games out of 28 played so far. It doesn't speak well about Gregg Popovich at all (I am pretty sure that he also has a big influence on the front office of his team, so he's responsible for the “weak team” anyway). As far as pure coaching is concerned, for comparison, Ime Udoka coached his team to 15 wins in 27 games, which is a knock-out against Popovich.
There is not a single player in the top-20 both on the MVP list and on the MFP list.
NBA 2023 MVP race – final results
(Originally posted on Tuesday 26 December 2023)
For the sake of completeness I have to post these final lists for the season 2022-23.
All the statistical data I used I found on this site:
http://www.basketball-reference.com/
I described my way of calculating the MVP and the MFP values in these posts:
Comparing NBA MVPs
Most frustrated NBA players
The final NBA 2023 MVP race list is this:
1. Jayson Tatum: 2091.0 (team wins: 57)
2. Joel Embiid: 1990.9 (team wins: 54)
3. Nikola Jokic: 1982.0 (team wins: 53)
4. Giannis Antetokounmpo: 1826.5 (team wins: 58)
5. Domantas Sabonis: 1640.9 (team wins: 48)
6. Jaylen Brown: 1506.5 (team wins: 57)
7. Donovan Mitchell: 1505.9 (team wins: 51)
8. Julius Randle: 1500.6 (team wins: 47)
9. Brook Lopez: 1398.4 (team wins: 58)
10. De'Aaron Fox: 1380.2 (team wins: 48)
11. Jrue Holiday: 1369.9 (team wins: 58)
12. Luka Doncic: 1363.2 (team wins: 38)
13. James Harden: 1355.7 (team wins: 54)
14. Shai Gilgeous-Alexander: 1350.0 (team wins: 40)
15. Ja Morant: 1278.8 (team wins: 51)
16. Evan Mobley: 1272.2 (team wins: 51)
17. Darius Garland: 1259.1 (team wins: 51)
18. Anthony Edwards: 1241.0 (team wins: 42)
19. Trae Young: 1239.7 (team wins: 41)
20. Stephen Curry: 1238.4 (team wins: 44)
Jayson Tatum won the race, but his per-game value was not so special. Joel Embiid, the official MVP, was second on my race list, which means that my calculations once again were almost perfect.
I must admit that Embiid really surprised me this year – last year I thought that it was then the best opportunity ever to give him the MVP award and yet he came up with an even better season. Respect!
I have to point out that James Harden finished the race at the 13th place, but he played only in 58 games. Quite an achievement.
The final NBA 2023 MFP list is this:
1. Jalen Green: 854.9 (team wins: 22)
2. Alperen Sengun: 851.1 (team wins: 22)
3. Damian Lillard: 822.4 (team wins: 33)
4. Bojan Bogdanovic: 802.3 (team wins: 17)
5. Luka Doncic: 789.2 (team wins: 38)
6. Jaden Ivey: 762.6 (team wins: 17)
7. Keldon Johnson: 735.6 (team wins: 22)
8. Kevin Porter Jr.: 715.4 (team wins: 22)
9. KJ Martin: 698.9 (team wins: 22)
10. Jabari Smith Jr.: 678.4 (team wins: 22)
11. Shai Gilgeous-Alexander: 675.0 (team wins: 40)
12. Kristaps Porzingis: 671.5 (team wins: 35)
13. Tre Jones: 655.4 (team wins: 22)
14. Terry Rozier: 654.5 (team wins: 27)
15. Lauri Markkanen: 651.1 (team wins: 37)
16. Jalen Duren: 626.7 (team wins: 17)
17. P.J. Washington: 625.3 (team wins: 27)
18. Killian Hayes: 618.6 (team wins: 17)
19. Franz Wagner: 600.9 (team wins: 34)
20. Tyrese Haliburton: 594.5 (team wins: 35)
There were 2 players in the top-20 both on the MVP list and on the MFP list – Luka Doncic (12th and 5th) and Shai Gilgeous-Alexander (14th and 12th).
Sunday, 24 December 2023
The best Christmas time ever!
(Originally posted on Sunday, 13 December 2020; updated on 23 December 2021)
This year (2021), exactly like the year before (2020), many people have started enjoying Christmas time much earlier than usual!
This year (2021), exactly like the year before (2020), many people have started enjoying Christmas time much earlier than usual!
Wednesday, 8 November 2023
The Day We Found the Universe (by Marcia Bartusiak) – extensive review
(Originally posted on Wednesday, 8 November 2023)

What a book! What a FANTASTIC book!!!
This book (The Day We Found the Universe by Marcia Bartusiak) is so good that it should be in print forever! Unfortunately it seems that it's not in print anymore – I had to buy a used one.
I. Extremely accessible style of writing.
This book reads like a novel and yet it contains so much astronomical info that it's hard to describe. Reading the book was a very pleasant experience.
II. Little known facts from history.
This book is mostly about astronomy and astronomers, but there are also some fun facts about the second half of the XIX century and about the early XX century. Among others it's about how first professional observatories were founded and/or financed and about how the American society was changing over time.
III. Astronomers who don’t get enough credit.
I’ve learned about many astronomers who were as important and as good (sometimes even better) than Edwin Hubble, but they were active much earlier, so they simply had inferior equipment. They all have one thing in common – they don’t get enough credit for what they had done.
This is why my review is so long – I wanted to at least mention some of them (they never appear in just one Internet article, but are “spread out” over different topics). This is my (mini) tribute to them.
III.1. James Keeler (who died unexpectedly in 1900 at the age of only 42).
Keeler discovered that the number of nebulas (what we now generally call faint fuzzies) was much bigger than what the famous William Herschel thought, by extensively using photography combined with a reflecting telescope.
Some photographs that taken by Keeler were completely stunning to other astronomers from that time. On this page there's an example (Orion Nebula):
https://en.wikipedia.org/wiki/Crossley_telescope
James Keeler was also a master of spectroscopy and in 1985 he proved (by detecting The Doppler effect) that the rings of Saturn (or rather their particular parts) orbit the planet with different speeds (the closer to the planet the faster they move) – the theory came from James Clerk Maxwell in 1856.
III.2. Heber Curtis (the “winner” of the Great Debate from 1920).
From 1902 to 1920 Curtis continued the work of Keeler on nebulas by using the same reflecting telescope, so if Keeler hadn't died unexpectedly Curtis maybe wouldn't have taken part in the Great Debate at all (it could have been Keeler in his place).
His “win” in the Great Debate was not really complete – he was right that (some of) the nebulas were other galaxies far away, but he was also WRONG that our galaxy was only 30 000 light-yers wide and that our Sun was close to the center of our galaxy (he shared a typical view of our galaxy then).
Ironically Curtis “gave up” the race for determining the distance to M31 (or other “spiral nebulae”) just months after the Great Debate by leaving the Lick Observatory to become director of the Allegheny Observatory in Pittsburgh – a much worse location for astronomical observations.
III.3. Vesto Slipher (who made the second Edwin Hubble's big discovery – redshift increase with distance – much easier).
Already in 1914 Slipher presented his paper titled “Spectrographic Observations of Nebulae” where he described that of the 15 nebulas he had observed that far 3 were approaching Earth and the rest were moving away, some of them with huge velocities (Slipher got a standing ovation with Hubble present in the audience).
https://ui.adsabs.harvard.edu/abs/1915PA.....23...21S/abstract
By 1925 nearly all of 45 measured velocities of the “spiral nebulae” were Slipher's, but when Hubble used Slipher's velocities he didn't credit Slipher at all in 1929 or didn't credit Slipher properly in 1931. Only after 2 DECADES, in 1953, Hubble gave Slipher proper credit, admitting that Slipher “had contributed 42 out of 46 nebular velocities then available”.
Fortunately other astronomers knew that Slipher deserved significant credit and “the Royal Astronomical Society presented its highest award, the Gold Medal, to him in 1933”.
III.4. Henrietta Leavitt (who discovered and measured Cepheid variables).
Cepheid variables turned out to be crucial for determining distances to globular clusters or to other galaxies. Leavitt discovered them while working as one of women “computers” (which was Edward Pickering's idea). In the following fragment of the book – about George Hale – there is a funny quote (with reversed order of words) from an article by Vera Rubin (“People, stars, and scopes” in Science vol. 309 from 2005): “Pickering discovered women and Hale discovered money”.
https://www.science.org/doi/10.1126/science.1117658
III.5. Harlow Shapley (the “loser” of the Great Debate from 1920).
I must admit that I have been impressed by what I learned from the book about Shapley. Some people remember him only as the “loser” (of the Great Debate), but the reality was completely different. Moreover his story is quite inspiring. I also liked the fact that he had a strong sense of humor that was often self-depreciating.
Shapley grew up on a farm and his father was a hay dealer. Later, in order to save enough money to go to college, he worked for some newspapers as a reporter, including a crime/police reporter. This fact probably explains why he sometimes overreached in his own theories and conclusions, but he was right in many astronomy cases anyway.
Shapley concentrated on finding distances to globular clusters and discovered that they are very far. He was the first to claim that out galaxy was much bigger than it was previously believed – he “won” the Great Debate in this regard, however he overestimated its size (300 000 light-years instead of 100 000 light-years). He was also right that the Solar System wasn't near the center of our galaxy.
His biggest mistakes were not trying to find Cepheid variables in “spiral nebulas” AND blindly believing in what his friend Adriaan van Maanen was claiming – that the spiral nebulas were (slightly) rotating over several years (which “proved” that they had to be relatively close). This is why he “lost” the debate as far as the locations of spiral nebulas were concerned (he thought they were in our galaxy instead of outside).
It's interesting to note that there is no transcript of the actual Great Debate and the articles published a year later were actually deepened and extended. “It was the written version, vastly altered and amended, that ultimately established the legend handed down by succeeding generations of astronomers, many coming to believe it was the bona fide transcript of the April scrap”.
Shapley was even worse than Hubble at (not) giving credit to other people, especially to Henrietta Leavitt and Ejnar Hertzsprung (who was first to “calibrate” the relationship discovered by Leavitt), but Shapley actually did his own calibration of Cepheid variables and used several additional assumptions, combining them with his immense work on globular clusters.
Shapley was a little “too brave” in his far-reaching assumptions, but he was also able to change his views. After Hubble presented his findings about the distance to M31, Shapley understood what they meant – that the spiral nebulas weren't part of our galaxy. It created a kind of rift between Shapley and his friend van Maanen (who was more stubborn before admitting that his rotating spiral nebulas must have been a mistake).
By the way: Shapley also made some very interesting observation of ants (the animals). “He began to study the travels of ants around the observatory, noticing that the higher the temperature, the quicker their pace. One species ran fifteen times faster once the Sun heated the insects by an additional 30ºC. (…) His findings were published in scientific journals.”
As for Shapley's self-depreciating humor (and Marcia Bartusiak's fantastic style of writing) here's an example:
“(… ) Finishing up in 1907, at the age of twenty-one, he at last qualified for admission to the University of Missouri, just as his schoolteacher mother had always desired.
Given his years of experience reporting on midwestern mishaps, Shapley had always intended to major in journalism, but upon arriving on campus he discovered that the promised opening of the university's School of Journalism had been delayed. “So there I was,” said Shapley later in life, “all dressed up for a university education and nowhere to go. 'I’ll show them' must have been my feeling. I opened the catalogue of courses and got a further humiliation. The very first course offered was a-r-c-h-a-e-o-l-o-g-y, and I couldn't pronounce it! … I turned over a page and saw a-s-t-r-o-n-o-m-y; I could pronounce that – and here I am!” Shapley, a lover of tall tales since he was a child, was just joking around. He actually was in need of a job, and an offer from Frederick Sears, head of the university's astronomy department, to work for him at 35 cents an hour was likely the deciding factor.”
IV. Edwin Hubble demythologized.
I was actually negatively surprised what kind of person Hubble was – on one hand extremely intelligent and gifted, but on the other hand desperate in search of identity and very insecure about how other people looked at him. Ha came from the Missouri state (exactly like Shapley), but later developed a strong British mannerism, “becoming a full-fledged (some might say rabid) Anglophile”. “Hubble cultivated an air of sophistication and restraint around his colleagues. The cold and standoffish persona of his youth never went away. Hubble kept his distance and maintained a regal air. (…) As other astronomers put it, he was a “stuffed shirt,” who couldn't “write an inter-office memo without it sounding like the Preamble to the Constitution.”
What's worse he was colorizing his story by “adding some dubious credentials to his curriculum vitae” (there are some examples given in the book, but I won't delve into this). His wife (who got to know him only when he was 31) kept repeating his tales after his death, which made it even harder to learn his true story.
What is consistent is the fact the Hubble was actually overly cautious and he tried to avoid making a mistake at all costs. He was so insecure that he hadn't published his findings on the distance to M31 for a very long time, but instead he kept giving some info in his letters to other astronomers. These “leaks” were such a hot topic that the general news got published in the New York Times on 23 November 1924, while there was still no official paper from Hubble. Other astronomers had to almost force Hubble to send his paper to the meeting in Washington, but he didn't come himself! His paper was presented by Henry Russell (on 1 January 1925).
As I already mentioned in the point III.3. when Hubble used Slipher's velocities (in his second big discovery – redshift increase with distance) he didn't credit Slipher at all in 1929 or didn't credit Slipher properly in 1931. Only after 2 DECADES, in 1953, Hubble gave Slipher proper credit, admitting that Slipher contributed 42 out of 46 nebular velocities then available.
“Hubble's redshift increase with distance” was a discovery that was “only” a proof of what some other people predicted earlier by solving Albert Einstein's equations of the general relativity: Willem de Sitter in 1917 (with the assumption of an empty space), Alexander Friedmann in 1922 and Georges Lemaître (a Catholic priest!) in 1927.
Not to mention that Hubble relied heavily on the work of his aide Milton Humason who is hardly ever credited at all.
[On a side note – my own conclusion: Hubble was indeed a great astronomer, but he is extremely overrated nevertheless. Nowadays some people compare him to Isaac Newton or Albert Einstein, but to me such comparisons are simply laughable. Carrying out some observations with the biggest available telescope and seeing a regularity in the results (by Hubble) that confirmed some theories proposed by other people doesn't compare to coming up with great scientific theories (by Newton and Einstein) that were later confirmed by real-life observations. Yes, detailed observations are important, but never on their own. In other words: the one who came up with a great theory seems to be more important than the one who found a great proof of that theory.]
V. Examples of irony of life.
As I already mentioned, the history could have been completely different if Keeler hadn't died unexpectedly at the age of only 42 or if Curtis had stayed at the Lick Observatory much longer.
Now I'd like to describe in a little more detail two of the most ironic moments concerning the very first step in this story (Keeler extensively using astrophotography combined with a reflecting telescope) – it wouldn't be possible without two unlikely “heroes”:
– the controversial first director of the Lick Observatory – Edward Holden,
– bad observing conditions around the Allegheny Observatory in Pittsburgh.
Edward Holden wasn't beloved (to say the least) by the staff members of the Lick Observatory at all: “Holden took his final ride down “Lick Avenue”, the mountain's dusty road, on September 18, 1897. Only one person, a young assistant, went out to say good-bye.” But it was Holden who had hired Keeler to the observatory in 1888 (a very good decision) and it was Holden who brought the Crossley telescope to the observatory in 1895 (another very good decision). In the meantime, in 1891, Keeler left the observatory, partly because he was fed up with Holden (not a conscious decision by Holden, but it worked out very well in the end).
From 1891 to 1897 Keeler was the director of the Allegheny Observatory in Pittsburgh – a much worse location for astronomical observations. “He doggedly tracked down every new advance in spectroscopic and photographic equipment in hope of offsetting Lick Observatory's advantages. The experience, though exhausting, only enhanced his astronomical abilities.”
Keeler, a master of spectroscopy, had known that a reflecting telescope would be clearly better in this regard than a refractor (that absorbed some certain wavelengths selectively, depending on the glass and the lens construction), but in 1896 he “had seen the power of reflectors firsthand while visiting England” – there he met with Isaac Roberts who “displayed the eye-catching photographs taken with his 20-inch reflector. Roberts had pioneered many of the techniques for taking long-term exposures and was the first to reveal that the Andromeda nebula was a spiral”.
These things explain why Keeler, when he became the director of the Lick Observatory in 1898, did everything that was needed to make the Crossley telescope properly functional (it took 4 months) AND used it with a photo camera. What a shame he died so soon after that!
Here's a link to another good review of the book:
https://knopfdoubleday.com/2009/05/20/some-surprising-facts-from-the-day-we-found-the-universe/
This book (The Day We Found the Universe by Marcia Bartusiak) is so good that it should be in print forever!
Friday, 27 October 2023
Fake news turned out to be true!
(Originally posted on Friday, 27 October 2023)
Fake news turned out to be true!
This is a screenshot from the official Pfizer site (https://www.pfizer.com/news/press-release/press-release-detail/pfizer-and-biontech-receive-us-fda-approval-2023-2024-covid):

When some people (even doctors!) were saying such things during the pandemic then some pro-vaccine fanatics were threatening to jail them. Now it's officially confirmed. Fake news turned out to be true!
PS.
This is a perfect example that taking or not taking such a vaccine should be a personal decision, never obligatory. And that some other doctors (who were claiming that vaccines are 100% safe) were wrong, so nobody should decide what is true and what is fake.
PS #2
How many people died because they didn't seek medical attention right away?
Thursday, 26 October 2023
No comments allowed
(Originally posted on Thursday, 26 October 2023)
For some time now I have been noticing that more and more Internet articles don't allow any comments, as if whoever wrote a particular article was afraid that people would point out some inconvenient facts.
The most recent infuriating thing is the usual ban on any comments on what is happening in Palestine. When I was young I got deceived many times about who was right and who was wrong, but now I am much older and much wiser and any inconsiderate pro-Israeli propaganda doesn't work on me anymore. On the contrary, any such propaganda looks more and more stupid and/or embarrassing. BOTH sides are are at fault, not only one.
PS.
United Nations (UN) Secretary-General Antonio Guterres summarized the situation very nicely. Please, google it.
Sunday, 22 October 2023
“The freedom to be inoffensive is no freedom at all”
(Originally posted on Saturday, 10 October 2020)
Sunday, 15 October 2023
Do you think that modern communism would be much different than this?
(Originally posted on Saturday, 9 October 2021)
Do you think that modern communism would be much different than this?

Do you think that modern communism would be much different than this?

Respect for all the brave people
(Originally posted on Wednesday, 11 May 2022; updated on 8 June 2022)
I respect all the brave people who say or do what they think is correct. They can be from a minority, like the old-time scientists who realised that Earth is not in the middle of the Solar System. Or they can be from a majority, like people who are not salves – like people who live in a democratic country and who can make their own decisions and have their own opinions. Unfortunately we live in a totally fucked-up times when people from a majority are often afraid to say what they really think! Even in democratic countries!
Respect for all these people:

To be precise:
Respect for the kneeling footballers for not being afraid to kneel.
Respect for the standing footballers for not being afraid to stand.
Respect for the people who prepared the poster for not being afraid to point out (in a hilarious way) that (any) sport shouldn't be mixed with politics.
Respect for ALL of them!
And respect for Elon Musk:

I agree with Elon Musk, but in the last 15 years I've actually moved more to the right side and now I stand smiling (exactly like the conservative on the picture), while looking at the madness of the extreme left side (of the “woke progressive”). And at the confusion of people who used to regard themselves as neutral center – their confusion is similar to Elon Musk's confusion.
And respect for Kevin Sorbo.

I agree with Kevin Sorbo, although I must admit that in some cases abortion technically is not a murder because it's legal. But I agree with him 100% when looking at it from a different perspective – thinking about what is done to a human being who is totally innocent. It's exactly like a murder. And it's pathetic that so many people in the 21st century don't understand their sexual drive! Just think about it – the sexual drive doesn't exist before a person becomes able to procreate. It's ALL about spawning new generations, for crying out loud!
In March 2022 I've become a father for the third time and it was one of the best things that happened to me and to my family as a whole. Everybody's happy! My wife, our children, our mothers (grandmothers of our children) and all our more distant relatives. I have to point out that we didn't plan having the third baby because we are relatively old – this year (2022) I will turn 44 and my wife will turn 42. Yet we didn't think about abortion even for a split of a second!
Respect for all the people who disagree with the tweets above.
I don't agree with people who disagree with the tweets above, but I still respect them. Why? Because they are not afraid to publicly speak about things that are totally different from the natural way of life. Because they are not afraid to publicly speak about such things totally ignoring science, like genetics and evolution. They are really brave in their own way.
For example from the point of view of genetics an unborn baby is a unique human being RIGHT FROM THE START of pregnancy! Yet, they claim that abortion is all about woman's wishes as if she were the ONLY person involved. Ridiculous, but I respect them for not being afraid to say ridiculous things. Even rape is not a “good enough” reason for abortion – there are many heterosexual pairs who are infertile and who would be happy to adopt such a baby.
And I can't believe that some people say that homosexual pairs are “normal in every way”. If all the people in the world turned into homosexuals then the human species would die out! From the point of view of a member of a human species such a thing (dying out of human species) couldn't be considered normal, by definition. So, from this point of view (dying out of human species) homosexuals pairs are not normal in this very way! But I respect anybody who is not afraid to speak about it differently.
Summing up:
I agree with Elon Musk and I agree with Kevin Sorbo, but I don’t want to take away the right for other people to say opposite things, no matter how stupid they may seem from the scientific point of view. On the other hand many people who disagree with me, or with Elon Musk, or with Kevin Sorbo, seem to prefer a total censorship, which is simply pathetic.


UPDATE:
Another great tweet from Sorbo:

“I’m sorry, I haven’t gotten used to killing political figures on sight yet.”
(Originally posted on Saturday, 10 July 2021)
This line (“I’m sorry, I haven’t gotten used to killing political figures on sight yet.”) just floored me when I was replaying the game Freelancer. It's a very old game and the graphics are dated, but the “choreography” and the dialogues are quite good. And thought provoking.
PS. When I look at what is happening around the world right now, I wonder whether some political figures in our world haven't been “taken over” by aliens who/that are trying to destroy the humankind “from within”. I simply can't believe that so many very important people in our world say (or do) so many stupid/illogical/unnatural things. Sometimes it's like a fucking contest who would say (or do) the most idiotic thing! And the current censorship imposed by some big corporations is on a par with what we experienced in Poland when Poland was still trapped behind the Iron Curtain. I can't believe that the West has gone to hell like this. And the rest of the “civilised” world is being dragged behind the West. What a fucking irony!
Monday, 7 August 2023
Easy astronomy for total amateurs
(Originally posted on Friday, 26 March 2021; updated most recently on 7 August 2023)
After 6 additional months of using my telescopes (now I have three), I changed this post significantly again. I updated some parts, rearranged the whole content, shortened some of my descriptions and, most importantly, I added new info together with 46 new pictures (photos, drawings and screenshots). I was not able to mark the new content, but if you simply scan the post for new pictures you will find some of the new info there.
INTRODUCTION
I am a pure enthusiast who concentrates on positive things, instead of complaining about negative ones, so I truly enjoy watching the night sky through a small telescope from a balcony in a city with big light pollution. By the way: light pollution is all about the night sky being brighter near human settlements than at remote locations (more on that later).
The brighter the night sky (because of light pollution) the less night-sky objects you can see, both with the naked eye and through any observing equipment, however there are ALWAYS some very interesting things to be seen even in a small telescope.
At the time I finally bought my first telescope I was 43 years old and I have to say one thing: I wish I had done it earlier!
ATTENTION!
I constantly refer to small telescopes, but I do NOT recommend ANY small telescope. I recommend a small telescope that is SLOW (“lean”) – a small telescope that is “long enough”. Why? Because in a slow/lean telescope light rays are less bent, which minimizes potential problems with aberrations, false colors, coma and things like that. As far as inexpensive telescopes are concerned buying a slow/lean one (at least f/8, but in case of refractors preferably f/10) is like taking a sure shot.
I own three telescopes, but only two of them are good for complete newcomers: 70/700 refractor (my first telescope) and 114/900 Dobson (my second telescope that I bought after just one year). I will explain telescope numbers later, but now I have to point out that the Dobson is better simply because it gathers more light. I also own a 102/1300 Mak (Maksutov–Cassegrain), but in this telescope the field of view is much smaller than in my refractor and in my Dobosn, so it's not good for a nowcomer.
Some of the examples below are actually my own photos or videos that I took/recorded with just a hand-held smartphone (without an adapter) gently pressed against a telescope eyepiece. Obviously astrophotography with a smartphone is very limited, so in reality (while looking into a telescope eyepiece) everything looks clearly better.
I. Telescopes vs. binoculars.
I.1. What can be seen in a small telescope, but not in binoculars:
I.1.1. The rings of Saturn (seen as one big ring, but clearly visible).
To me seeing the rings of Saturn was like a dream come true! The view was simply hypnotizing!
Saturn is the best object in a small telescope for recording a video with a smartphone – it's fantastic on its own (without any stacking nor processing), but it's good to crop it later (only crop, not resize), so the object appears bigger, especially in the full screen mode.
Please remember that in some years, for example in 2024 and 2025, the rings are less visible because of the angle of view:

I.1.2. The darkest belt(s) of Jupiter.
Seeing darkest belt(s) of Jupiter means that you can actually see something on a surface of another planet! Incredible! Please notice that the belts of Jupiter (their size and their colors) change over time and sometimes they even disappear.

This is a single cropped picture, but there is lots of noise. You can get rid of the noise by averaging several photos (for details see the point XII.5. Averaging/stacking photos):

Averaging just several photos already gives impressive results! But it's still worse than what I could see with my own eyes – astrophotography with a smartphone is very limited.
I.1.3. Venus crescent phase.
It’s extremely cool to see a crescent phase of Venus, but if you are at a high latitude north (or south) it’s a rather rare/difficult sighting. I didn't crop this video, so please, watch it in the full-screen mode.
I.1.4. A shadow of Ganymede cast on the surface of Jupiter.
Seeing a shadow of Ganymede (the biggest moon of Jupiter) cast on the surface of Jupiter means that you look at a total solar eclipse happening on another planet! Such a shadow (of Ganymede) is surprisingly well defined and it’s easily visible even in a small telescope (unlike shadows of other Jupiter moons, which are much smaller or farther away from the planet).

This is a single cropped picture where the shadow was clearly visible. Averaging several photos made the shadow a little less clear, so I don't show it because this is not about astrophotography, but about the shadow itself.
I described how to find the exact dates and times of Ganymede shadow transits in the point X.2. How to find very rare phenomena.
I.1.3. Relatively small details of the Moon.
The amount of details of the Moon that can be seen in a small telescope is simply fantastic! Click to enlarge!

I.1.4. Shape of the Orion Nebula and the Trapezium hidden inside.
In a small telescope the nebula is “less glowing” when compared to binoculars (because bigger magnification makes such diffuse objects dimmer), but it appears much larger and you can see its shape (or rather it's brightest part). Moreover inside the nebula you can see 4 stars that are very close to each other – these stars as a whole are called the Trapezium.

I.1.5. The brightest moons of Jupiter even when they appear very close to the planet.
It's not about the brightness of the moons, but about the apparent separation of the moons from the planet (about the angular distance between the moons and the planet). The moons can be seen even in 8x42 binoculars, but only when they appear far enough from the planet. In a small telescope the magnification is much bigger, so the moons can appear much closer to the planet (and much closer to each other) and still be discernible.

When I took the photo above all four Galilean Moons were visible in my small telescope, but only 2 of them were visible in my 8x42 binoculars. Please notice that Jupiter is overexposed because I had to make the moons visible and this is why the belts are not visible at all (I could see 2 belts on that night). Again: astrophotography with a smartphone is very limited.
Here's a screenshot from the site Stellarium-web.org for the time I took the picture above:
.jpg)
I.1.6. Relatively bright stars that are very close to each other.
Some stars (double or multiple stars) appear very close to each other, so they can be separated/split only at a big magnification (otherwise they appear as a single star). From my own experience I can say that it's extremely cool to “discover” a double star by sheer accident.
The most famous example of a multiple star is the Trapezium I mentioned (and pictured) together with the Orion Nebula. Another great multiple star is Sigma Orionis – just below the Orion Belt on the left. There are 4 main stars, but one of them is clearly weaker than the rest, so it can get drowned in the light of the nearby star:

The Sigma Orionis is in the middle, but as you can see there is another double star nearby (HD 294272).
The most famous example of a double star is Albireo – even in a small telescope it’s very easy to split AND you can see different colors of the stars!

I.1.7. The brightest moon of Saturn.
It looks like a relatively weak star, but it's clearly visible (unless it hides behind the planet).
I.1.8. Relatively weak stars.
Increasing magnification makes more stars visible, so under equal skies a small telescope will ALWAYS show more stars than binoculars, just because the magnification is much bigger (more on that later – in the part about contrast).
I.1.9. Most of “doable” galaxies.
A galaxy “doable” under light-polluted skies has to be very bright at its core – what you can (barely) see is only that central part of the galaxy.
There is actually one galaxy (M31 – the Andromeda Galaxy) that I saw even in my 8x42 binoculars, but all the other galaxies that I have seen from my light-polluted city (11 of them so far: M49, M63, M64, M66, M81, M82, M85, M94, M104, M105 and M106) were visible only in my small telescope. Either way they look extremely unimpressive – like a small cloud of light (people usually call it a faint fuzzy). The Andromeda Galaxy looks more or less like this:

It's not important how well you can see a galaxy, but what it means that you can see it at all. Galaxies are typically millions of light-years away – for example the Andromeda Galaxy is around 2.5 million light years away. It means that the light that you can see travelled for 2.5 million years before it reached your eyes! My personal best has been the sight of light rays that traveled for around 60 million years (from M85).
Please notice that when I write about seeing a particular night-sky object I mean seeing it “with your own eyes” – seeing the light that traveled a HUGE distance through space for a LONG time. When you see a picture of an object displayed on a computer screen you see only the light generated by the computer screen. When you see a picture of an object printed on a piece of paper you see only the light generated by the Sun (or by a lamp), reflected from the picture.
I.1.10. Most of “doable” globular star clusters.
A globular star cluster “doable” under light-polluted skies has to be very bright at its core, just like a “doable” galaxy – what you can (barely) see is only that central part of the globular cluster.
There is actually one globular cluster (M13 – the Hercules Globular Cluster) that I saw even in my 8x42 binoculars, but all the other globular star clusters that I have seen from my light-polluted city (11 of them so far: M2, M3, M5, M9, M10, M12, M14, M15, M53, M56 and M92) were visible only in my small telescope. Either way they look almost as unimpressive as galaxies – like a small cloud of light (a faint fuzzy), but the cloud is more concentrated, so it's generally easier to see.
Please notice that globular star clusters are typically tens of thousands of light-years away. Maybe it's not as impressive as in case of galaxies, but it's still very far! For example I have seen light that traveled from the M53 for 58 thousand years!
I.1.11. More open star clusters.
Similarly to the point I.1.8. Relatively weak stars there are many open star clusters that can be seen only in a telescope. This is not about seeing more stars in a cluster, but seeing a whole new cluster! There are many open star clusters that consists ONLY of very weak stars that can't be seen in binoculars at all.
I.2. In what regard are binoculars better than a small telescope?
I.2.1. Big field of view.
The best thing about hand-held binoculars is that the field of view (FOV) is much larger than in any telescope, so you can see much more of the night sky at a particular moment. Some of the biggest night-sky objects (as far as their angular size on the night sky is concerned) can fit into the view only in binoculars, HOWEVER there are VERY FEW such objects and most of them CAN'T BE SEEN under light-polluted skies at all anyway.
I.2.2. Easier search/identification.
Thanks to a bigger FOV you can find/identify a particular place on the night sky much easier simply because you see more stars at the same time. This fact makes binoculars a perfect complement to a small telescope. I often look through binoculars first to see stars than are invisible to the naked eye, which helps me point my telescope in a preferable direction.
I.2.3. Scanning of the night sky.
In a span of several seconds I can switch from the Orion's Sword (the area with the Orion Nebula in the middle) up to the Orion's Belt, then right to the star Aldebaran and the nearby open star cluster Hyades and then farther right to the open star cluster Pleiades. This sequence is truly spectacular and you can't do something like this (so quickly) in a telescope. But it actually makes binoculars kind of boring – when you find what you are looking for almost instantly then you can run out of targets pretty quickly, especially under light-polluted skies.
The best thing to do is to lie down on a reclining chair (or something similar) and scan the night-sky RANDOMLY. This is when binoculars really shine!
I.2.4. Portability and instant use.
Hand-held binoculars are much smaller and much more portable than a small telescope. Moreover you can use them instantly – the preparation time with any telescope, even a small one, is clearly longer. However, extreme portability and extremely short preparation time should be considered the least important things in astronomy.
I.3. A small telescope vs. binoculars – summary.
To me a small telescope is definitely better than a pair of ANY binoculars – there is absolutely no comparison as far as magnification is concerned. To me relatively high magnification is the most important thing because it shows details/new things that are simply too small at low magnifications.
I actually regret buying 12x60 binoculars (wasting my money) after reading some opinions like “It’s better to buy a pair of binoculars instead of a small telescope”. Based on my experience, I now find such opinions controversial, to say the least. Very soon after I had bought these binoculars I decided to buy a telescope simply because I finally realized that to see the rings of Saturn I need magnification of around 40x. After some more time I also bought smaller binoculars simply because they were lighter and my arms didn't tire so soon.
I would say that if you can afford it then you should buy BOTH a small telescope and a pair of 8x42 binoculars. They complement each other perfectly and I use them alternately. Moreover, a small telescope comes with a toy-like finder scope that is useless when looking from my balcony. Thanks to binoculars it’s easier to find crucial night-sky objects.
I own three pairs of binoculars (all of them porro binoculars): 12x60, 8x42 and 8x30 and I recommend ONLY the 8x42 ones!

I compared different types of binoculars in detail here:
Most universal types of binoculars
Please notice that some people rave about very big, very heavy and very expensive binoculars that look almost like two small telescopes bound together. Even such heavy (and expensive) monsters have much lower magnification than a small (and cheap) telescope, so the small telescope in some regards is still better anyway!
Another thing that is very strange to me is that you have to use a tripod to be able to use big and heavy binoculars, but if I had to fiddle with a tripod than I would rather use a small telescope than binoculars.
II. Useful info.
II.1. Free maps of the night sky.
Thankfully we live in modern times a we can use websites like this:
https://stellarium-web.org
This awesome site allows you to search for a particular night-sky object without learning anything about star constellations! You can also change date and time to see where a particular object was in the past or where it will be in the future. AWESOME!
A good method is to change the time minute by minute until a particular object is exactly in the direction you want it to be. It's quite useful on a balcony where you have some parts of the sky obstructed by nearby apartment buildings.
Please notice that you can simulate the night sky seen with the naked eye in big light pollution by setting the time to an early hour, but it's not quite realistic and the stars may be tilted “too much”. Most examples in the next point are made this way.
I have also installed the free program Stellarium from this site:
https://stellarium.org/
The program is not perfect but it's still very good:
1) the program has much more options and is much more configurable,
2) the program is much less burdening for the computer.
Please notice that I still regularly use the website, especially when I want quick results, better visuals or deeper star field.
I described the program Stellarium in detail here:
Stellarium program vs. Stellarium website
There is also a free astronomy Android app – Stellarium Mobile (153MB in total) that I installed on my smartphone. It shows only stars of magnitude below 8, but at least it seems consistent, unlike another free Android app that I installed (I will not name it).
II.2. Air/atmosphere in the way.
One of the most important things to remember is that it's quite pointless to look at night-sky objects that are very low over the horizon because the amount of air/atmosphere that is in the way then is HUGE.

The example above is exaggerated as far as observing height and the Earth's curvature are concerned. The yellow line (looking at zenith/straight up) is the amount of 1 air mass by definition. The orange line (looking just above the horizon) is MUCH longer, which means that the amount of air/atmosphere is MUCH bigger. I used the program Stellarium and it showed these values:
1.00 air mass at zenith (90 degrees above the horzion)
1.03 air mass at 77 degrees above the horizon
1.41 air mass at 45 degrees above the horizon
2.87 air masses at 20 degrees above the horizon
5.53 air masses at 10 degrees above the horizon
10.25 air masses at 5 degrees above the horizon
25.14 air masses at 1 degree above the horizon
A relatively good minimum threshold is 20 degrees above the horizon, especially for diffuse objects and weak stars:

II.3. Degrees above the horizon.

The picture above is a very good example how different angles “work” in real life. Imagine that you are standing in the middle of this sphere and when you look at the horizon the angle is 0 degrees. When you look at an object at 20 degrees above the horizon it's already relatively far from the horizon and an object at 45 degrees is suddenly very high in the sky! It means that the amount of air/atmosphere in the way when looking at an object at 45 degrees (or more) is already very small (it doesn't get much better than this, as I described it in the previous point).
Interestingly, looking at an object at 70 degrees above the horizon feels almost like looking exactly straight up! In fact aiming ANY telescope at objects at an angle of 65 degrees (or more) is quite troublesome and is not really recommended for newcomers. Even more experience astronomers avoid aiming at objects above 70 degrees. I had no idea that looking at such angles can be so troublesome!
II.4. Direction of an observing site.
Some observing sites, like a lawn next to a detached house, allow observing practically in any direction, but some other, like a balcony or a place near big apartment buildings, have some directions blocked.
Generally the best observing direction on the Northern Hemisphere is to the south because it maximizes the number of night-sky objects you can see throughout the year. The worst direction is to the north, especially when you live at high latitude. Unfortunately even the directions to the northeast or to the northwest are not good enough as far as the Moon and the planets are concerned. During some months (for the Moon) or years (for the planets) the only way to observe these objects high above the horizon is to find a place facing south.
III. Light pollution and balcony/urban astronomy.
III.1. Basic info.
Light pollution is all about the night sky being brighter near human settlements than at remote locations. Even small cities produce significant amount of artificial light that “spills” over large areas around them. A modest amount of light pollution degrades diffuse objects such as galaxies, nebulas and comets far more than stars. On the other hand the Moon, the planets and brightest stars are generally IMMUNE to light pollution. Basically, there is always something interesting to look at even from a balcony, unless you have some unrealistic expectations.
Below there is a rough double example how light pollution works. It's an artificial visual example for comparing different magnitudes of stars at different apertures (that are all relatively small). It’s not perfect, but it gives you a general idea of the difference in brightness between stars of subsequent magnitudes (2.5x on each magnitude step) without light pollution and then with significant light pollution.


Your equipment together with light pollution at your observing site are your main limiting factors (seeing and transparency are also important, obviously – more on that later). If your eyes are good then you may see some additional stars at the verge of visibility, but the magnitude difference shouldn’t be all that significant. I think that in most cases people mistake the lack of dark adaptation and the lack of their observing technique with the weak abilities of their eyes.
The numbers in the examples above are color values (white color is 255-255-255 and black color is 0-0-0). In-between numbers represent brightness decrease when compared to the base value (white). Obviously white stars are still white in small telescopes, but the examples are about brightness, not about colors.
I have to point out that when you go out of a city to a place with significantly lower light pollution then you are stunned by how many stars you can see even with the naked eye. HOWEVER, nowadays even at quasi-rural sites the skies are only semi-dark (not truly dark), so a trip to such a site with a small telescope is rather disappointing as far as faint fuzzies are concerned – they are still faint fuzzies. Yes, you can see more of them, but the new ones are at the threshold of visibility anyway, so they look as unimpressive as possible.
After just one such disappointing trip to a semi-dark site with my 70/700 refractor I decided that the next time I will take just my 8x42 porro binoculars with Bak-4 prisms (that are clearly better than Bak-7 prisms) and leave my small telescope(s) at home. The wide view of small binoculars (8 degrees) is hard to beat – it's 10 times bigger as far as area is concerned when compared to my refractor's maximum field of view of 2.5 degrees: (8 degrees / 2.5 degrees)^2. Not to mention that binoculars are much smaller, more portable and less problematic than a small telescope.
The most impressive things in a small telescope (much more impressive than what you can see in binoculars) are the ones visible at relatively high magnifications, so they have to be “bright enough” anyway, which means that most of them can be seen also from a city. All the other things (at the threshold of visibility) are not really impressive, even under semi-dark skies.
III.2. Confusion about the Bortle scale.
The Bortle scale is a scale describing different levels of light pollution based on naked eye observations, but there is LOTS of confusion about this scale. Some people use it in a totally indiscriminate way – they mix it up with bad transparency (bad clarity of the atmosphere) and/or bad seeing (big atmospheric turbulence) and/or artificial lights that make your eye pupils constrict (for example street lamps).
Bortle himself wrote about light pollution in reference to SKY conditions as far as their DARKNESS is concerned. Bortle also wrote that he hoped that his scale “would provide a consistent standard for comparing observations with light pollution”. You can’t achieve consistency in comparing light pollution when other important factors don’t remain equal.
When seeing and/or transparency is bad then your observations will be obviously worse, but NOT because of light pollution! Please notice that transparency and/or seeing can be bad even at remote locations, where there is hardly any light pollution by definition. Even in a city it would be silly to accept an idea that light pollution changes from night to night, depending on current transparency and/or current seeing.
The main problem with the Bortle scale is that it is based on naked eye observations, so If you assess the sky conditions while being directly blinded by nearby street lamps and/or by other relatively bright objects (including objects that only reflect light) you will definitely misjudge what you could see through a telescope. An objective lens/mirror of a telescope doesn't constrict due to bright light, unlike the human eye pupil does during naked-eye observations. In other words: judging the Bortle class from a balcony in a city is practically impossible, but a telescope is immune (more or less) to direct light and what really counts is only the sky-glow.
Fortuantely you don't have to judge the Bortle class of your location yourself and you can use an online map. I prefer this site:
https://www.lightpollutionmap.info
with the overlay “World Atlas 2015” active – when you click at a particular place a description pops up, where you are given also the Bortle class of the chosen place. It may be not perfectly up to date, but the other overlays are very poor at showing truly dark locations and they don't state the Bortle class of a particular place at all.
III.3. Light pollution vs. the full Moon.
The full Moon (or close to the full Moon) has a similar effect to light pollution – it degrades diffuse objects such as galaxies, nebulas and comets far more than stars. It's true even at remote dark locations and some people don't go to such places when there is the full Moon (or close to the full Moon).
Some people add the effect of the full Moon to light pollution itself, but to me it's again incorrect. It would actually be totally silly to say something like this: “We're in the middle of a desert, very far from human settlements, but there is the full Moon, so the middle of the desert is full of light pollution.” To me light pollution is all about artificial lights produced by human settlements and the moonlight is not artificial. Moreover, the light pollution map I mentioned above does NOT change according to the phases of the Moon, so it treats light pollution as something totally independent from the Moon light. Exactly like I do.
Anyway, when you look at the night sky from a place with a particular light pollution (for example a balcony in a particular city) and there is also the full Moon then the effect is even worse – the night sky is even brighter and even less night-sky objects can be seen, both with the naked eye and through any observing equipment.
III.4. Dark adaptation on a balcony.
The difference between looking at the night sky while being directly blinded by nearby street lamps and looking at the same night sky “from a covered place” is HUGE! The first time I tried to find the Hercules Globular Cluster (M13) from my balcony I couldn't see it in my 8x42 binoculars, but I was doing it while standing up, so the nearby street lamps were blinding me. The next time I looked at the M13 from my balcony I saw it even in my 8x42 binoculars, but I was doing it while half-lying on a portable reclining chair, so I was shielded from the nearby street lamps by a cover on my balcony guardrail.
It actually proves that the street lamps make your eye pupils constrict in a significant way, which is totally independent from light pollution of the night sky (from the sky-glow). Unfortunately you can't lie down when looking through a telescope, but there are some things hat can help you even on a balcony.
My dark adaptation is always very weak because when I look at the night sky from my balcony there are several street lamps close by that are blinding me directly (more or less), even when I shield my eyes with my hands. Here’s a picture taken from my balcony:

I took the picture in the “night-mode” (the time of exposure was relatively long), so the planets Jupiter (on the left) and Saturn (above the Moon) would be visible (they were visible with the naked eye), but it made everything else (especially the street lamps and the apartment buildings) a little brighter that in reality.
As you can see there are lots of nearby street lamps, so “my balcony astronomical observatory” is simply terrible to the naked eye. When I look into a telescope eyepiece at particular angles (at some positions of my telescope) the street lights are especially annoying. I planned to buy some kind of movable cover, but this site (with all those pictures) inspired me to use a kind of hood instead:
https://www.cloudynights.com/topic/446598-in-praise-of-dark-skies-apparels-observing-hoods/
And here's my hood:

My hood is actually a piece of black cloth folded in half (100cm x 144cm folded into 100cm x 72cm). Why folded in half? Because one layer of the cloth still lets some light through while two layers of the cloth block practically all light.
Interestingly the cloth is folded in such a way that its “good side” is inside and what you can see is actually the “wrong side”. Why? Because the “wrong side” of the cloth is more slippery, so it shouldn't drag my telescope by accident.
Additional advantage of my hood is that I can use it together with ANY kind of clothing, from a T-shirt to a winter jacket.
When I tested my hood I realized it was perfect in two different ways! The main goal was to block light from nearby street lights and it was pretty straight-forward. However another unforeseen problem arrived – my balcony floor was so bright (mostly because of the street lights) that it was blinding me on its own. My hood “rose to the challenge” and I was able to wrap it around my head also from below. I had to hold it with one hand, but my whole head was like in a mini darkroom and I could have my both eyes open. Fantastic feeling in the middle of a city.
The only problem was that my hood touched a part of the focuser that was greased. Now I know I have to be more careful how I wrap my hood around my head.
III.5. Good sides of balcony astronomy.
When you look at the night sky from your own balcony you can do it relatively often and together with your little children! But there are also some other HUGE practical advantages of using a telescope on a balcony – you can keep all the little things inside your home, you can put a normal (relatively heavy, but comfortable) chair next to your telescope AND you can always wash your hands in your bathroom when you accidentally touch a telescope element that is greased. You can't do such things “in the wild”.
Over time I noticed an additional advantage of balcony astronomy – easy access to a computer and very good online star maps. When I was newcomer and I was star-hopping from an easy night-sky target to a more difficult one I could go in and out of my apartment over and over again, checking my current “night-sky position” on the computer and planning the next “hop” one at a time. I wouldn't find some object at all if I tried to do it without a detailed computer star map (free smartphone star maps are much worse). Nowadays I do it differently, but I have to prepare in advance – I described different ways of finding night-sky objects in the point X.1. How to find very weak objects.
IV. Types of telescopes.
IV.1. Important example how telescopes work in general.
There are basically two kinds of telescopes: refractors and reflectors. They will be described in the following points together with some simplified examples how they work, but first I have to point out one very important thing – any observing equipment (just like the human eye) works in a very counter-intuitive way. Here's an example for a telescope, but binoculars generate image in a similar way:

Totally mind-blowing! You can find the explanation with additional examples and comments in the point VI.7. Exit pupil and eye relief.
Here, in the following points, there are some examples for different types of telescopes, but they are greatly simplified and may be misleading UNLESS you remember the example above.
IV.2. Refractors.
A refracting telescope uses a lens to magnify the view, at the same time “squeezing” all the gathered light in order to fit into human eye pupil:

The objective lens is mounted in a fixed way, so it doesn't need any adjustments later. This is why a refractor is totally unproblematic as far as maintenance is concerned. It's very similar to binoculars in this regard – just take it out, attach a telescope diagonal with a telescope eyepiece and watch the night sky!
Please notice that the mirror on the other end of a refractor (hidden in the telescope diagonal) is theoretically not needed, but it helps to look at the night sky at a more convenient angle. If there were no mirror diagonal then you would have to literally lie under the telescope when it would be pointing almost straight up. By the way: the mirror in the diagonal is mounted in a fixed way too (no additional problems there at all).
IV.3. Reflectors.
A reflecting telescope uses one or more curved mirrors to magnify the view, at the same time “squeezing” all the gathered light in order to fit into human eye pupil:

.jpg)
.jpg)
The first reflector above (the simple one) is called a Newtonian telescope (or simply a Newton), just because it was invented by Newton (the famous scientist) himself. By the way: a Dobsonian telescope (also called a Dobson) is a Newtonian telescope with a simplified mount – perfect for newcomers (exactly like a small refractor on a simple tripod).
The second reflector is Maksutov–Cassegrain telescope (Mak) and the third reflector is Schmidt–Cassegrain telescope (SCT) – as you can see their designs are generally similar. In my 102/1300 Mak the field of view is definitely too small for a newcomer (because the magnification is much bigger by definition – more on that later). On the other hand an SCT is more newcomer-friendly, but it's MUCH more expensive – completely beyond my financial reach.
As you can see in any reflector the secondary mirror is “obstructing the view”, but in case of my Newton/Dobson it blocks only several percent of the incoming light (it's the area of the central obstruction that counts, not the diameter). In a Newton/Dobson there also diffraction spikes, but they are not as bad as it may seem (more on that later).
V. Practical differences between small refractors and small reflectors.
V.1. Quality of view.
I will start with a double visual example that gives a pretty good idea about the differences between a refractor and a Newton. The example is not perfect, because the original pictures were taken with a smartphone, but the most important thing is that they were taken on the same night and the time difference was ONLY 9 minutes. The pictures were cropped and resized so the planet Jupiter would be of the same size (slightly enlarged for the refractor and slightly downsized for the Newton).
70/700 achromatic (cheap) refractor:

114/900 Dobson (with a spherical objective mirror):

The main problem with the refractor is the chromatic aberration – it's color distortion usually seen as a bluish or purple fringe at the edge of a bright object. To me, in my slow/lean refractor, it's not really bad at all.
If you're interested, chromatic aberration is all about light rays of different lengths being bent differently while simple/cheap ways of correcting this effect are not perfect:


The main problem with the Newton/Dobson is the less smooth edge of a bright object. This effect is probably a combination of spherical aberration and diffraction spikes. To me, in my slow/lean Newton/Dobson, it's not really bad at all.
If you're interested, spherical aberration is all about light rays focusing not exactly at the same point due to incorrect shape of an objective mirror/lens. Below there are examples of spherical and parabolic mirrors that are exaggerated as far as mirror curvature and focusing distance are concerned:


My 114/900 Dobson has a spherical primary mirror that is strongly criticized by some people, but some other people claim that in such a small AND slow/lean reflector it’s not important at all. When I compared my telescopes side-by-side I noticed that stars in the refractor were “slightly more pin-point”, but barely. The difference was very small and without the side-by-side comparison I wouldn't even notice it – as you cans see on both pictures the moons of Jupiter look more or less the same, except for the one closest to the planet.
I have to point out that the Dobson picture was taken 9 minutes after the refractor one, so the moon closest to the planet was already almost hiding behind the planet (or getting in front of it). That very moon on the Dobson picture was almost drowned by the rough edge of the planet, but the remaining three moons were “as pin-point” as on the refractor picture. It makes me believe that the rough edge of the planet was caused by barely visible “mass diffraction spikes” (see the next point) rather than spherical aberration.
V.2. Diffraction spikes in a Newton.
The main downside of a central obstruction in a Newton are diffraction spikes. The secondary mirror has to be held in place somehow, so there are some tiny spider vanes that make very bright stars appear not quite realistic (not as points, but as a cross). ONLY the brightest stars – the vast majority of stars appear in a normal way (as points). Some purist may be annoyed by the diffraction spikes, but I like them myself. They are very rare (in a small telescope) and they make a single bright star look very interesting. Here's my own picture of the star Betelgeuse (that was stacked and resized):

Pleas notice that there are different types of spider vanes, but in small Newtonian telescopes the typical type is the “cross” – second to last on this picture:

You can also see diffraction spikes on a mass scale when taking an overexposed picture of Jupiter (usually taken at low magnification):
I think this is the main reason why the edge if a bright planet (especially Jupiter) seems to be a little rough (not completely smooth) even at high magnification.
V.3. Light gathering abilities.
Generally for the same price the reflectors are bigger, which means that they gather more light, so they ate brighter than refractors. It's true because the objective mirrors for reflectors are significantly less expensive to produce than the objective lenses for refractors. In other words: for the same price you get a mirror that is clearly bigger than a lens.
It doesn't even matter that in a reflector a secondary mirror is “obstructing the view” because it blocks only several percent of the incoming light. It's nothing! For example when the central obstruction is 25% of aperture (objective diameter) then the AREA of the central obstruction is only 6.25% (I omitted some elements from the formula for the area because they get reduced anyway):
(0.25*A)^2 / (A)^2 = (0.25)^2 / 1^2 = 0.0625 = 6.25%
The difference due to ANY central obstruction (even a much bigger one) is NOT noticeable AT ALL as far as brightness is concerned. From this topic:
https://www.cloudynights.com/topic/579795-how-much-increase-in-aperture-to-see-a-difference/
you can learn that a noticeable difference (due to a change in aperture) requires around 50% increase in aperture area and a significant difference requires around 100% increase in aperture area. For this very reason I ignore the central obstruction of the Dobson completely throughout this post as far as brightness is concerned (6.25% means practically nothing).
V.4. Cool-down times.
A reflecting telescope needs time to cool down, especially when there is a significant difference in temperatures between indoors and outdoors. It's all about air shimmering around warmer surface when it's cooling down – the moving air spoils the view. On the net I found this quote:
“In general, small refractors cool quickly. Unless the temperature differential is large, a refractor is ready for use within a few minutes after it is set up. A 6” to 10” Newtonian reflector (such as a Dob) may require 30–60 minutes to cool down, depending on the temperature differential, and less if fans are used to expedite cooling.”
Using my Dobson is hilariously enjoyable – I just grab it by the handle, place it on my balcony and go back to my apartment. While the Dobson is cooling down I do whatever I want (usually I eat supper). By the way, a small Dobson doesn't take very long to cool down (around 25 minutes).
V.5. Collimation of reflectors.
Mirrors in a reflecting telescope are NOT mounted in a fixed way. It doesn't matter why, it matters that they are mounted in an adjustable way and from time to time you need to align the mirrors again. This process is called collimation.
For a total newcomer collimation may look like a very troublesome thing and in some cases it is a very troublesome thing indeed – there are LOTS of topics on various astronomy forums where people tell some “hair-raising stories” about collimation, especially of fast/fat Newtons. HOWEVER it turns out that collimating a slow/lean Newton is much easier than collimating a fast/fat one, just because the room for error is much bigger.
In fact I myself had wanted to keep everything as easy as possible, so originally I avoided collimation issues by buying a refractor, but when I finally found the crucial info about easier collimation of a small slow/lean reflector I instantly bought such a telescope myself.
My 114/900 Dobson has a spherical primary mirror that is strongly criticized by some people, but some other people claim that in such a small AND slow/lean reflector it’s not important at all. The spherical mirror actually HELPS with collimation, because such a mirror reflects light rays always in the same way – the curvature is constant, so it's not devastating when it's a little skewed. On the other hand a parabolic mirror has to be aligned/collimated very carefully, which is much more difficult by definition.
To me it's enough when I see (during the collimation process) the whole primary mirror reflected in the secondary mirror – otherwise some light would be lost. So far I haven't even touched the secondary mirror and I only collimated the primary mirror, which was a piece of cake (and actually quite fun). I didn't notice anything negative in my views.
V.6. Upside-down view (Newton) vs mirrored view (refractor).
Another difference is that in my Newton/Dobson the view is upside-down (each direction is reversed: left-right and up-down), while in my refractor the view is mirrored (the direction up-down is correct, but the direction left-right is still reversed).
As far as astronomy is concerned the view upside-down is actually better! Why? Because when I look at a star map all I have to do is to turn my head upside-down and I see what I can see in the telescope. In the mirrored view I can't use this “trick” and I have to use my imagination to “reverse back” the right-left view.
V.7. Mount of a telescope.
There are basically two kinds of mounts of a telescope: alt-azimuth (altitude-azimuth) mount and equatorial (or parallactic) mount. A Dobsonian mount is a kind of alt-azimuth (altitude-azimuth) but instead of a tripod it uses a kind of wooden base:

The alt-azimuth mount on a tripod is light and easy to assemble and operate – there are independent movements up-down and left-right that don't require complex mechanisms or any geographical alignments. The Dobsonian mount is equally easy to operate, but assembling it requires some time and effort. The bright side is that it needs to assembled ONCE and later you don't have to do it at all.
On the other hand, the equatorial mount (always on a tripod) allows you to move your telescope according to the movements of the night-sky objects, BUT it's definitely more difficult to assemble and operate. Moreover the mechanism is much heavier because there has to be a counterweight attached.
No contest – the alt-azimuth mount is MUCH better for a total amateur. Please notice that the equatorial mount with a proper setup allows also the alt-azimuth type of movements, but what would be the point of using such a mount with such a setup? Making the whole setup heavier?
V.8. Low height of a 114/900 Dobson.
My small Dobson is too low for any comfortable seeing, even while sitting on a normal chair. I had to buy some kind of platform to raise my Dobson off the ground.


I had had one folding step in my apartment already, so I had to buy only two more. This solution woks perfectly well for me – I can look into the eyepiece while sitting on a normal chair, no matter which direction my telescope is pointing at.
V.9. Looking almost straight up vs. looking almost horizontally.
I can place my Dobson right next to my balcony guardrail, so I am able to look almost straight up. With a refractor I couldn't do it because the legs of the tripod “pushed” the refractor away from the guardrail.
On the other hand looking almost horizontally through my Dobson is a problem because a balcony guardrail is the way. Even when I place it on the above platform the balcony guardrail still forces me to discard all the night-sky objects that are rather low above the horizon (less then 17 degrees). Well, it has an upside too – I save some time and avoid possible disappointments (when night-sky objects are very low over the horizon – there is simply too much air/atmosphere in the way, so they are much less visible then).
The Dobson is much more versatile as far as eyepiece placement is concerned – no matter which way I point it I can sit on the same chair. Please, just look at these pictures that I took inside my home:


On the second picture I added a normal chair that I use on my balcony. As you can see the Dobson can be used on any target (quite low and quite high over the horizon) with the same chair, while the refractor can't. If I set the tripod for the refractor high enough to sit on the chair while looking at a target that is quite high over the horizon then if I changed for a target that is quite low over the horizon I would have to stand.
My Dobson, being a small one, is UNIVERSAL in this regard, unlike the refractor. Usually people complain about Dobsons, but such complaints are true only for big Dobsons that are very tall – apparently it's the price you have to pay for having a telescope with HUGE aperture.
V.10. Background/foreground color.
When I compared my telescopes side-by-side I noticed that the background (or rather foreground) in the refractor at 4mm exit pupil (more on that later) seemed slightly brighter/more bluish than in the Dobson at 5mm exit pupil (the same eyepiece). I have no idea why – theoretically a bigger exit pupil should make the same background/foreground brighter, not darker (more on that later). I think it had something to do with the refractor being achromatic and “scattering” blue/purple light from the light pollution, but I am not completely sure.
V. 11. Refractor vs. Newton – summary.
If I had to choose only one telescope from the ones that I own, I would choose 114/900 Dobson, simply because it gathers more light than 70/700 refractor (more on that in the next point). It's also much more comfortable when looking at objects that are very high above the horizon.
VI. Numbers and calculations (telescopes, eyepieces and their combinations).
It's important to understand some basic terms because you can describe a particular telescope by giving a few different values. A particular eyepiece can also be described by giving a few different values. Moreover, when you combine a particular telescope with a particular eyepiece you achieve particular results that can be described by giving some additional values. If you want to understand how a telescope works (together with an eyepiece) you have to do some math, like it or not.
A quote comes to my mind: “It was my understanding that there would be no math”.
VI.1. Aperture = objective lens (or mirror) diameter of a telescope.
Aperture describes in a simplified way the light gathering abilities of a telescope (or binoculars), HOWEVER what really matters is the AREA of aperture. Generally the bigger the aperture (area) the better/brighter the telescope (at the same magnification).
You can compare different aperture in a very easy way when you ignore some elements from the formula for the area that get reduced anyway:
(A1/A2)^2
For example let's compare aperture of my two telescopes (114/900 Dobson and 70/700 refractor) one way and then the opposite way:
(114/70)^2 = 2.652
(70/114)^2 = 0.377 (= 1/2.652)
The first value means that the area of the bigger aperture is 2.652 times bigger than the area of the smaller aperture, which means that it's bigger BY 165.2%. The second value means that the area of smaller aperture is 37.7% of the area of the bigger aperture, which means that the area of smaller aperture is smaller by 62.3% (1-0.377 = 0.623).
If you’re interested the math behind this “conversion” is this:
1.652/(1+1.652) = 0.623 (rounded)
0.623/(1-0.623) = 1.653 (rounded)
Please notice that the assumption about the same magnification is very important because brightness would be otherwise different (more on that later – in the part about the exit pupil).
In a bigger telescope you can use bigger magnifications (and the view will be still bright enough) AND the resolution is also better (so you can see smaller details).
VI.2. Focal length of a telescope = distance from the objective lens/mirror to a place where all light rays come together.
In a refractor or in a Newton it's basically the length of the telescope.


VI.3. Focal ratio of a telescope = focal length of a telescope / aperture.
I prefer to describe my telescopes giving both aperture and focal length in millimeters, for example 70/700 or 114/900. Unfortunately many astronomers describe their telescopes using Aperture and Focal ratio. What's worse some of them, especially in the US, give the Aperture in inches instead of millimeters. Even worse, the notation of the focal ratio is always “inverted” (f/…), which makes it even more confusing.
Please notice that it's all about proportions – for example two different telescopes (70/700 and 100/1000) have the same focal ratio of 10 (700/70 = 1000/100 = 10), which is written as “f/10”. I hate this “inverted focal ratio notation” with a passion.
Another thing connected with the focal ratio that annoys me very much is the fact that it is common to describe some telescopes as “slow” (f/8 and “above”, so f/9, f10 and so on) or “fast” (f/5 and “below”, so f/4, f/3 and so on).
Here's a description that I found on the net:
“The terms fast and slow in reference to focal length come from photography and make more intuitive sense when applied to telescopes used for astrophotography. To take an image of the night sky, your DSLR or CCD collects photons of light. The trick to good astrophotography is to catch as many photons as you can as quickly as possible. Speed is important because longer exposures increase the risk of noise in the image sensor and your telescope drifting off target.”
I don't really care about the reference to photography and from my point of view the focal ratio basically tells me if the telescope is “fat” (fast) or “lean” (slow). The only things I have found really useful about the focal ratio are these (I already mentioned them):
1) in a slow/lean telescope light rays are less bent, which minimizes potential problems with aberrations, false colors, coma and things like that,
2) collimating a slow/lean Newtonian telescope is much easier than collimating a fast/fat one, just because the room for error is much bigger.
VI.4. Weight of a telescope.
To me this is by far the biggest limiting factor when buying a telescope. Whenever I start thinking about buying a telescope with bigger aperture, I am stopped by the thought of its weight. The smallest slow/lean Dobson that has bigger aperture than mine weighs TWICE as much! A slow/lean refractor that has bigger aperture than my Dobson needs a very heavy tripod to be stable, so overall it weighs is also TWICE as much as my Dobson!
These are all the numbers that describe a telescope alone. Please notice that things like magnification, exit pupil and field of view don't come from a telescope alone, but from a combination of a telescope and an eyepiece.
VI.5. Different values of an eyepiece.
An eyepiece looks like a small tube with lenses that you insert into the part of a telescope that is called focuser or focus tube.
Every eyepiece has its own values for:
1) focal length of a telescope,
2) apparent field of view of an eyepiece,
3) eye relief of an eyepiece.
Focal length of an eyepiece is similar to a focal length of a telescope and it's the most important value for an eyepiece. Examples are given in the next point (about magnification).
Apparent field of view of an eyepiece basically says if it's a wide-view eyepiece, a standard view eyepiece or a narrow-vie eyepiece. Examples are given in the point VI.6. Field of view (FOV).
Eye relief of an eyepiece says at what distance from the eyepiece you have to hold your eye in order to see the whole field of view. Examples are given in the point VI.7. Exit pupil and eye relief.
VI.6. Magnification.
Magnification = focal length of a telescope / focal length of an eyepiece
The shorter an eyepiece the bigger the magnification. For example my 70/700 refractor came with two different eyepieces:
1) a 25mm eyepiece that gives the magnification 28x (700/25),
2) a 10mm eyepiece that gives the magnification 70x (700/10).
The same eyepieces give different magnifications with a different telescope. For example in 114/900 Dobson:
1) a 25mm eyepiece gives the magnification 36x (900/25),
2) a 10mm eyepiece gives the magnification 90x (900/10).
As you can see, the “longer” a telescope the bigger the magnifications with the same eyepiece.
I have to repeat some things that I already mentioned in the point I (in all the sub-points):
1) at higher magnification the moons of Jupiter can appear much closer to the planet (and much closer to each other) and still be discernible,
2) increasing magnification makes more stars visible,
3) some relatively bright stars appear very close to each other, so they can be separated only at high magnification (otherwise they appear as a single star),
4) the higher the magnification the more details of the Moon you can see.
I used to think that magnification is almost exactly like shortening the distance to a particular object, HOWEVER after I saw the pictures below I realized that this is NOT the case.


So, the amount of light rays entering a telescope does NOT depend on magnification because the real distance doesn't change. Pretty obvious, isn't it? Yes, it is, but it's not obvious why higher magnification makes more stars visible. More on that later – in the part about contrast.
Magnification influences both the field of view and the exit pupil. These three things should be ALWAYS analyzed together!
VI.6. Field of view (FOV).
Some people say/write “true field of view”, but it's the same as simply “field of view”.
Field of view (FOV) = apparent field of view of an eyepiece (AFOV) / magnification
Both my small telescopes use 1.25-inch eyepieces and standard such eyepieces have the AFOV of around 52 degrees:
1) magnification 28x gives the FOV of 1.86 degree (52/28),
2) magnification 36x gives the FOV of 1.44 degree (52/36),
3) magnification 70x gives the FOV of 0.74 degree (52/70),
4) magnification 90x gives the FOV of 0.58 degree (52/90).
Obviously the bigger the magnification the smaller the field of view. It's actually quite natural – when you use bigger magnification you see a smaller part of the whole picture, so you look through a narrower path, hence narrower field of view. As simple as that. This general rule can be slightly “bent” by using wide-view eyepieces (eyepieces with bigger apparent field of view).
Interestingly it's easier to understand and explain narrow-view optics, so wide-view optics are simply a “reversed” case. To generate examples I used this awesome site:
https://www.stelvision.com/en/telescope-simulator/
I simulated what can be seen in a 70/700 telescope. The second picture in the first example is only theoretical because there is no narrow-view 25mm eyepiece available, but it greatly helps to explain the concept.
Please, remember that you can open all the pictures in different tabs and switch between the tabs to see the differences better.
1. The same magnification, but different optics.
Normal-view (AFOV 52 degrees) 25mm eyepiece (magnification: 28x)

NARROW-view (AFOV 43 degrees) 25mm eyepiece (magnification: 28x)

It's like looking at the same picture, but in the narrow-view you are looking through some kind of tube/tunnel (the example pictures are exaggerated in this regard). Some people claim that this “looking through a tunnel” effect is annoying to them, but I myself bought a 40mm eyepiece with apparent field of view of just 43 degrees (after hesitating for several months) and I don't see this "tunnel" effect AT ALL, probably because the field of view is overall very big (for a telescope).
In fact a problem of "tunnel" effect, but for a whole different reason – in some cheap SHORT NORMAL-VIEW (AFOV 52 degrees) eyepieces I can't see the whole theoretically possible field of view simply because the eye relief is too short. It annoys me VERY much because I'm loosing something (that is theoretically possible) and this is the main reason why I stopped using a 10mm eyepiece completely (nowadays I use a 15mm or a 20mm wide-view eyepiece combined with a Barlow lens – more on that later).
When the idea is reversed the second picture could be considered as the normal-view and the first picture could be considered as the wide-view. So, a wide-view is like looking through a shorter tube/tunnel (the example pictures above are exaggerated in this regard), which in practice means that you can see a bigger picture. A daytime example would be like this:

In this example you can see that everything is of the same size, so the magnification in wide-view optics is the same, but you can see a little more. In telescopes it's really important only at high magnifications, when the field of view is really small.
2. Different magnifications, but the same optics.
Normal-view (AFOV 52 degrees) 25mm eyepiece (magnification: 28x)
Normal-view (AFOV 52 degrees) 32mm eyepiece (magnification: 22x)

It's like looking at similar pictures, but taken with different zooms – on the picture taken with less zoom everything is smaller, but you can also see some additional things on the sides of the picture. Pretty natural concept, right?
3. Different magnifications and different optics + wider FOV.
Normal-view (AFOV 52 degrees) 25mm eyepiece (magnification: 28x)
NARROW-view (AFOV 43 degrees) 40mm eyepiece (magnification: 17.5x)

It's like looking at similar pictures, but taken with different zooms AND in the narrow-view you are looking through some kind of tube/tunnel (the example pictures are exaggerated in this regard). In THIS combination on the second picture you can still see some additional things on the sides of the picture, but everything is smaller.
4. Different magnifications and different optics + the same FOV (more or less).
Normal-view (AFOV 52 degrees) 32mm eyepiece (magnification: 22x)
NARROW-view (AFOV 43 degrees) 40mm eyepiece (magnification: 17.5x)
Again it's like looking at similar pictures, but taken with different zooms AND in the narrow-view you are looking through some kind of tube/tunnel (the example pictures are exaggerated in this regard). However in THIS combination it's almost like looking at the same picture (the field of view is almost equal) but the in narrow-view the picture is held farther away from your eyes, so the picture and everything on the picture looks smaller. Strange, isn't it?
So, what's the point of using the narrow-view 40mm eyepiece instead of normal 32mm eyepiece? The difference lies in the exit pupil – in the narrow-view 40mm eyepiece the exit pupil is bigger (the view is brighter) because the magnification is smaller (see the next point).
Theoretically the usefulness of this “move” is very limited under light-polluted skies because magnification is generally more important then, HOWEVER when I bought a 40mm eyepiece with apparent field of view of just 43 degrees (after hesitating for several months) and I compared it to my 32mm eyepiece side-by-side (or rather one after another) I realized that in my 114/900 Dobson I actually prefer the 40mm eyepiece because for some reason it's easier to maintain a proper eye placement. In case of my 70/700 refractor the 32mm eyepiece is a little better because the background is visibly darker (I'm not quite sure why this effect is much smaller in my Dobson – the background is already “dark enough” in the 40mm eyepiece).
VI.7. Exit pupil and eye relief.
Exit pupil = aperture / magnification
The meaning of the exit pupil is by far the most difficult thing to grasp and to explain, so please concentrate.
Basically the exit pupil is a diameter of a “beam of light” that exits a telescope (or binoculars). This “beam of light” enters a human eye pupil, so when the beam is very narrow then the view is very dark. The broader the beam the brighter the view (because more light enters the human eye pupil), BUT there is an upper limit (the size of the human eye pupil).
Please notice that this “beam of light” concept is actually a simplification. Let's refresh the example how the exit pupil works:
Totally mind-blowing! Please notice that every point at the exit pupil contains light rays coming from ALL the objects in view! You can verify this fact by looking through any kind of binoculars while covering half of the objective lenses – you will still see the whole view (NOT half of it), but the whole view will be half as bright. Here is a fascinating discussion on this topic:
https://www.cloudynights.com/topic/603397-a-basic-exit-pupil-question/
This quote is awesome: “And on your part, I want to thank you for your honest and concerted effort to understand this confusing issue. I can tell you in the Astromart thread I referenced earlier, members whose names are well known here gave Alan French quite a battle before they finally grasped the concept. At the time, I was merely a bystander...”
By the way: here's a picture of what happens when light rays enter human eye:

So, ALL light coming from a particular star is concentrated on the retina, where an upside-down image is formed (and then reversed by the brain).
If the eye has a vision defect all light from a particular star is concentrated at the wrong place, so the star gets blurred (more or less, depending on the severity of the vision defect):

There is another cool “experiment” that you can do with a pair of binoculars to further understand the concept of exit pupil and by the way to understand the importance of big eye relief.
Please, slowly move your eyes away from your binoculars (or move your binoculars away from your eyes/head). The view will NOT get dimmer AT ALL (quite surprising), BUT the field of view will get smaller and smaller (kind of natural).
All the examples are for a Newton (the view is upside-down), but binoculars “handle” light rays in a similar way (but the view is not upside-down). In the examples below the “red light rays” go into the objective lens “from above”, but the same light rays go into the exit pupil “from below” and this is why the view is upside down.

The correct distance at which the human eye pupil should be places is called eye relief – you can see all of the “available” field of view ONLY from there. With a yellow line I marked a human eye pupil that is placed incorrectly (very far away from the eye relief).
As you can see when you move your eye very far away from a telescope eyepiece (or from your binoculars) without any up or down movements then you can't see the “blue light rays” nor the “red light rays” at all. On the other hand you can still see ALL of the “green light rays” and this is why what you can still see an object that is straight ahead as bright as possible.
The next step in this “experiment” is to move your eyes (head) upwards – the view will NOT get dimmer AT ALL, but you will see another object in the field of view. In case of binoculars the (narrow) field of view (as a whole) will shift downwards (a natural movement).
In case of a Newton the (narrow) field of view (as a whole) will shift “upwards while the view is upside down” (a counter-intuitive movement):

As you can see when your eye is very far away from a telescope eyepiece and you move it up then you can't see the “blue light rays” nor the “green light rays” at all. On the other hand you can still see ALL of the “red light rays” and this is why what you can still see an object that is at the top of the view as bright as possible.
Please notice that during the movement (eye/head moving up) the “red object” (that is up in normal view) in case of Newton “appears from the bottom” (because the view is upside-down). Moreover during the movement you can see only a part of “red light rays”, so the “red object” is vignetted (not fully bright) at first.
VI.8. Comparing exit pupils = comparing brightness of the view.
ATTENTION! Comparing brightness of the view is all about comparing objects that are more or less diffuse (not stars). Interestingly it includes also the BACKGROUND (and the foreground in the form of light pollution), which is connected with the concept of contrast – more on that later.
Comparing exit pupils (precisely speaking: comparing their areas) is like comparing brightness of the view. This is another thing that is a little counter-intuitive about binoculars and telescopes. Some people think that when aperture is bigger then the view is always brighter, but this is NOT true! It's true when magnification is the same, but changing magnification also changes the exit pupil, so it changes the brightness of the view as well.
When magnification is increased then the view gets darker. Why? Because at bigger magnification any diffuse object looks bigger, so it looks more “stretched”. When an objects looks more stretched all the light rays that come from the object are more “spread out” (the amount of light rays doesn't change), so the object looks dimmer.
If you don't believe me then look at a diffuse object (for example the Moon) with a long eyepiece (small magnification) and then change the eyepiece for a much shorter one (much bigger magnification). The object will definitely look dimmer, which is actually good for very bright objects like the Moon or the planet Jupiter.
Let's repeat the formula for exit pupil:
Exit pupil = aperture / magnification
It's actually a little time consuming to first calculate two different exit pupils and then to compare their areas, but there is a much easier way to compare brightness of equipment (even between telescopes and binoculars):
EBC – equipment brightness comparison
M – magnification
A – aperture
EBC(M1xA1; M2xA2) = (M2/M1)^2 * (A1/A2)^2
I used the notation MxA just like it is used in binoculars (for example 12x60). My formula works also for a telescope because it’s just a different (greatly simplified) way of comparing exit pupil areas. I described it in detail here:
Binoculars and spotting scopes brightness comparison
Any combination is possible – let's see some examples with round values:
1. Bigger aperture (200 vs. 100) + THE SAME magnification (M1=M2) = brighter view.
(M2/M1)^2 * (A1/A2)^2 = 1^2 * (100/50)^2 = 4
So, when aperture is twice as big, with the same magnification, then brightness is 4 times bigger.
2. The same aperture/telescope (A1=A2) + lower magnification (50x vs 100x) = brighter view.
(M2/M1)^2 * (A1/A2)^2 = (100x/50x)^2 * 1^2 = 4
So, when magnifications is 50% smaller, with the same aperture, then brightness is 4 times bigger.
The points 1 and 2 show that theoretically instead of buying bigger telescope you can simply use lower magnification (the brightness increase is the same), HOWEVER any target looks 50% smaller in BOTH dimensions (height and width), so 75% smaller as far as area is concerned. Moreover in a bigger telescope you can use bigger maximum magnification (when the view will be still bright enough) AND the resolution is also better (so you can see smaller details).
3. Bigger aperture (200 vs. 100) + bigger magnification (100x vs 50x) = the same brightness.
(M2/M1)^2 * (A1/A2)^2 = (50x/100x)^2 * (200/100)^2 = 0.25 * 4 = 1
This is why bigger telescopes are clearly better – you can see with the same brightness a target twice as big in BOTH dimensions (height and width), so FOUR times bigger as far as area is concerned!
VI.9. Brightness of the view (in a telescope) vs. brightness of a night-sky object (surface or total).
The term brightness is very broad, so you have to watch out which brightness you are talking about. Let's analyze this issue on the example of the Moon – the naked eye view vs. a telescope view.
As far as total brightness is concerned the Moon is brighter, especially at low magnification, but as far as surface brightness is concerned the Moon in a telescope is NEVER brighter (it can be only equally bright).
Imagine the Moon as a bright spotlight (ONE spotlight). By using a telescope at magnification of just 20x you see the Moon (its AREA) bigger by 400x (20x20). At such a low magnification (20x) the exit pupil in any telescope should be quite big, so it’s like looking at 400 spotlights right next to each other. This is why the Moon looks/is brighter – the total brightness is MUCH bigger, even if a single “telescope spotlight” is a little less bright than the naked-eye (ONE) spotlight.
Here's a double example that works best when it’s dark and the pictures are enlarged (preferably opened in new tabs):


The big Moon on the second picture above is much more “blinding” (much brighter as far as total brightness is concerned), even though its surface brightness is actually a little lower than on the first picture.
VII. Contrast.
The meaning of contrast is one of my newest “discoveries” as far as astronomy is concerned. It explains why increasing magnification makes more stars visible, but why it works this way is not really obvious.
VII.1. Contrast – general info.
I will start with some things that you can verify yourself, even in a city with big light pollution. For example the brightest planets and the brightest stars can be seen even around sunset when the sky is still quite bright. There is no light pollution at that time but the sunlight is still scattered in the Earth's atmosphere all around you. The brightest planets and the brightest stars can be seen even then simply because they are so bright that they stand out from the still bright early-evening sky.
The same planets and the same stars (plus some other stars too) can be seen in the middle of the night even in biggest cities with huge light pollution for exactly the same reason – they are so bright that they stand out from the relatively bright night-sky.
It's all about contrast – the brighter a planet/star the easier it can be seen on a given background. In case of sunlight (around sunset) or light pollution (during the night), that is scattered in the Earth's atmosphere, the background is rather the foreground – it's like a thin curtain of scattered light that is IN FRONT of the stars and other night-sky objects.
A weak contrast is when a star is not much brighter than the background/foreground – it's much harder to spot such a star then. When the brightness of a star is the same as (or weaker than) the brightness of a background/foreground you cant's see it at all because it can't be “singled out” from other light rays.
VII.2. Space is never completely black.
Another concept hard to grasp is that even in space (without the atmosphere) the background (not foreground) of the night-sky is never completely black. There are always some light rays that come from stars, galaxies or other space objects that are very far away, so they can't be seen individually. Let's refresh these two pictures:
Human eye can't see a particular star when there are too few light rays from the star going into the eye. It's true both while looking at the night-sky with the naked eye and while using a telescope. Even though very distant stars can't be see on their own, their light rays accumulate to some extent. A perfect example is the Milky Way, understood not as our whole galaxy but as a patch of light on the night sky. Unfortunately it can't be seen from light-polluted cities, so I have to show you a picture:

This patch of light is actually the disc of our galaxy, seen from within along the plane of the disc, while the biggest part of this patch of light is the central part of our galaxy. Most of the stars in our galaxy are so far away from the Earth that individual stars can't be seen, but you can see the accumulated light coming from billions of stars that are there.
The number of stars in other directions of our galaxy (not along the plane of the disc, but a little above or a little below the main disc) is much smaller, so you can't see any accumulated eye with the naked eye, but some stars are still there.
By the way: I think that naming our galaxy as the Milky Way was a moronic idea because now we have two different things that are called exactly the same way. One thing is the patch of light on the night-sky (the original meaning of the phrase Milky Way) and the other thing is our whole galaxy, that consists not only of the stars along the galactic plane, but also of stars located above or below the disc, including stars that are relatively close to the Earth that can be seen all over the night-sky as “normal” (single) stars. I HATE this name for our galaxy!
In other directions than the Milky Way, understood as a patch of light on the night-sky, there are not only “invisible” stars from our galaxy, but more importantly there are other whole galaxies. In fact there are MANY more galaxies than you can even imagine! One of the most famous space photos (“Hubble Ultra-Deep Field”) was actually taken in a direction that was practically EMPTY and this is what was hiding there (click to enlarge!):

Most of the objects on the picture are galaxies! Totally unbelievable! But it's not the point. The point is that the background of the night-sky is NEVER completely black. It's more like a “soup of light” consisting of light rays coming from many different sources.
Light pollution makes the background (or rather the foreground) of the night-sky MUCH brighter and it resembles a “soup of light” even more. The (many different) sources of artificial light are much closer to the observer, but you can't see particular street lamps in the sky. What you see as light pollution are light rays that were sent upwards (for example by a street lamp), then they were scattered in the atmosphere and then some of them returned back downwards.
VII.3. Contrast when increasing magnification.
When you increase magnification two things happen simultaneously:
1) the background/foreground gets darker,
2) field of view gets smaller, so you can see a smaller portion of the night-sky.
Both things are important as far as contrast is concerned, but for different reasons.
VII.3.1. Contrast when increasing magnification – darker background/foreground.
When you increase magnification (in a particular telescope) all the different individual sources of light (that are too far to be seen individually) are stretched away from each other, so all the light rays (from different sources) become less concentrated and the background gets darker.
The stars that are relatively close to the Earth that previously were equally bright as the background now (after increasing magnification) become visible simply because their light rays are still concentrated in a point (the stars are too far away to see their disks even at very high magnifications), so they are not stretched (they don't dim), while the background gets darker (because it's stretched).
Here's a visual double example – the “star” is equally bright on both pictures, but background is different:

Please notice that increasing magnification under light-polluted skies gives more “visible” results because there are more “random” light rays there, so the background (or rather the foreground) gets visibly darker. Under very dark skies (without light pollution) the effect is still there (more stars appear) but the difference is not as big because the background is already very dark even at low magnification.
Please remember that under very dark skies you can see MUCH MORE stars OVERALL (even at low magnification) because the background is much darker and this is why astronomers LOVE dark locations.
VII.3.2. Contrast when increasing magnification – smaller field of view.
Increasing magnification (in a particular telescope) can be problematic as far as relatively large night-sky objects are concerned. I will show it on the example of the Andromeda galaxy.
Here's a very good picture of M31 that represents an awesome view under very dark skies:
The whole picture shows what can be seen at a very low magnification of around 20x. The yellow square shows what can be seen at magnification 5 times bigger (100x).
When magnification is increased from 20x to 100x than the drop in the brightness of the view is 96% ((20x/100x)^2 = (1/5)^2 = 0.2 * 0.02 = 0.04 = 4%). Here's a rough simulation:

At the higher magnification the background is not really a background, but just a part of the galaxy (even the area in the bottom right part of the second picture) and the difference in brightness between the core and the part of galaxy around the core is relatively small – this is why the contrast is weak.
Please notice that the drop in brightness is so big that under light-polluted skies, especially in a small telescope, you would see ONLY the core and the part of galaxy around the core would look almost completely black (it would look like a “classic” background). At low magnification under light polluted skies the view of the galaxy is destroyed by the bright foreground, so you can see only the core anyway.
VII.4. The same contrast when increasing aperture without increasing magnification.
When aperture is increased (when you use a bigger telescope) and magnification stays the same everything is brighter, including the background/foreground, so the contrast theoretically stays the same. HOWEVER, when a star is brighter it's easier to see it even on equally brighter background/foreground:


Increasing aperture DOES make more stars visible even if the contrast (the ratio of brightness) stays the same. Why? Because the ABSOLUTE difference becomes bigger. For example the difference between values 3.0 and 2.0 (1.0) is bigger than the difference between values 1.5 and 1.0 (0.5), even though the ratio stays the same (3.0/2.0 = 1.5 = 1.5/1.0).
VII.5. Contrast at the same exit pupil = comparing contrast of different telescopes.
As far as stars (and other point-like objects) are concerned, comparing contrast of different telescopes is like comparing their apertures, but it's a little complicated why.
Let's refresh calculations from the point VI.1. Aperture = objective lens (or mirror) diameter of a telescope for comparing 114/900 Dobson to 70/700 refractor, using my full formula for brightness from the point VI.8. Comparing exit pupils = comparing brightness of the view:
(M2/M1)^2 * (A1/A2)^2 = (1/1)^2 * (114/70)^2 = 1 * 2.652 = 2.652
As far as brightness is concerned this value means that at AT THE SAME MAGNIFICATION the brightness of the view in the bigger telescope is 2.652 times bigger.
As I already mentioned in the previous point, at the same magnification everything is brighter, including the background/foreground, so the contrast theoretically stays the same. However, in the bigger telescope you can greatly increase magnification before the brightness of the view falls down to the level of the smaller telescope. For example almost exactly the same brightness is achieved:
1) in 70/700 refractor at magnification 28x,
2) in 114/900 Newton/Dobson at magnification 45x.
(28x/45x)^2 * (114/70)^2 = 0.3872 * 2.6522 = 1.0269
At such combinations the difference in brightness of the view is ONLY 2.7% which is completely undetectable as far as diffuse objects are concerned. HOWEVER, as I described in the point VII.3.1. Contrast when increasing magnification – darker background/foreground, the stars (and some other point-like objects too) are so far away that they are not stretched even at very high magnifications, so they don't dim.
It means that the stars in the bigger telescope at the magnification 45x are still 2.652 times brighter, while the background gets as dark as in the smaller telescope at magnification 28x. This is why the contrast in the bigger telescope is 2.652 times bigger (at the same exit pupil).
This effect is much better than the effect that I described in the previous point VII.4. “The same contrast when increasing aperture without increasing magnification” – brighter stars are easier to see even on a brighter background/foreground (with the same contrast). So it's best to increase aperture (use a bigger telescope) AND increase magnification at the same time.
VII.6. Contrast with diffuse objects.
As I already described, increasing magnification improves contrast by darkening the background/foreground, but the effect is best with stars and other point-like objects.
However, there are numerous diffuse objects that are “improved” by higher magnification. Most importantly there are globular star clusters that usually have a very bright core. There are also some galaxies with a very bright core, but there are less of them. Some nebulas also handle improved magnification well, but only a few of them are visible in a small telescope.
VIII. Various tips and comments.
I described many things in details in previous points, but here I would like make some additional tips and comments.
VIII.1. Long eyepiece = the most important eyepiece for a newcomer.
I myself, even with my decent experience, still use the longest eyepiece the most, simply because the filed of view is the biggest then. For a newcomer it's a must! It's either 32mm eyepiece or 40mm eyepiece – the filed of view is almost exactly the same because the 40mm eyepiece has a smaller AFOV (search above).
VIII.2. Good “medium” eyepiece = the best eyepiece overall.
From my experience I can say that the best medium eyepiece for a small telescope is a wide-view medium eyepiece that allows a good enough magnification (of around 45x), but still gives an exit pupil of around 2.0mm +/- 0.5mm. Such an eyepiece should also have a comfortable eye relief (of at least 14mm). It's either a 20mm or a 15mm eyepiece.
In my 114/900 Dobson either eyepiece is very good, but in my 70/700 refractor a 15mm eyepiece is clearly better because it offers higher magnification (47x), while a 20mm eyepiece is “not powerful enough” (only 35x).
VIII.3. No good “high power” eyepiece.
As far as short eyepieces are concerned there two big problems. The most obvious one is very small exit pupil – only the Moon and the brightest planets look enjoyable then. To me even stars (point-like objects) look worse – the brightest ones look kind of weird, kind of “hazy”(it probably has something to do with my own eye defect).
The second problem is actually more important – very short eye relief. I myself literally HATE standard 10mm eyepieces – the eye relief is so small that I am afraid that I will touch the objective lens with my eyelashes. This is why I hold my eye farther than the eye relief, so the “real field of view” is actually smaller than theoretically possible. And this is why I stopped using 10mm eyepieces completely!
Instead of using “high power” (short) eyepiece I use a “medium” (wide-view) eyepiece together with a Barlow lens (2x, 2.5x or 3x, depending on the Barlow). This way I obtain high or very high magnification (for a small telescope) with a relatively big field of view AND I still retain good (long enough) eye relief! Perfect!
VIII.4. Small telescope vs. expectations.
Some people have some unrealistic expectations about small telescopes because some Internet sites, including some online astronomy shops, state that you can see many Messier objects (object from the Messier Catalogue) even in small telescopes. It's true, HOWEVER please remember that the word “see” in this context should be understood as “I see that I can see something”, which is better than “I can’t see the object at all”.
What’s worse some Internet sites give you “examples” of what you can see by showing pictures taken with long exposure time (that are additionally stacked and processed), which is is extremely misleading for total amateurs! On the picture below there is a comparison how the M13 (Hercules Globular Cluster) looks in binoculars (the very first example) and several different telescopes.

By the way: the vast majority of the photos of night-sky objects you can find on the net are not really “true photos” but they are hundreds or even thousands of different photos averaged/stacked together and heavily processed. There is NO WAY to see anything like this with your own eyes even in a big telescope.
Please notice that the most famous catalog of astronomical objects – the Messier Catalogue was created only because these objects were blurry and could be mistaken for a comet! Moreover there was hardly any light pollution in those times (18th century), so they were blurry under very dark skies!
VIII.5. Angular sizes/distances given in arcminutes and/or arcseconds.
I regularly have trouble imaging an angular size/distance given in arcminutes and arcseconds, so I prepared a cheat sheet with basic examples. I did it for myself, but it may be useful also for total newcomers, so I post it here. Click to enlarge.

VIII.6. Filters.
In short: filters are fun little gimmicks that get boring pretty quickly and there are two worth buying.
By far the best overall filter for visual use is the green/light green #56 filter (light transmission 53%). I enjoy this filter very much while looking at Jupiter (best details, at least to me) and also at the Moon (very relaxing color). Unfortunately it's a little weaker for astrophotography with a smartphone.
The only other color filter worth buying is the dark yellow #15 filter (light transmission 66%) – in my 114/900 Dobson the color is actually light-orange. The Moon looks a little like Mars and the view was much more interesting than the typical gray view of the Moon. It's great both for visual use as well as astrophotography with a smartphone.
The most important goal of using a filter is too make the view dimmer without changing magnification (gray filters) OR to block some light wavelengths (color filters). The views are much more interesting at much higher magnifications, so a gray filter is in fact almost completely useless in a small telescope. The only exception is the planet Venus seen in a Newton/Dobson – the planet is so bright that the diffraction spikes may spoil the view even at high magnification, especially if the phase of Venus is relatively “poor”. I think the green filter (plus a high magnification) should be enough, but I actually didn't try it because for Venus I used my Mak or my refractor.
Here's some info about other inexpensive filters:
1. Out of curiosity I combined the dark yellow #15 filter and the yellow #12 filter (light transmission 74%), but the results were quite similar to the dark yellow #15 filter alone (some examples below were made with this combination). The problem was that I didn't like how long an eyepiece is when it's combined with two filters at the same time
2. The blue #80A filter (29% light transmission) is too "cold" for visual use, especially while looking at the Moon. The color is actually piercing light-blue and it's much brighter than the light transmission 29% suggests. Even while looking at Jupiter it's worse than the green/light green #56 filter. It's not great for astrophotography with a smartphone either because there is lots of dark noise. Only the Moon looks good on smartphone pictures with this filter, but the view is still kind of cold. As I prefer visual observations I stopped using the blue #80A filter completely.
3. The "orange" #21 filter (light transmission 46%) looks rather red-orange (instead of pure orange), even while looking at the Moon, but I realized this fact only after buying the dark yellow #15 filter. In fact my "orange" #21 filter looks more red than orange during daylight, but I have to point out that on the net I found some pictures of other orange filters that look actually truly orange during daylight, so they should be better also during night. My "orange" #21 filter is simply terrible for astrophotography with a smartphone because the pictures are even more red than orange. I stopped using the "orange" #21 filter completely.
Below there are my own photos of the Moon (most of them cropped and/or resized) taken with a smartphone at very low magnifications (this is why they lack details).
The filters green/light green #56, blue #80a, combination of dark yellow #15 and yellow #12 (light orange) and “no filter” – click to enlarge:
%20and%20no%20filter.jpg)
The dark yellow #15 filter (shorter exposure time is helpful to achieve the orange color) – click to enlarge:

My #21 “orange” filter with different settings for ISO and/or exposure time (it's impossible to take a single good picture with a smartphone with this filter) – click to enlarge:
.jpg)
VIII.7. Forget about a toy finder scope!
Seriously, you should forget about a toy finder scope that comes with a small telescope. I attached it to each of my telescopes once and I will never do it again. It's simply too weak when looking from my balcony, with all those street lights blinding me. Moreover I have no patience for aligning a finder just to realize that it gets misaligned again. All that matters to me is the telescope itself.
As my finder scope I use my 8x42 binoculars, but the truth is that ANY binoculars should be good enough. If you don't have any binoculars then you should rely only on the stars that are visible with the naked eye. You have to rely on them even while using binoculars because you have to use some kind of reference point anyway.
The problem is that it's very hard to point a telescope in exactly the same direction as binoculars just a moment ago. The angles are totally different unless you sit down with your butt on the ground and aim binoculars along the tube of the telescope. It's relatively easy to do with a refractor and much more difficult with a Dobson. Either way, a total amateur needs a long eyepiece that gives the maximum (or almost maximum) field of view. I think that a 32mm eyepiece OR a 40mm eyepiece is a must buy.
In the last point I showed you how to search for some objects with the naked eye even in big light pollution.
VIII.8. Aiming a telescope at the brightest objects.
Even under light-polluted skies there are numerous stars (plus a few planets) that can be seen with the naked eye, so you can find your way without binoculars. The first step is obviously to aim at a bright object. In case of a refractor it's a little easier when the bright object is relatively low above the horizon, but when the object is higher above the horizon I actually prefer the Dobson.
I can zero-in on a bright object almost instantly – I simply rest my head against the lower part of my 114/900 Dobson tube and look along the tube. The way I do it, I have to see the object more or less here (I couldn’t find a better picture on the net – the angle should be more horizontal):

Works like a charm because the finder slot never gets “misaligned”. And aiming my Dobson at stars that are high above the horizon is MUCH easier than aiming my refractor.
VIII.9. Use a comfortable chair!
Generally it's a very good idea to place a normal (relatively heavy, but comfortable) chair next to your telescope. To me it was like a God-sent idea because I tried it out when I was looking at the rings of Saturn for the first time ever. The view was simply hypnotizing and I spent LOTS of time in the same position! And right after that I switched to watching Jupiter and its belts and its moons from the exact same spot! It was in 2021, so the planets appeared quite close to each other on the night sky. What a night! Unforgettable!
VIII.10. Stray-light shield.
From my own experience I can say that in case of a Newton/Dobson there are some rare cases when a light from a nearby street lamp reflects from the secondary mirror, or maybe its holding parts, and goes into the focuser tube, washing out the view completely. It's all about pointing a telescope at some particular angles in reference to the street lamps.
On a balcony, with some street lamps close by, it's unavoidable, but a stray-light shield deals with this problem perfectly. Here's my shield that is a total overkill, but I like it:

My shield is very easy to made and very light – it's made from black technical/Bristol paper + a rubber band.
VIII.11. Watch out for differences in temperatures.
1. Cold air + warm telescope.
The cold air that “touches” the warm telescope gets warmer (making the telescope colder), but this warmer air instantly mixes up with the cold air that is farther away from the telescope, so the air close to the telescope is constantly “moving”, similarly to the air over a very hot object during summer. So, it's important to cool down the telescope as a whole.
2. Warm air + cool telescope.
If you wear glasses then you know that when it's cold outside and you go into a warm building the glasses will instantly fog up. If you don't wear glasses then fill an empty glass with ice water – on the outside side of the glass small drops of water will appear. It's all about water condensation. Please, read the long answer on this site:
https://www.reddit.com/r/Astronomy/comments/9c94nu/why_does_my_telescope_get_so_much_condensation/
Please remember that you should AVOID wiping the dew off your eyepieces! You don't want to scratch the eyepieces by accident – there can be some dust or grit on the eyepiece besides the dew that you won't be able to see in the darkness.
VIII.12. Observing conditions are not only about the light pollution!
One night I used my telescope and even though there were no clouds the observing conditions were much worse than previously! I couldn't even clearly see the Orion's Belt with the naked eye! To be honest I had never thought that there could be such a big difference independent from the light pollution. On the net I found the info that “Bad transparency is caused by pollutants in the air, either artificial, natural, or (most often) both.” and “Bad seeing is caused by turbulence combined with temperature differences in the atmosphere”. On this site:
https://www.cloudynights.com/topic/487715-why-does-poor-seeing-happen-or-is-it-poor-transparency/
there is an interesting discussion on this topic.
I found a great site with a complex astronomy forecast:
https://clearoutside.com
This site is great for another reason – you can check at what time starts and ends the astronomical darkness AND you can also see a picture for the whole year! Just click the button “Annual Darkness”.
Los Angeles:

Seattle:

My home city:

Please notice that in my home city during the summer months there are “astronomical white nights” when the night sky is never fully dark because the Sun is too little below the horizon and the astronomical twilight never ends.

A site that is even better for checking the exact times for twilight end, nautical twilight end and astronomical twilight end is this:
https://sunrise-sunset.org
VIII.13. How much are your “astronomy hours” skewed?
Have you ever wondered what does the word midnight mean? The word midnight means literally the middle of a night. Unfortunately in the vast majority of cases the true (astronomical) middle of a night is not at midnight local time. And I am not even talking about daylight saving time!
“Astronomy hours” at some places are simply ridiculous. At some places they are ridiculous only during the DST (daylight saving time – summer time), but in some other places, like the western China, they are ridiculous all year long. On the other hand there are some places where the astronomy hours are perfect all year long.
Here's a very interesting solar noon map that I found on the net (click to enlarge):

The picture is for standard/winter time, but when the DST starts many places go “more red”. In the western Spain during the DST the Sun is highest above the horizon around 2:30PM, so the middle of the astronomical night is around 2:30AM. Interestingly the Great Britain lies at the same longitudes as Spain, but it is in a different time zone, which is much more reasonable.
In China there is no DST, but there is one whole big time zone, so in the western China the Sun is highest above the horizon around 3:00PM, so the middle of the astronomical night is around 3:00AM. Oh, man.
On the site sunrise-sunset.org (link given above) there is info also about solar noon, so you can calculate the true (astronomical) middle of the night right away (+12hours from the solar noon).
VIII.14. Apparent magnitude and limiting magnitude.
Apparent magnitude is a number that shows how bright a particular object appears from a particular place. The lower the number the brighter the object. Here are examples of apparent magnitude as seen from the Earth at maximum brightness:
– full Moon: -12.9
– planet Venus: -4.92
– planet Jupiter: -2.94
– planet Mars: -2.94
– star system Sirius: -1.47
– star Canopus: -0.72
– planet Saturn: -0.55
All the night-sky objects above are extremely bright and can be easily seen with the naked eye even in the worst light pollution. From my own experience I can say that in a small telescope even stars of magnitude around 0.5 still look literally like diamonds in the sky and stars of magnitude around 2 still look relatively bright. Unfortunately weaker stars (magnitude 3 and above) are more and more negatively influenced by light pollution.
The magnitude of the weakest stars that can be seen with the naked eye depends on light pollution and it varies greatly. Without any light pollution the maximum magnitude is 7 or 8 and in the worst light pollution it's less than 4. Interestingly, a small telescope in significant light pollution even at low magnification will show you stars of magnitude clearly over 9 – more than you could ever see with the naked eye even in darkest locations on Earth! The catch is that the field of view in any telescope is extremely small when compared to the field of view of the naked eye, so the “WOW effect” is greatly diminished. But it's cool anyway!
My own record for the weakest star that I saw in my 114/900 Dobson at medium magnification (45x) is barely above 11. I could push that record using higher magnifications, but I don't like the view when the exit pupil is very small.
The maximum magnitude of stars that can bee seen in a telescope is called limiting magnitude and it depends on many different things, not only light pollution. A fantastic telescope limiting magnitude calculator can be found on this site:
https://www.cruxis.com/scope/limitingmagnitude.htm
There is one additional thing to remember – the apparent magnitude of a galaxy, a nebula or a star cluster is NOT the same as the magnitude of a single star (a point-like object). On the net I found these quotes (a question and an answer):
“Is it possible, that I can see apparent magnitude stars of 10 or 11 in my ten inch dob, and not be able to see AM 8 and 9 DSOs?”
“A 1'x1' galaxy at magnitude 10 has a surface brightness of 10 and would be easily seen in a small scope. A 20'x20' face-on galaxy of magnitude 10 has a surface brightness of magnitude 16.2. That 2nd one would be tough in a big scope.
Both have the same Total Integrated magnitude, but radically different surface brightnesses. Since the background sky behaves like a large object and also has a surface brightness, it is the contrast between the object and the sky we see. In the first example, we'd see a white dot against a charcoal background. Easy. In the 2nd example, we'd see a large charcoal patch against a charcoal background. Tough.”
IX. How to find bright night-sky objects.
This point is rather long and old, but the next one is much shorter and it's actually more helpful for finding objects at the threshold of visibility. Here, in this point, I show only a general direction where to look.
In most of the pictures below I used the site stellarium-web.org to simulated the night sky seen with the naked eye in big light pollution by setting the time to an early hour, so most of the stars are NOT visible.
IX.1. Orion's Sword with the Orion Nebula (M42) in the middle.
It's a little below the Orion's Belt. To be honest I didn't notice the Orion Nebula in a small telescope the first time I looked at it, probably because my expectations were too big after I had seen some pictures of the nebula on the net. The nebula can be seen even in binoculars, but only as a little glow (that actually looks cool).

IX.1b. Trapezium.
The Trapezium is a tight open star cluster in the heart of the Orion Nebula. In a small telescope you can see it's main 4 stars even at the magnification 45x, but this asterism (a pattern of stars on the night sky) is very small then. At the magnification 60x (or more) it's much easier to see.
IX.2. Pleiades (M45).
The easiest way to locate them is to find the bright star Aldebaran to the right and a little above of the line of the Orion's Belt and then look 50% farther to the right, roughly in the same direction, but a little lower. The Pleiades are quite spectacular even in binoculars.

IX.3. Hyades (Aldebaran region).
Hyades are right next to the star Aldebaran. Not as spectacular as the Pleiades, but in bigger magnification you can see many more stars.

IX.4. Lambda-Lambda asterism.
The name of this asterism comes from the fact that its shape resembles the letter lambda, and its central star is Lambda Orionis (Meissa) – the “head” of the Orion constellation.

By the way, this asterism is a great way to verify what is the current range of your observing tool. When you buy a telescope you are given its theoretical range, but in the middle of a city with big light pollution you will never see such weak stars. Thanks to this asterism (or rather its main part) you can judge the current range yourself. It works also for binoculars that are NOT given theoretical range at all.
When I was playing around on the site stellarium-web.org I noticed that when very few stars are visible this asterism looks like a mirrored letter L. What's more important the brightest stars appear almost one by one, which is very important to my idea. Here's the crucial part of the asterism seen with a very deep range.

I noted the magnitudes of most the stars in the crucial part of the asterism AND I numbered the 11 brightest ones.

In my 70/700 refractor with the magnification 28x I could see clearly more than 11 stars, so the then range of my telescope was definitely over 9.
IX.5. Andromeda Galaxy (M31) – my first “faint fuzzy”.
In this post:
Binoculars and spotting scopes brightness comparison
I described how to find the Andromeda Galaxy in detail, but you need a big part of the night sky to do it that way. Please notice that I made that post in a totally different time of year, so now this part of the night sky looks almost upside-down, like this:
 Instead, you can visit the site stellarium-web.org and search for the constellation Cassiopeia and find the crucial triangle of stars right away. Then you have to extend the “bottom” line of this triangle to the “right” by a little more than 100% and a little “below” this line there is the Andromeda Galaxy. Please remember that the concepts “bottom”, “right” and “below” change CONSTANTLY, so you have to be careful. In this case the “bottom” can be defined as the side of the triangle with 4 stars.

IX.6. Alpha Persei Cluster (Mirphak region).
The star Mirphak is bright enough to be visible to the naked eye. The first time I have ever looked in that direction in my small telescope the observing conditions were very weak, but the view was interesting anyway.

IX.7. NGC 869 (h Persei) and NGC884 (chi Persei).
Outside a city, under relatively dark skies and through binoculars the Double Cluster looks very good, but it's very small. From my balcony I can't see it with binoculars at all. I did find it in my 114/900 Dobson and it looked better than I expected.
IX.8. M34.
From my balcony I can't see this open star cluster with binoculars at all. I did find it in my 114/900 Dobson. To me M34 looks like a flying bird with a long neck.


IX.9. M35.
From my balcony I can't see this open star cluster with binoculars at all. M35 is high “above” the constellation of Orion. Seeing M35 in my 114/900 Dobson gave me a true WOW effect. Even in my wildest dreams I would never imagine that an open star cluster can look so good from my balcony. The best descriptions that comes to my mind is “rich in stars”.

IX.10. Praesepe (M44).
There is a very easy way to find Praesepe. First of all you should go to the site stellarium-web.org and search for the constellation Gemini (Twins). In big light pollution you won’t be able to see most of its stars, but when you know in what direction to look then you can find the 2 crucial stars – the heads of the twins.


Imagine a line between these two stars and extend this line by around 300% to the left and a little above this line there is Praesepe.

This open star cluster is quite interesting, but the stars are not as bright as in the Pleiades. I found Praesepe with my 12x60 binoculars (magnification x12 and FOV of 5.3 degree), but the view was shaky.
This open star cluster is even better to verify what is the current range of your observing tool than the Lambda-Lambda asterism, especially in my 114/900 Dobson.
IX.11. Coma Berenices Star Cluster (Melotte 111).
This star cluster is rarely mentioned on the Internet, but in the binoculars it's SPECTACULAR! When I saw it in my 12x60 binoculars for the first time I was stunned! I was not prepared for what I saw – it was totally a WOW effect!
Go to the site stellarium-web.org and search for the constellation Leo. In big light pollution you won’t be able to see most of its stars, but when you know in what direction to look then you should be able to find the 4 crucial stars.


Imagine a line between the two top stars and extend this line by around 130% to the left and a little above this line there is the Coma Berenices Star Cluster.

Please notice that the star Gamma Comae Berenices (“15 Comae Berenices”), which is a part of the star constellation Coma Berenices, is on the edge of the Coma Berenices Star Cluster. The best part of this cluster is a little BELOW this star!

In my 12x60 binoculars I could see the whole area above, but in a telescope the FOV is smaller, so you won't be able to see everything at once.
IX.12. Coathanger asterism (Collinder 399)
This asterism really looks like a coathanger! It's relatively easy to find even from my balcony. Go to the site stellarium-web.org and search for the stars Vega and Altair. These stars are one of the brightest stars in the sky, so they are easily visible even from my balcony. The Coathanger asterism is between them, closer to the star Altair, as shown below. There is also a third relatively bright star (marked with yellow circle) that can be helpful, if you can see it.

The third star (marked with yellow circle) is called Albireo and it's actually a double star with a striking colour contrast between the brighter yellow star and its fainter blue companion. It was visible even in my 114/900 Dobson!
IX.13. Hercules Globular Cluster (M13) – another “faint fuzzy”.
The M13 is the first night sky object that I found after simulating light pollution for a particular hour of observations thanks to the free program Stellarium. Previously, when I was using the website stellarium-web.org, I was simulating light pollution by setting the time to an early hour, but the star constellations were tilted then.
To find the M13 you have to start with the stars Vega and Altair.

The yellow circle marks a crucial star that is “the point of an arrow”. The arrow is very easy to locate in 8x42 binoculars because the field of view is “almost big enough” then. A little below to the left there is the M13.

IX.14. Bright stars.
Even if there is a time of year when you can't see “anything interesting” from you balcony, you can simply look at bright stars. Some of them look literally like diamonds in the sky and some other show some strong colors (blue, yellow, orange or almost red). They all look cool in a small telescope.
IX.15. Scan the night sky in a totally random way.
You can scan the night sky in a totally random way and still have fun! Well, there are so many interesting night sky objects, including relatively bright stars that I hardly ever do it, but sometimes when I try to locate a specific target I find a cool small unnamed asterism by sheer accident and I say to myself: “Wow, it looks cool!”
PS. There are many other interesting night-sky objects that can be seen in a small telescope, but finding some of them is quite a challenge. From my own experience I can say that every observing session teaches you something new and month after month you can feel more and more comfortable at using your telescope.
X. How to find very weak objects or very rare phenomena.
X.1. How to find very weak objects.
Aiming a telescope in a rough direction of a target and scanning the area while looking for that object is not a good idea as far as weak objects are concerned. It's very easy to miss them this way. Moreover to be 100% sure if an object is beyond your reach you have to identify the proper place with 100% certainty.
The only way to be 100% sure is to start with a very bright star and then star-hop to the proper place/target. Moreover, you have to find the place and STOP. Sometimes it takes some time to notice a very weak object that may seem invisible while the view is moving.
Here’s how I prepare for star hopping:

I focus on bright star patters that fit into the field of view (the circles are 1.5 degree). If there is no such pattern I focus on a bright lone star. The last circle, marked by yet another bright star pattern, is where you should either see the M81 right away OR where you should change to a medium eyepiece.
Then I use the program GIMP and simulate the “night mode” (red color doesn't kill your dark adaptation). I use this program because in some cases the “night mode” on the site Stellarium-web.org is less readable than mine simulation and I also prefer to look at normal colors during the day (while I plan for star-hopping):


I download such an annotated and colorized screenshot to my smartphone and use it as my “mobile map”. Obviously I prepare several different maps for a given night, not just one.
The only problem is that at a different date and/or time the whole view/picture will be skewed, so it's better to plan for a particular day AND hour.
X.2. How to find very rare phenomena.
X.2.1. How to find the exact date and time of a Ganymede shadow transit.
Even in a small telescope you can see a shadow of Ganymede (the biggest moon of Jupiter) cast on the surface of Jupiter! The problem is WHEN to look at Jupiter because such a shadow transit usually lasts very short time (up to 3 hours, but on average much less than this).
Another problem is that your part of the Earth may be facing in opposite direction when a shadow transit happens, so Jupiter won't be visible at all then. This is why it’s very important to search for transits visible at a particular observing site. It's a complete waste of time to analyze ALL the possible moon/shadow transits because there are too many of them (every 7 days and 3.7 hours).
My method is basically all about finding moon transits, while corresponding shadow transits must be “sometime near”. I gather the needed data at this site:
https://ssd.jpl.nasa.gov/horizons/app.html#/
1. Ephemeris Type: Observer Table
(It allows crucial table settings in the point 5.)
2. Target Body: Ganymede (JIII)
3. Observer Location: … [pick a particular city]
4. Time Specification: Start=2022-07-12 UT , Stop=2023-08-18, Step=1 (hours)
(From the time when Jupiter is right behind the Sun in 2023 to the time when Jupiter is right behind the Sun in 2024, but the observing window is further limited in the point 5.)
5. Table Settings: custom => EDIT => Observer Table Settings => None => mark only these settings:
* 12. Satellite angular separ/vis.
* 23. Sun-Observer-Target ELONG angle.
Below (in the part Additional Table Settings) I additionally set these values:
* Elevation cutoff: 15 (deg)
(The “hidden” goal of this cutoff is limiting the number of hours/lines AND limiting “false results” – it's not perfect, but it's good enough.)
* Solar elongation cutoff: 85 : 180 (deg)
(The cutoff at 85 degrees is all about Jupiter being close enough to the Earth, so the planet's angular size is at least 80% of the max. The observing window is still very long: almost 6 months.)
To make your life easier I decided to make calculations for 6 cities spread all around the world for the Jupiter season 2023-24. I picked some well-known cities that are roughly 60 degrees longitude apart: Houston, Rio De Janeiro, Rome, New Delhi, Tokyo and Honolulu.
I checked some random results and it seems to me that latitude is important only when it’s very high or very low. Either way you have to check the results for your own precise local time and also for possible false results, by using for example the site stellarium-web.org set exactly for your own location. I will show an example for the first city.
Please notice that if you live/observe close to the middle of a gap between two cities you may want to check the results from both sides of your location.
Houston: -95 degrees longitude (west)

The original data is a little bigger, but it's easy to discard unneeded columns (or unneeded parts of columns) while importing it into a spreadsheet. Alternatively you can simply search the data for “/t” (small letter t).
The times in the results are always given in the Universal Time (UT), so you have to know your time zone that may be IN ADDITION skewed by the daylight saving time (DST). For example my own local time (on the screenshots below) is UT+2 (during DST), but it will be UT+1 during winter/standard time.
Before Jupiter's opposition the code at the end of a line is L (Jupiter “leads Sun”), but it also means that a shadow transit leads a moon transit – you have to change the clock to an earlier time (quickly in 1-hour steps), up to 6 hours earlier. After Jupiter's opposition the code is T (Jupiter “trails Sun”), but it also means that a shadow transit trails a moon transit – you have to change the clock to a later time, up to 6 hours later.
When Jupiter is close to opposition (close to the solar elongation angle of 180 degrees) there is hardly any time difference at all. A particular solar elongation angle is given in every a line, for example in the first line above it's 86 degrees.
Let's verify the start of the first transit above (first line with the date 2 August 2023), but for a different city: Portland in Oregon that is at a much higher latitude than Houston and, more importantly, as many as 28 degrees more to the west (at -123 degrees longitude west).


The moon transit will happen already during daylight, but shadow transit will happen 6 hours earlier – still during the night, but Jupiter will be already 29 degrees above the horizon. A perfect example!
Rio de Janeiro: -43 degrees longitude (west)

Rome: 13 degrees longitude (east)

New Delhi: 77 degrees longitude (east)

Tokyo: 140 degrees longitude (east)

Honolulu: -158 degrees longitude (west)

X.2.2. Comets.
The best site for planning for comets is this – one sub-site is for current comets and the other is for future comets:
http://aerith.net/comet/weekly/current.html
http://www.aerith.net/comet/future-n.html
In a small telescope only the brightest comets can be seen. Currently I am waiting for the comets 12P/Pons- Brooks (March and April 2024) and C/2023 A3 (Tsuchinshan- ATLAS) (October and November 2024).
XI. General info and some trivia.
XI.1. Celestial sphere and other basic terminology.
All the night-sky objects from outside of the Solar System are so far away from the Earth that they appear almost completely stationary in reference to each other. The Earth rotates around its own axis of rotation, so (almost) all night-sky objects seem to be moving through the night sky, but the distances between them on the night sky don't change.
Some tiny movements of the closest stars, that can actually be measured when the Earth circles the Sun, are not important from the point of view of amateur astronomy. Search the net for “Stellar parallax” if you’re interested – basically it “works” like this:

The Earth is round, so a person standing at the North Pole will see almost completely different night sky than a person standing at the South Pole. For example the North Star (also called Polaris), that is often used to find a northern direction, can be seen only from the Northern Hemisphere (and from a latitude of less than 1 degree south, to be precise):

When looking from the Southern Hemisphere the Earth itself obscures the North Star. On the other hand at the North Pole the North Star is (almost exactly) at zenith – it’s (almost exactly) overhead.
So, the night sky is actually seen not as a flat surface, but as a sphere. And this sphere is called a celestial sphere. The crucial parts of the celestial sphere are named according to the names used when describing the Earth – there are: the north celestial pole (overhead the North Pole), the south celestial pole (overhead the South Pole), the celestial equator (overhead the Equator), the northern celestial hemisphere (overhead the Northern Hemisphere) and the southern celestial hemisphere (overhead the Southern Hemisphere).
XI.2. Observing possibilities – latitude and declination.
A person at the North Pole (a latitude of 90 degrees north) can see only the northern celestial hemisphere and a person at the South Pole (a latitude of 90 degrees south) can see only the southern celestial hemisphere. A person standing at the Equator (a latitude of 0 degrees) can see the WHOLE celestial sphere (not on every night, but throughout a year).
However, there is a big problem with observing night-sky objects that are very low over the horizon – there is simply too much air/atmosphere in the way, so they are much less visible then. A relatively good minimum threshold is around 20 degrees above the horizon, so you have to discard some parts of the celestial hemisphere.
At the Equator you have to discard 40 degrees in total (20 degrees above the northern horizon and 20 degrees above the souther horizon), so you are still left with a view of 140 degrees: from a declination of +70 degrees to a declination of -70 degrees.
Please notice that a declination for the celestial sphere “works” exactly the same way as a latitude for the Earth – a positive value means “north” on the celestial sphere and a negative value means “south” on the celestial sphere. In other words a positive declination points at the northern celestial hemisphere and a negative declination points at the southern celestial hemisphere.
At the North Pole there is only one horizon – the southern horizon, so you have to discard only 20 degrees, BUT because you can see only the northern celestial hemisphere from there you are left with only 70 degrees of view (from a declination of +90 degrees to a declination of +20 degrees).
Interestingly at the North Pole there are no directions north, west nor east. Every direction is south. It's like standing at the very summit of a mountain – any step you take means you are going down. When the Sun moves (or rather when the Earth rotates) you have to keep turning your eyes towards the Sun, but you keep looking south anyway (all day long and all night long).
So, at the North/South Pole there isn't any visible day-night difference, but the Sun gets lower and lower above the horizon (and then below the horizon) hour by hour, day by day and month by month – the Sun is going down in a spiral.
Please, notice that at the North Pole during the times when the Sun stays below the horizon all through the day, the night-sky objects just move around in full circles and no “extra” night-sky objects are visible then. The lower a latitude is the smaller circles around a celestial north pole can be seen in full. At the Equator you can't see anything going in circle and you can see all the night-sky objects moving in celestial half-circles (the one directly above the Equator actually looks like a straight line).
Most astronomers agree that the best latitude is a little below the Equator because the southern celestial hemisphere is generally more interesting. Unfortunately most people in the world can’t change their latitude in any significant way, so we have to live with a particular night sky.
TRIVIA: The stars that are close to the celestial equator can be seen both from the Northern Hemisphere and from the Southern Hemisphere, but they are upside-down on the opposite Hemishpere. Here's a picture of the constellation Orion seen from the Northern Hemisphere:

Here's a picture of the constellation Orion seen from the Southern Hemisphere:

Please notice that the Earth rotates around its own axis of rotation, so when you look from the Southern Hemisphere in the north direction the Sun and all the night-sky objects move from right to left – in opposite direction than on the Northern Hemisphere when looking south. The reason is the same – a person standing on the Southern Hemisphere is upside-down when compared to the person standing at the Northern Hemisphere.
X.3. Observing possibilities – calculating possible declination from latitude.
Let’s focus on the Northern Hemisphere and calculate what can be seen from there. If your latitude is at least 20 degrees north then you can see the North Star at least 20 degrees above the horizon, which is good enough. A latitude of more than 20 degrees north doesn't really improve anything as far as the northern celestial hemisphere is concerned.
The crucial question is this: “How far south can I see?” It’s very easy to calculate: take your latitude and subtract 90 degrees for the objects seen at the horizon or 70 degrees for the objects seen at 20 degrees above the horizon. I live at a latitude of 52 degrees north, but the view from my balcony is blocked by a nearby apartment building (around 10 degrees from the horizon), so I subtract 80 degrees for what I can see at all (I get a declination of -28 degrees) or 70 degrees for what I can see at 20 degrees above the horizon (I get a declination of -18 degrees). Pretty weak.
X.4. Observing possibilities – seasons.
The Earth not only circles the Sun, but it also rotates around its own axis of rotation that is tilted in reference to the Earth’s orbital plane:


First of all, there are some objects that can’t be seen for some part of the year – they either “hide” behind the Sun or are too close to the Sun, so they are (in)visible only during days. Half a year later the Earth is on the other side of the Sun and such objects can be seen during the night.
Second of all, the bigger a latitude the shorter/longer the nights are (depending on the season). At the Equator the night is (almost exactly) 12 hours long throughout a year:

At latitudes that are “too far” north during late spring and early summer the night sky is never truly dark because the Sun is too little below the horizon. so you miss additional part of the southern celestial hemisphere. Interesting at the North Pole you don't actually miss anything when there are white nights because you can see only the northern celestial hemisphere from there anyway.
X.5. Aperture vs. magnification (in telescopes used for visual).
I HAVE to write about this topic somewhere. It pisses me off very much when people speak about one thing, but think about another thing! There is a never-ending discussion on the topic of “What is more important in a telescope – aperture or magnification?”, but most people give arguments that “Big aperture is better than small aperture”, ignoring magnification completely. Morons.
I have to give you a crucial example – a comparison to the naked-eye view. Please, notice that this example is for telescopes used for visual.
Imagine that you have a telescope with a HUGE aperture, but without ANY magnification (magnification 1x). The exit pupil in such a telescope would be equal to aperture (aperture/1), so it would be HUGE. Such a HUGE exit pupil would be much bigger than the size of human eye pupil at night (around 7mm), so most of the vast majority of the gathered light would be wasted. Using such a telescope would be like looking at the night-sky with the naked eye through a big barrel. It means that a HUGE aperture is totally MEANINGLESS without any magnification!
Now imagine a telescope with a tiny aperture of around 7mm (the size of human eye pupil at night) with magnification 3x. The exit pupil in such a telescope would be 2.3mm (7mm/3 = 2.3mm). Such an exit pupil would be still big enough to see night-sky objects comfortably, but the increased magnification would make more stars visible. Moreover it would make bright non-point-like objects look three times bigger, so you would see more details, especially on the Moon. It proves that increased magnification is BETTER than naked-eye view.
Please notice that increasing magnification much further without increasing aperture (of 7mm) would make the exit pupil too small (would make the view too dark). This is why you HAVE to increase aperture in order to PREVENT the exit pupil from getting too small (to prevent the view from getting too dark). Magnification and aperture work in an almost perfect harmony, but in SLOW telescopes used for visual magnification is ALWAYS a little more important because the exit pupils are ALWAYS smaller than 7mm (smaller than the size of human eye pupil at night).
It seems to me that some people confuse the contest "aperture vs. magnification" with the contest "big telescope vs. small telescope". It's not the same! Obviously a bigger telescope is better than a smaller telescope, but the example above proves that magnification is actually a little more important overall. Not much, but still.
The end of the never-ending discussion! Yeah, I am kidding myself – some people will never learn.
XI. More astronomy fun.
You can find plenty of interesting things about astronomy on the net, but here I HAVE to point at two fantastic things – a great Youtube video and a beautiful free Android app.
XI.1. Great timelapse of a night sky.
I enjoy timelapses of the night sky and this Youtube video is by far the best I have ever seen! It's best to watch it at full-screen!
What’s especially good:
1. There are numerous timelapses (combined into one movie) from the same place and almost from the same time (all were recorded in a span of 10 days), but aiming at different parts of the (same) night sky.
2. It’s the southern sky, which is mostly alien for a person from the central Europe like me.
3. All the timelapses are at least very good and some of them are simply fantastic.
4. Some night-sky objects are named and there are also some other comments.
5. The timelapses are not too fast, but not too slow – simply perfect.
6. The music is beautiful on its own and fits the timelapses perfectly.
7. You can see that night-sky objects move in a very curious way, especially when you look in a relatively narrow field of view – “from right to left” when looking in one direction and “from left to right” when looking in another direction. The catch is that the night-sky objects always set (hide behind the horizon) going in the same direction – “from right to left” on the southern hemisphere and “from left to right” on the northern hemisphere.
XI.2. Beautiful free Android app with cool travel through space, even to other stars.
Solar System Scope is a free Android app with cool travel through space, even to other stars! It's not perfect – for example the positions of some Messier objects seem to be incorrect, but I don't care about it because there is no “visit” option to travel to them anyway.
It's very hard to describe this beautiful app with words, so I made a video focusing on the travel aspect:
It's 14 minutes long, so it's easy to miss some things if you randomly jump through the movie, so I made some screenshots (you still have to watch the video to see the actual travel):


XII. Astrophotography with a smartphone.
Astrophotography with a hand-held smartphone is extremely rewarding for an enthusiastic amateur like me. Over time I realized that some little things greatly improve the end effect, so I will describe them separately.
XII.1. Forget about a smartphone adapter.
I bought and tried to use a smartphone adapter myself, but there were several things I didn't like. First of all I was afraid that I would damage a telescope eyepiece by tightening the adapter hold too much. Moreover the combined weight of my smartphone and the adapter was quite big, so I was afraid that the eyepiece AND the focuser tube could get damaged/skewed. Setting my smartphone (through the adapter) in a proper position in reference to a telescope eyepiece was quite troublesome. During the use my smartphone got misaligned anyway. The adapter had to be combined with a particular eyepiece and when I thought about changing to another eyepiece and going through all that trouble again, I happily gave up.
XII.2. Hand-held smartphone.
Obviously there is a little shakiness when you take pictures with a hand-held smartphone, but it's not as bad, as it may seem. The (not that big) shakiness can be seen on my videos – two of them (of Saturn and Venus) you can see in the point I and more of them are below.
A hand-held smartphone is GREAT for additional reasons – you can record a video where the view “zooms out”. Here are two examples:
XII.3. Crucial settings in a smartphone camera app.
As far as normal (daytime) pictures are concerned the standard Camera app in my smartphone works great, but it doesn't have these important features, even in the “pro” mode:
1) manual focus,
2) ISO setting,
3) shutter setting.
This is why I had to install another one. Well, I installed several free apps, but the one that worked for me was Lumio Cam. Here's a screenshot from a video I found on the net:

I always set the manual focus at “Far”, but not at maximum (not focus at infinity – some smartphones/apps apparently allow focus “beyond infinity” and it messes things up). I also manually set ISO and shutter, but the settings vary from photo to photo.
Typical settings for smartphone pictures/photos:
1) the Moon: ISO-200, shutter-250 (which means 1/250th of a second)
2) Jupiter belts: ISO-400, shutter-120
3) Saturn with rings: ISO-400, shutter-60
4) Jupiter with moons: ISO-2500, shutter-25
5) relatively weak stars: ISO-3200, shutter-8 (which means 1/8th of a second)
Any shutter setting longer than 1/8th of a second makes my pictures blurred because my hand-held smartphone shakes a little. Some of my pictures of stars taken with the setting shutter-8 are blurred too.
The same settings are important when recording a video. In general videos yield surprisingly similar results to pictures, but the size/resolution is smaller, so some details may be lost OR some very close stars are not properly separated on a video.
On the other hand it seems that there is a little less noise in videos, especially in the background (probably some different kind of processing is used from the one for taking pictures), so they often look better than single pictures. Not to miss anything I always take some pictures AND record some videos of the same object.
The app Lumio Cam also has an ADDITIONAL great setting that allows taking a series of photos with one press of a button! The symbol of this setting is three rectangles overlapping each other. This symbol replaces the single rectangle that can be seen on the picture above – second from the right at the bottom. Simply press this symbol to change the setting.
XII.4. Cropping videos (and pictures too).
Even at very high magnifications the planets look very small in a telescope eyepiece, so they also look small on pictures and videos. With pictures it's not really a problem because you can magnify them on the computer screen as much as you want, but it's worth to crop them anyway.
Cropping videos is a MUST, because, for some reason, you can't magnify videos on the computer screen and, what's even WORSE, they are always squeezed to fit into the screen! It means that if you recorded a video at a resolution higher than your monitor/computer screen resolution then everything looks SMALLER than it should!
When you crop a video (only crop, not resize) then an object appears bigger in the normal mode and magnified in the full screen mode! For example in this video, from 2:02 till 2:26, you can see the same video of Saturn twice – first original/squeezed and then cropped (not resized), but stretched by the full screen mode:
XII.5. Averaging/stacking photos.
Let's refresh the pictures from the point I.1.2. The darkest belt(s) of Jupiter:
To average several photos I toyed with the free program GIMP (GNU Image Manipulation Program) combined with the free plug-in G'MIC (GREYC's Magic for Image Computing).
Here's an example of the most primitive, but also the easiest way to average/stack photos (it's a different set of photos than were used to create the picture above):
Please, notice that all the photos that are to be average/stacked in the program GIMP/G'MIC have to be taken AT THE SAME ANGLE! When you move your hands, even slightly, between photos then a planet/belt may get a little tilted, so averaging such pictures would produce a mess. This is why it's good to take a series of photos with one press of a button.
Averaging numerous photos is the main part of what some people call “stacking”, but they combine averaging/stacking with lot's of processing. In the video above I did some color processing, so you can see that the end result can be completely different than what you (or rather your smartphone) can see – more on that in the next point.
XII.6. Processing = cheating?
Averaging numerous photos to reduce noise is clearly OK, but color processing or sharpening (which is also a kind of processing) may seem like “cheating”. I used to think that ANY processing is definitely cheating until I made, by accident, the following example.
I dedicate this example to people like me who can't even imagine how much processing is done by a smartphone/digital camera “behind your back”.
To finally understand all this talk about processing (usually referred to “raw files/pictures”) I needed a good example, namely a DAYTIME picture with TOO MUCH light, recorded simultaneously as a JPG file and as a raw DNG (Digital Negative) file. A daytime picture is much better because everybody knows what the “correct” picture should look like.
I used the free Smartphone app Lumio Cam and set the option “RAW + JPG”. I took the crucial picture a little “by accident” (I had intended to analyze a raw file of a picture taken with little light) and only later realized that it's simply perfect (because there was actually too much light). All the pictures below are only a part of this crucial picture. I had to censor the picture anyway because my wife was breastfeeding our little daughter.
To process the raw DNG file I used the free program GIMP, but to load the file to GIMP I had to install yet another free program – RawTherapee.
1. Smartphone JPG looked like this:

I took the picture when the Sun was shining from the back and when I saw the JPG I thought: “The conditions were poor, so the picture is far from perfect”.
2. Smartphone raw DNG file (without any processing) looked like this:

I was surprised by two things. First – on the raw image I could see flowers on the curtain behind my wife. Second – the raw picture was kind of bland. Further inspection revealed that there was also less noise on the raw picture, especially on my wife's face. What I didn't notice at first was that it was clearly less sharp than the smartphone JPG file.
These two pictures alone show how much processing is done by a smartphone/digital camera “behind your back”.
Please notice that what you can see above is not a raw DNG file, but this JPG looks almost exactly like the raw DNG file, even though some digital info was already lost.
3. Smartphone raw DNG file after some processing, but without any sharpening looked like this:

With two quick steps I greatly improved the raw DNG file – the picture is now more lively (less bland) AND you can still see flowers on the curtain behind my wife.
The biggest surprise to me was that the newest picture was still clearly less sharp than the smartphone JPG, which can be seen especially on the flowerpot. It means that my smartphone somehow made the raw image more sharp.
If you're interested, the steps I took so far were these:
In the first step I used the option Adjust Color Levels (menu Colors => Levels) and moved the left slider 10% to the right:

In the second step I used the option Adjust Color Curves (menu Colors => Curves) like this:
4. Smartphone raw DNG file after some processing and with the filter Sharpen (Unsharp Mask):

To achieve a “correct” image from the raw DNG file I was literally FORCED to do something that I had used to considered as cheating – I was literally FORCED to do some sharpening. Well, the smartphone JPG is still a little sharper, but my picture is overall MUCH better!
I used the filter Sharpen (Unsharp Mask) that can be found in the menu Filters => Enhance => Sharpen (Unsharp Mask), but with a little “weaker” values than the default values:

The second name of the filter (“Unsharp Mask”) made me curious and on this site:
https://thegimptutorials.com/how-to-sharpen-image/
I found these quotes:
“This slightly confusing name dates back to a technique created for darkroom film development, where a blurred positive version of a photograph is used to enhance the negative film copy of the image you’re working on. Somehow.”
“The Sharpen filter uses a digital version of the unsharp masking technique, so extra credit if you have a basic understanding of unsharp masking.”
Unsharp masking is described here:
https://en.wikipedia.org/wiki/Unsharp_masking
The crucial thing to me was that I realized that sharpening was possible even during the times of the darkroom! I had NO idea!
Please notice that stronger sharpening would increase the amount of noise (I tried it).
Summing up:
1. The overall amount of automatic processing in smartphones/digital cameras is VERY significant.
2. Automatic sharpening of digital images is a STANDARD procedure in smartphones/digital cameras.
3. The automatic processing in smartphones/digital cameras can be pretty WEAK in some cases.
4. Processing raw files yourself can bring much better (more “correct”) results.
These facts significantly changed my view on picture processing, especially on sharpening.
On a side note: I tried to process the smartphone JPG “backwards”, but the results were very poor. Now I understand that most of the (automatic) processing is irreversible. “Like my raincoat!”
One thing was bothering me: if my smartphone overdid the sharpening in this case, is it possible that in some other cases my smartphone can understate the sharpening? Out of curiosity I processed a cool picture of the Moon that I took myself earlier – it was the smartphone JPG (not the raw file), but the end results was clearly better anyway:
Smartphone JPG (a part of it):

Smartphone JPG with the filter Sharpen (Unsharp Mask):
.jpg)
The picture with the filter Sharpen (Unsharp Mask) is clearly better, but it still looks natural. I think that my original picture was sharp because the shutter speed was only 1/250th of a second, so my smartphone apparently did a poor job with sharpening.
My view on picture processing has been completely altered and now I sharpen slightly even my “normal” daytime photos – they look better while still looking natural.
The best (most universal) settings for sharpening pictures of the size up to 2600x1700 pixels are: Radius 1.000, Amount 1.000 and Threshold 0.000:

I used these exact settings to sharpen the part of the picture of the Moon above.
As far as photos of Jupiter are concerned I “cheat” by over-doing color processing (and sometimes sharpening) to make more details visible – astrophotography with a smartphone is very limited, so nothing looks completely natural anyway.
XII.7. Averaging/stacking video frames.
The number of averaged/stacked pictures should be as high as possible, but it's impossible to obtain large number of similar photos with a hand-held smartphone. HOWEVER there is a way to stack hundreds of VIDEO FRAMES from a single video recorded with a hand-held smartphone.
For example this is the final “picture” created from a video recorded on a different occasion (with a telescope eyepiece combined with my favorite color filter for visual use – green/light green filter #56) – the number of stacked video frames was 300:

To obtain the picture above I used the program RegiStax 6 – the processing tools, especially the sharpening tool, in this program are simply fantastic! The man problem is that it can't handle MP4 files, so I have to convert my videos to AVI files first.
When everything works then the end result is like magic! Here's a video showing how I obtained the above “picture” (read my Youtube description for details):
XII.8. Averaging/stacking screenshots of MP4 video frames.
Unfortunately the program RegiStax 6 is a little unpredictable and sometimes the results come up completely wrong for no apparent reason. Moreover converting MP4 files to AVI files worsens the quality of the video, so it's bad by definition.
A “desperate” alternative is to average/stack screenshots of chosen (best) MP4 video frames (read my Youtube description for details):
XII.9. Digital zoom.
Please notice that it's actually good to use a little digital zoom while taking/recording pictures/videos of the planets (or even of the stars), so they appear slightly bigger (or more separated in case of close stars). Generally all the objects, except for the Moon, look quite small in a small telescope.
XII.10. Visual keepsakes.
Nowadays I always take same pictures AND record some videos of bright objects, to have fun stacking and processing them later, when there are clouds in the skies and I can't use a telescope. They also remind me how some of the objects look in a small telescope when it's a different season and they hide behind the Sun.
XII.11. Best telescope for astrophotography with a hand-held smartphone.
Most of my pictures and videos were taken/recorded with my 114/900 Dobson simply because its base is more sturdy and there is a little less shaking when I press my smartphone against a telescope eyepiece. It's not really important for visual use because you don't touch a telescope eyepiece with your own eye, so the view is perfectly steady then.
Clear skies!
After 6 additional months of using my telescopes (now I have three), I changed this post significantly again. I updated some parts, rearranged the whole content, shortened some of my descriptions and, most importantly, I added new info together with 46 new pictures (photos, drawings and screenshots). I was not able to mark the new content, but if you simply scan the post for new pictures you will find some of the new info there.
INTRODUCTION
I am a pure enthusiast who concentrates on positive things, instead of complaining about negative ones, so I truly enjoy watching the night sky through a small telescope from a balcony in a city with big light pollution. By the way: light pollution is all about the night sky being brighter near human settlements than at remote locations (more on that later).
The brighter the night sky (because of light pollution) the less night-sky objects you can see, both with the naked eye and through any observing equipment, however there are ALWAYS some very interesting things to be seen even in a small telescope.
At the time I finally bought my first telescope I was 43 years old and I have to say one thing: I wish I had done it earlier!
ATTENTION!
I constantly refer to small telescopes, but I do NOT recommend ANY small telescope. I recommend a small telescope that is SLOW (“lean”) – a small telescope that is “long enough”. Why? Because in a slow/lean telescope light rays are less bent, which minimizes potential problems with aberrations, false colors, coma and things like that. As far as inexpensive telescopes are concerned buying a slow/lean one (at least f/8, but in case of refractors preferably f/10) is like taking a sure shot.
I own three telescopes, but only two of them are good for complete newcomers: 70/700 refractor (my first telescope) and 114/900 Dobson (my second telescope that I bought after just one year). I will explain telescope numbers later, but now I have to point out that the Dobson is better simply because it gathers more light. I also own a 102/1300 Mak (Maksutov–Cassegrain), but in this telescope the field of view is much smaller than in my refractor and in my Dobosn, so it's not good for a nowcomer.
Some of the examples below are actually my own photos or videos that I took/recorded with just a hand-held smartphone (without an adapter) gently pressed against a telescope eyepiece. Obviously astrophotography with a smartphone is very limited, so in reality (while looking into a telescope eyepiece) everything looks clearly better.
I. Telescopes vs. binoculars.
I.1. What can be seen in a small telescope, but not in binoculars:
I.1.1. The rings of Saturn (seen as one big ring, but clearly visible).
To me seeing the rings of Saturn was like a dream come true! The view was simply hypnotizing!
Saturn is the best object in a small telescope for recording a video with a smartphone – it's fantastic on its own (without any stacking nor processing), but it's good to crop it later (only crop, not resize), so the object appears bigger, especially in the full screen mode.
Please remember that in some years, for example in 2024 and 2025, the rings are less visible because of the angle of view:

I.1.2. The darkest belt(s) of Jupiter.
Seeing darkest belt(s) of Jupiter means that you can actually see something on a surface of another planet! Incredible! Please notice that the belts of Jupiter (their size and their colors) change over time and sometimes they even disappear.

This is a single cropped picture, but there is lots of noise. You can get rid of the noise by averaging several photos (for details see the point XII.5. Averaging/stacking photos):

Averaging just several photos already gives impressive results! But it's still worse than what I could see with my own eyes – astrophotography with a smartphone is very limited.
I.1.3. Venus crescent phase.
It’s extremely cool to see a crescent phase of Venus, but if you are at a high latitude north (or south) it’s a rather rare/difficult sighting. I didn't crop this video, so please, watch it in the full-screen mode.
I.1.4. A shadow of Ganymede cast on the surface of Jupiter.
Seeing a shadow of Ganymede (the biggest moon of Jupiter) cast on the surface of Jupiter means that you look at a total solar eclipse happening on another planet! Such a shadow (of Ganymede) is surprisingly well defined and it’s easily visible even in a small telescope (unlike shadows of other Jupiter moons, which are much smaller or farther away from the planet).

This is a single cropped picture where the shadow was clearly visible. Averaging several photos made the shadow a little less clear, so I don't show it because this is not about astrophotography, but about the shadow itself.
I described how to find the exact dates and times of Ganymede shadow transits in the point X.2. How to find very rare phenomena.
I.1.3. Relatively small details of the Moon.
The amount of details of the Moon that can be seen in a small telescope is simply fantastic! Click to enlarge!

I.1.4. Shape of the Orion Nebula and the Trapezium hidden inside.
In a small telescope the nebula is “less glowing” when compared to binoculars (because bigger magnification makes such diffuse objects dimmer), but it appears much larger and you can see its shape (or rather it's brightest part). Moreover inside the nebula you can see 4 stars that are very close to each other – these stars as a whole are called the Trapezium.

I.1.5. The brightest moons of Jupiter even when they appear very close to the planet.
It's not about the brightness of the moons, but about the apparent separation of the moons from the planet (about the angular distance between the moons and the planet). The moons can be seen even in 8x42 binoculars, but only when they appear far enough from the planet. In a small telescope the magnification is much bigger, so the moons can appear much closer to the planet (and much closer to each other) and still be discernible.

When I took the photo above all four Galilean Moons were visible in my small telescope, but only 2 of them were visible in my 8x42 binoculars. Please notice that Jupiter is overexposed because I had to make the moons visible and this is why the belts are not visible at all (I could see 2 belts on that night). Again: astrophotography with a smartphone is very limited.
Here's a screenshot from the site Stellarium-web.org for the time I took the picture above:
.jpg)
I.1.6. Relatively bright stars that are very close to each other.
Some stars (double or multiple stars) appear very close to each other, so they can be separated/split only at a big magnification (otherwise they appear as a single star). From my own experience I can say that it's extremely cool to “discover” a double star by sheer accident.
The most famous example of a multiple star is the Trapezium I mentioned (and pictured) together with the Orion Nebula. Another great multiple star is Sigma Orionis – just below the Orion Belt on the left. There are 4 main stars, but one of them is clearly weaker than the rest, so it can get drowned in the light of the nearby star:

The Sigma Orionis is in the middle, but as you can see there is another double star nearby (HD 294272).
The most famous example of a double star is Albireo – even in a small telescope it’s very easy to split AND you can see different colors of the stars!

I.1.7. The brightest moon of Saturn.
It looks like a relatively weak star, but it's clearly visible (unless it hides behind the planet).
I.1.8. Relatively weak stars.
Increasing magnification makes more stars visible, so under equal skies a small telescope will ALWAYS show more stars than binoculars, just because the magnification is much bigger (more on that later – in the part about contrast).
I.1.9. Most of “doable” galaxies.
A galaxy “doable” under light-polluted skies has to be very bright at its core – what you can (barely) see is only that central part of the galaxy.
There is actually one galaxy (M31 – the Andromeda Galaxy) that I saw even in my 8x42 binoculars, but all the other galaxies that I have seen from my light-polluted city (11 of them so far: M49, M63, M64, M66, M81, M82, M85, M94, M104, M105 and M106) were visible only in my small telescope. Either way they look extremely unimpressive – like a small cloud of light (people usually call it a faint fuzzy). The Andromeda Galaxy looks more or less like this:
It's not important how well you can see a galaxy, but what it means that you can see it at all. Galaxies are typically millions of light-years away – for example the Andromeda Galaxy is around 2.5 million light years away. It means that the light that you can see travelled for 2.5 million years before it reached your eyes! My personal best has been the sight of light rays that traveled for around 60 million years (from M85).
Please notice that when I write about seeing a particular night-sky object I mean seeing it “with your own eyes” – seeing the light that traveled a HUGE distance through space for a LONG time. When you see a picture of an object displayed on a computer screen you see only the light generated by the computer screen. When you see a picture of an object printed on a piece of paper you see only the light generated by the Sun (or by a lamp), reflected from the picture.
I.1.10. Most of “doable” globular star clusters.
A globular star cluster “doable” under light-polluted skies has to be very bright at its core, just like a “doable” galaxy – what you can (barely) see is only that central part of the globular cluster.
There is actually one globular cluster (M13 – the Hercules Globular Cluster) that I saw even in my 8x42 binoculars, but all the other globular star clusters that I have seen from my light-polluted city (11 of them so far: M2, M3, M5, M9, M10, M12, M14, M15, M53, M56 and M92) were visible only in my small telescope. Either way they look almost as unimpressive as galaxies – like a small cloud of light (a faint fuzzy), but the cloud is more concentrated, so it's generally easier to see.
Please notice that globular star clusters are typically tens of thousands of light-years away. Maybe it's not as impressive as in case of galaxies, but it's still very far! For example I have seen light that traveled from the M53 for 58 thousand years!
I.1.11. More open star clusters.
Similarly to the point I.1.8. Relatively weak stars there are many open star clusters that can be seen only in a telescope. This is not about seeing more stars in a cluster, but seeing a whole new cluster! There are many open star clusters that consists ONLY of very weak stars that can't be seen in binoculars at all.
I.2. In what regard are binoculars better than a small telescope?
I.2.1. Big field of view.
The best thing about hand-held binoculars is that the field of view (FOV) is much larger than in any telescope, so you can see much more of the night sky at a particular moment. Some of the biggest night-sky objects (as far as their angular size on the night sky is concerned) can fit into the view only in binoculars, HOWEVER there are VERY FEW such objects and most of them CAN'T BE SEEN under light-polluted skies at all anyway.
I.2.2. Easier search/identification.
Thanks to a bigger FOV you can find/identify a particular place on the night sky much easier simply because you see more stars at the same time. This fact makes binoculars a perfect complement to a small telescope. I often look through binoculars first to see stars than are invisible to the naked eye, which helps me point my telescope in a preferable direction.
I.2.3. Scanning of the night sky.
In a span of several seconds I can switch from the Orion's Sword (the area with the Orion Nebula in the middle) up to the Orion's Belt, then right to the star Aldebaran and the nearby open star cluster Hyades and then farther right to the open star cluster Pleiades. This sequence is truly spectacular and you can't do something like this (so quickly) in a telescope. But it actually makes binoculars kind of boring – when you find what you are looking for almost instantly then you can run out of targets pretty quickly, especially under light-polluted skies.
The best thing to do is to lie down on a reclining chair (or something similar) and scan the night-sky RANDOMLY. This is when binoculars really shine!
I.2.4. Portability and instant use.
Hand-held binoculars are much smaller and much more portable than a small telescope. Moreover you can use them instantly – the preparation time with any telescope, even a small one, is clearly longer. However, extreme portability and extremely short preparation time should be considered the least important things in astronomy.
I.3. A small telescope vs. binoculars – summary.
To me a small telescope is definitely better than a pair of ANY binoculars – there is absolutely no comparison as far as magnification is concerned. To me relatively high magnification is the most important thing because it shows details/new things that are simply too small at low magnifications.
I actually regret buying 12x60 binoculars (wasting my money) after reading some opinions like “It’s better to buy a pair of binoculars instead of a small telescope”. Based on my experience, I now find such opinions controversial, to say the least. Very soon after I had bought these binoculars I decided to buy a telescope simply because I finally realized that to see the rings of Saturn I need magnification of around 40x. After some more time I also bought smaller binoculars simply because they were lighter and my arms didn't tire so soon.
I would say that if you can afford it then you should buy BOTH a small telescope and a pair of 8x42 binoculars. They complement each other perfectly and I use them alternately. Moreover, a small telescope comes with a toy-like finder scope that is useless when looking from my balcony. Thanks to binoculars it’s easier to find crucial night-sky objects.
I own three pairs of binoculars (all of them porro binoculars): 12x60, 8x42 and 8x30 and I recommend ONLY the 8x42 ones!

I compared different types of binoculars in detail here:
Most universal types of binoculars
Please notice that some people rave about very big, very heavy and very expensive binoculars that look almost like two small telescopes bound together. Even such heavy (and expensive) monsters have much lower magnification than a small (and cheap) telescope, so the small telescope in some regards is still better anyway!
Another thing that is very strange to me is that you have to use a tripod to be able to use big and heavy binoculars, but if I had to fiddle with a tripod than I would rather use a small telescope than binoculars.
II. Useful info.
II.1. Free maps of the night sky.
Thankfully we live in modern times a we can use websites like this:
https://stellarium-web.org
This awesome site allows you to search for a particular night-sky object without learning anything about star constellations! You can also change date and time to see where a particular object was in the past or where it will be in the future. AWESOME!
A good method is to change the time minute by minute until a particular object is exactly in the direction you want it to be. It's quite useful on a balcony where you have some parts of the sky obstructed by nearby apartment buildings.
Please notice that you can simulate the night sky seen with the naked eye in big light pollution by setting the time to an early hour, but it's not quite realistic and the stars may be tilted “too much”. Most examples in the next point are made this way.
I have also installed the free program Stellarium from this site:
https://stellarium.org/
The program is not perfect but it's still very good:
1) the program has much more options and is much more configurable,
2) the program is much less burdening for the computer.
Please notice that I still regularly use the website, especially when I want quick results, better visuals or deeper star field.
I described the program Stellarium in detail here:
Stellarium program vs. Stellarium website
There is also a free astronomy Android app – Stellarium Mobile (153MB in total) that I installed on my smartphone. It shows only stars of magnitude below 8, but at least it seems consistent, unlike another free Android app that I installed (I will not name it).
II.2. Air/atmosphere in the way.
One of the most important things to remember is that it's quite pointless to look at night-sky objects that are very low over the horizon because the amount of air/atmosphere that is in the way then is HUGE.

The example above is exaggerated as far as observing height and the Earth's curvature are concerned. The yellow line (looking at zenith/straight up) is the amount of 1 air mass by definition. The orange line (looking just above the horizon) is MUCH longer, which means that the amount of air/atmosphere is MUCH bigger. I used the program Stellarium and it showed these values:
1.00 air mass at zenith (90 degrees above the horzion)
1.03 air mass at 77 degrees above the horizon
1.41 air mass at 45 degrees above the horizon
2.87 air masses at 20 degrees above the horizon
5.53 air masses at 10 degrees above the horizon
10.25 air masses at 5 degrees above the horizon
25.14 air masses at 1 degree above the horizon
A relatively good minimum threshold is 20 degrees above the horizon, especially for diffuse objects and weak stars:

II.3. Degrees above the horizon.
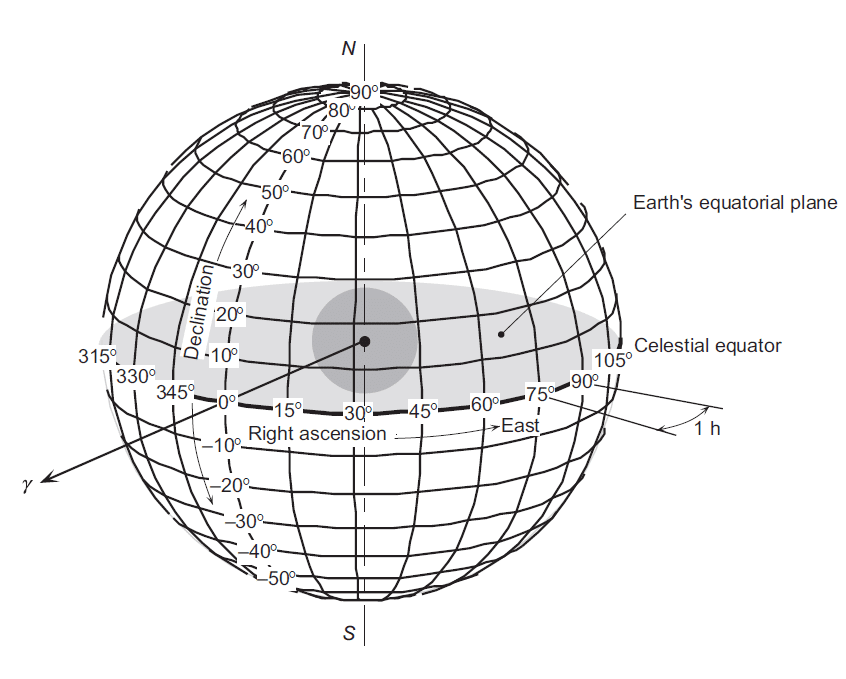
The picture above is a very good example how different angles “work” in real life. Imagine that you are standing in the middle of this sphere and when you look at the horizon the angle is 0 degrees. When you look at an object at 20 degrees above the horizon it's already relatively far from the horizon and an object at 45 degrees is suddenly very high in the sky! It means that the amount of air/atmosphere in the way when looking at an object at 45 degrees (or more) is already very small (it doesn't get much better than this, as I described it in the previous point).
Interestingly, looking at an object at 70 degrees above the horizon feels almost like looking exactly straight up! In fact aiming ANY telescope at objects at an angle of 65 degrees (or more) is quite troublesome and is not really recommended for newcomers. Even more experience astronomers avoid aiming at objects above 70 degrees. I had no idea that looking at such angles can be so troublesome!
II.4. Direction of an observing site.
Some observing sites, like a lawn next to a detached house, allow observing practically in any direction, but some other, like a balcony or a place near big apartment buildings, have some directions blocked.
Generally the best observing direction on the Northern Hemisphere is to the south because it maximizes the number of night-sky objects you can see throughout the year. The worst direction is to the north, especially when you live at high latitude. Unfortunately even the directions to the northeast or to the northwest are not good enough as far as the Moon and the planets are concerned. During some months (for the Moon) or years (for the planets) the only way to observe these objects high above the horizon is to find a place facing south.
III. Light pollution and balcony/urban astronomy.
III.1. Basic info.
Light pollution is all about the night sky being brighter near human settlements than at remote locations. Even small cities produce significant amount of artificial light that “spills” over large areas around them. A modest amount of light pollution degrades diffuse objects such as galaxies, nebulas and comets far more than stars. On the other hand the Moon, the planets and brightest stars are generally IMMUNE to light pollution. Basically, there is always something interesting to look at even from a balcony, unless you have some unrealistic expectations.
Below there is a rough double example how light pollution works. It's an artificial visual example for comparing different magnitudes of stars at different apertures (that are all relatively small). It’s not perfect, but it gives you a general idea of the difference in brightness between stars of subsequent magnitudes (2.5x on each magnitude step) without light pollution and then with significant light pollution.


Your equipment together with light pollution at your observing site are your main limiting factors (seeing and transparency are also important, obviously – more on that later). If your eyes are good then you may see some additional stars at the verge of visibility, but the magnitude difference shouldn’t be all that significant. I think that in most cases people mistake the lack of dark adaptation and the lack of their observing technique with the weak abilities of their eyes.
The numbers in the examples above are color values (white color is 255-255-255 and black color is 0-0-0). In-between numbers represent brightness decrease when compared to the base value (white). Obviously white stars are still white in small telescopes, but the examples are about brightness, not about colors.
I have to point out that when you go out of a city to a place with significantly lower light pollution then you are stunned by how many stars you can see even with the naked eye. HOWEVER, nowadays even at quasi-rural sites the skies are only semi-dark (not truly dark), so a trip to such a site with a small telescope is rather disappointing as far as faint fuzzies are concerned – they are still faint fuzzies. Yes, you can see more of them, but the new ones are at the threshold of visibility anyway, so they look as unimpressive as possible.
After just one such disappointing trip to a semi-dark site with my 70/700 refractor I decided that the next time I will take just my 8x42 porro binoculars with Bak-4 prisms (that are clearly better than Bak-7 prisms) and leave my small telescope(s) at home. The wide view of small binoculars (8 degrees) is hard to beat – it's 10 times bigger as far as area is concerned when compared to my refractor's maximum field of view of 2.5 degrees: (8 degrees / 2.5 degrees)^2. Not to mention that binoculars are much smaller, more portable and less problematic than a small telescope.
The most impressive things in a small telescope (much more impressive than what you can see in binoculars) are the ones visible at relatively high magnifications, so they have to be “bright enough” anyway, which means that most of them can be seen also from a city. All the other things (at the threshold of visibility) are not really impressive, even under semi-dark skies.
III.2. Confusion about the Bortle scale.
The Bortle scale is a scale describing different levels of light pollution based on naked eye observations, but there is LOTS of confusion about this scale. Some people use it in a totally indiscriminate way – they mix it up with bad transparency (bad clarity of the atmosphere) and/or bad seeing (big atmospheric turbulence) and/or artificial lights that make your eye pupils constrict (for example street lamps).
Bortle himself wrote about light pollution in reference to SKY conditions as far as their DARKNESS is concerned. Bortle also wrote that he hoped that his scale “would provide a consistent standard for comparing observations with light pollution”. You can’t achieve consistency in comparing light pollution when other important factors don’t remain equal.
When seeing and/or transparency is bad then your observations will be obviously worse, but NOT because of light pollution! Please notice that transparency and/or seeing can be bad even at remote locations, where there is hardly any light pollution by definition. Even in a city it would be silly to accept an idea that light pollution changes from night to night, depending on current transparency and/or current seeing.
The main problem with the Bortle scale is that it is based on naked eye observations, so If you assess the sky conditions while being directly blinded by nearby street lamps and/or by other relatively bright objects (including objects that only reflect light) you will definitely misjudge what you could see through a telescope. An objective lens/mirror of a telescope doesn't constrict due to bright light, unlike the human eye pupil does during naked-eye observations. In other words: judging the Bortle class from a balcony in a city is practically impossible, but a telescope is immune (more or less) to direct light and what really counts is only the sky-glow.
Fortuantely you don't have to judge the Bortle class of your location yourself and you can use an online map. I prefer this site:
https://www.lightpollutionmap.info
with the overlay “World Atlas 2015” active – when you click at a particular place a description pops up, where you are given also the Bortle class of the chosen place. It may be not perfectly up to date, but the other overlays are very poor at showing truly dark locations and they don't state the Bortle class of a particular place at all.
III.3. Light pollution vs. the full Moon.
The full Moon (or close to the full Moon) has a similar effect to light pollution – it degrades diffuse objects such as galaxies, nebulas and comets far more than stars. It's true even at remote dark locations and some people don't go to such places when there is the full Moon (or close to the full Moon).
Some people add the effect of the full Moon to light pollution itself, but to me it's again incorrect. It would actually be totally silly to say something like this: “We're in the middle of a desert, very far from human settlements, but there is the full Moon, so the middle of the desert is full of light pollution.” To me light pollution is all about artificial lights produced by human settlements and the moonlight is not artificial. Moreover, the light pollution map I mentioned above does NOT change according to the phases of the Moon, so it treats light pollution as something totally independent from the Moon light. Exactly like I do.
Anyway, when you look at the night sky from a place with a particular light pollution (for example a balcony in a particular city) and there is also the full Moon then the effect is even worse – the night sky is even brighter and even less night-sky objects can be seen, both with the naked eye and through any observing equipment.
III.4. Dark adaptation on a balcony.
The difference between looking at the night sky while being directly blinded by nearby street lamps and looking at the same night sky “from a covered place” is HUGE! The first time I tried to find the Hercules Globular Cluster (M13) from my balcony I couldn't see it in my 8x42 binoculars, but I was doing it while standing up, so the nearby street lamps were blinding me. The next time I looked at the M13 from my balcony I saw it even in my 8x42 binoculars, but I was doing it while half-lying on a portable reclining chair, so I was shielded from the nearby street lamps by a cover on my balcony guardrail.
It actually proves that the street lamps make your eye pupils constrict in a significant way, which is totally independent from light pollution of the night sky (from the sky-glow). Unfortunately you can't lie down when looking through a telescope, but there are some things hat can help you even on a balcony.
My dark adaptation is always very weak because when I look at the night sky from my balcony there are several street lamps close by that are blinding me directly (more or less), even when I shield my eyes with my hands. Here’s a picture taken from my balcony:

I took the picture in the “night-mode” (the time of exposure was relatively long), so the planets Jupiter (on the left) and Saturn (above the Moon) would be visible (they were visible with the naked eye), but it made everything else (especially the street lamps and the apartment buildings) a little brighter that in reality.
As you can see there are lots of nearby street lamps, so “my balcony astronomical observatory” is simply terrible to the naked eye. When I look into a telescope eyepiece at particular angles (at some positions of my telescope) the street lights are especially annoying. I planned to buy some kind of movable cover, but this site (with all those pictures) inspired me to use a kind of hood instead:
https://www.cloudynights.com/topic/446598-in-praise-of-dark-skies-apparels-observing-hoods/
And here's my hood:

My hood is actually a piece of black cloth folded in half (100cm x 144cm folded into 100cm x 72cm). Why folded in half? Because one layer of the cloth still lets some light through while two layers of the cloth block practically all light.
Interestingly the cloth is folded in such a way that its “good side” is inside and what you can see is actually the “wrong side”. Why? Because the “wrong side” of the cloth is more slippery, so it shouldn't drag my telescope by accident.
Additional advantage of my hood is that I can use it together with ANY kind of clothing, from a T-shirt to a winter jacket.
When I tested my hood I realized it was perfect in two different ways! The main goal was to block light from nearby street lights and it was pretty straight-forward. However another unforeseen problem arrived – my balcony floor was so bright (mostly because of the street lights) that it was blinding me on its own. My hood “rose to the challenge” and I was able to wrap it around my head also from below. I had to hold it with one hand, but my whole head was like in a mini darkroom and I could have my both eyes open. Fantastic feeling in the middle of a city.
The only problem was that my hood touched a part of the focuser that was greased. Now I know I have to be more careful how I wrap my hood around my head.
III.5. Good sides of balcony astronomy.
When you look at the night sky from your own balcony you can do it relatively often and together with your little children! But there are also some other HUGE practical advantages of using a telescope on a balcony – you can keep all the little things inside your home, you can put a normal (relatively heavy, but comfortable) chair next to your telescope AND you can always wash your hands in your bathroom when you accidentally touch a telescope element that is greased. You can't do such things “in the wild”.
Over time I noticed an additional advantage of balcony astronomy – easy access to a computer and very good online star maps. When I was newcomer and I was star-hopping from an easy night-sky target to a more difficult one I could go in and out of my apartment over and over again, checking my current “night-sky position” on the computer and planning the next “hop” one at a time. I wouldn't find some object at all if I tried to do it without a detailed computer star map (free smartphone star maps are much worse). Nowadays I do it differently, but I have to prepare in advance – I described different ways of finding night-sky objects in the point X.1. How to find very weak objects.
IV. Types of telescopes.
IV.1. Important example how telescopes work in general.
There are basically two kinds of telescopes: refractors and reflectors. They will be described in the following points together with some simplified examples how they work, but first I have to point out one very important thing – any observing equipment (just like the human eye) works in a very counter-intuitive way. Here's an example for a telescope, but binoculars generate image in a similar way:

Totally mind-blowing! You can find the explanation with additional examples and comments in the point VI.7. Exit pupil and eye relief.
Here, in the following points, there are some examples for different types of telescopes, but they are greatly simplified and may be misleading UNLESS you remember the example above.
IV.2. Refractors.
A refracting telescope uses a lens to magnify the view, at the same time “squeezing” all the gathered light in order to fit into human eye pupil:

The objective lens is mounted in a fixed way, so it doesn't need any adjustments later. This is why a refractor is totally unproblematic as far as maintenance is concerned. It's very similar to binoculars in this regard – just take it out, attach a telescope diagonal with a telescope eyepiece and watch the night sky!
Please notice that the mirror on the other end of a refractor (hidden in the telescope diagonal) is theoretically not needed, but it helps to look at the night sky at a more convenient angle. If there were no mirror diagonal then you would have to literally lie under the telescope when it would be pointing almost straight up. By the way: the mirror in the diagonal is mounted in a fixed way too (no additional problems there at all).
IV.3. Reflectors.
A reflecting telescope uses one or more curved mirrors to magnify the view, at the same time “squeezing” all the gathered light in order to fit into human eye pupil:

.jpg)
.jpg)
The first reflector above (the simple one) is called a Newtonian telescope (or simply a Newton), just because it was invented by Newton (the famous scientist) himself. By the way: a Dobsonian telescope (also called a Dobson) is a Newtonian telescope with a simplified mount – perfect for newcomers (exactly like a small refractor on a simple tripod).
The second reflector is Maksutov–Cassegrain telescope (Mak) and the third reflector is Schmidt–Cassegrain telescope (SCT) – as you can see their designs are generally similar. In my 102/1300 Mak the field of view is definitely too small for a newcomer (because the magnification is much bigger by definition – more on that later). On the other hand an SCT is more newcomer-friendly, but it's MUCH more expensive – completely beyond my financial reach.
As you can see in any reflector the secondary mirror is “obstructing the view”, but in case of my Newton/Dobson it blocks only several percent of the incoming light (it's the area of the central obstruction that counts, not the diameter). In a Newton/Dobson there also diffraction spikes, but they are not as bad as it may seem (more on that later).
V. Practical differences between small refractors and small reflectors.
V.1. Quality of view.
I will start with a double visual example that gives a pretty good idea about the differences between a refractor and a Newton. The example is not perfect, because the original pictures were taken with a smartphone, but the most important thing is that they were taken on the same night and the time difference was ONLY 9 minutes. The pictures were cropped and resized so the planet Jupiter would be of the same size (slightly enlarged for the refractor and slightly downsized for the Newton).
70/700 achromatic (cheap) refractor:

114/900 Dobson (with a spherical objective mirror):

The main problem with the refractor is the chromatic aberration – it's color distortion usually seen as a bluish or purple fringe at the edge of a bright object. To me, in my slow/lean refractor, it's not really bad at all.
If you're interested, chromatic aberration is all about light rays of different lengths being bent differently while simple/cheap ways of correcting this effect are not perfect:


The main problem with the Newton/Dobson is the less smooth edge of a bright object. This effect is probably a combination of spherical aberration and diffraction spikes. To me, in my slow/lean Newton/Dobson, it's not really bad at all.
If you're interested, spherical aberration is all about light rays focusing not exactly at the same point due to incorrect shape of an objective mirror/lens. Below there are examples of spherical and parabolic mirrors that are exaggerated as far as mirror curvature and focusing distance are concerned:


My 114/900 Dobson has a spherical primary mirror that is strongly criticized by some people, but some other people claim that in such a small AND slow/lean reflector it’s not important at all. When I compared my telescopes side-by-side I noticed that stars in the refractor were “slightly more pin-point”, but barely. The difference was very small and without the side-by-side comparison I wouldn't even notice it – as you cans see on both pictures the moons of Jupiter look more or less the same, except for the one closest to the planet.
I have to point out that the Dobson picture was taken 9 minutes after the refractor one, so the moon closest to the planet was already almost hiding behind the planet (or getting in front of it). That very moon on the Dobson picture was almost drowned by the rough edge of the planet, but the remaining three moons were “as pin-point” as on the refractor picture. It makes me believe that the rough edge of the planet was caused by barely visible “mass diffraction spikes” (see the next point) rather than spherical aberration.
V.2. Diffraction spikes in a Newton.
The main downside of a central obstruction in a Newton are diffraction spikes. The secondary mirror has to be held in place somehow, so there are some tiny spider vanes that make very bright stars appear not quite realistic (not as points, but as a cross). ONLY the brightest stars – the vast majority of stars appear in a normal way (as points). Some purist may be annoyed by the diffraction spikes, but I like them myself. They are very rare (in a small telescope) and they make a single bright star look very interesting. Here's my own picture of the star Betelgeuse (that was stacked and resized):

Pleas notice that there are different types of spider vanes, but in small Newtonian telescopes the typical type is the “cross” – second to last on this picture:

You can also see diffraction spikes on a mass scale when taking an overexposed picture of Jupiter (usually taken at low magnification):
I think this is the main reason why the edge if a bright planet (especially Jupiter) seems to be a little rough (not completely smooth) even at high magnification.
V.3. Light gathering abilities.
Generally for the same price the reflectors are bigger, which means that they gather more light, so they ate brighter than refractors. It's true because the objective mirrors for reflectors are significantly less expensive to produce than the objective lenses for refractors. In other words: for the same price you get a mirror that is clearly bigger than a lens.
It doesn't even matter that in a reflector a secondary mirror is “obstructing the view” because it blocks only several percent of the incoming light. It's nothing! For example when the central obstruction is 25% of aperture (objective diameter) then the AREA of the central obstruction is only 6.25% (I omitted some elements from the formula for the area because they get reduced anyway):
(0.25*A)^2 / (A)^2 = (0.25)^2 / 1^2 = 0.0625 = 6.25%
The difference due to ANY central obstruction (even a much bigger one) is NOT noticeable AT ALL as far as brightness is concerned. From this topic:
https://www.cloudynights.com/topic/579795-how-much-increase-in-aperture-to-see-a-difference/
you can learn that a noticeable difference (due to a change in aperture) requires around 50% increase in aperture area and a significant difference requires around 100% increase in aperture area. For this very reason I ignore the central obstruction of the Dobson completely throughout this post as far as brightness is concerned (6.25% means practically nothing).
V.4. Cool-down times.
A reflecting telescope needs time to cool down, especially when there is a significant difference in temperatures between indoors and outdoors. It's all about air shimmering around warmer surface when it's cooling down – the moving air spoils the view. On the net I found this quote:
“In general, small refractors cool quickly. Unless the temperature differential is large, a refractor is ready for use within a few minutes after it is set up. A 6” to 10” Newtonian reflector (such as a Dob) may require 30–60 minutes to cool down, depending on the temperature differential, and less if fans are used to expedite cooling.”
Using my Dobson is hilariously enjoyable – I just grab it by the handle, place it on my balcony and go back to my apartment. While the Dobson is cooling down I do whatever I want (usually I eat supper). By the way, a small Dobson doesn't take very long to cool down (around 25 minutes).
V.5. Collimation of reflectors.
Mirrors in a reflecting telescope are NOT mounted in a fixed way. It doesn't matter why, it matters that they are mounted in an adjustable way and from time to time you need to align the mirrors again. This process is called collimation.
For a total newcomer collimation may look like a very troublesome thing and in some cases it is a very troublesome thing indeed – there are LOTS of topics on various astronomy forums where people tell some “hair-raising stories” about collimation, especially of fast/fat Newtons. HOWEVER it turns out that collimating a slow/lean Newton is much easier than collimating a fast/fat one, just because the room for error is much bigger.
In fact I myself had wanted to keep everything as easy as possible, so originally I avoided collimation issues by buying a refractor, but when I finally found the crucial info about easier collimation of a small slow/lean reflector I instantly bought such a telescope myself.
My 114/900 Dobson has a spherical primary mirror that is strongly criticized by some people, but some other people claim that in such a small AND slow/lean reflector it’s not important at all. The spherical mirror actually HELPS with collimation, because such a mirror reflects light rays always in the same way – the curvature is constant, so it's not devastating when it's a little skewed. On the other hand a parabolic mirror has to be aligned/collimated very carefully, which is much more difficult by definition.
To me it's enough when I see (during the collimation process) the whole primary mirror reflected in the secondary mirror – otherwise some light would be lost. So far I haven't even touched the secondary mirror and I only collimated the primary mirror, which was a piece of cake (and actually quite fun). I didn't notice anything negative in my views.
V.6. Upside-down view (Newton) vs mirrored view (refractor).
Another difference is that in my Newton/Dobson the view is upside-down (each direction is reversed: left-right and up-down), while in my refractor the view is mirrored (the direction up-down is correct, but the direction left-right is still reversed).
As far as astronomy is concerned the view upside-down is actually better! Why? Because when I look at a star map all I have to do is to turn my head upside-down and I see what I can see in the telescope. In the mirrored view I can't use this “trick” and I have to use my imagination to “reverse back” the right-left view.
V.7. Mount of a telescope.
There are basically two kinds of mounts of a telescope: alt-azimuth (altitude-azimuth) mount and equatorial (or parallactic) mount. A Dobsonian mount is a kind of alt-azimuth (altitude-azimuth) but instead of a tripod it uses a kind of wooden base:

The alt-azimuth mount on a tripod is light and easy to assemble and operate – there are independent movements up-down and left-right that don't require complex mechanisms or any geographical alignments. The Dobsonian mount is equally easy to operate, but assembling it requires some time and effort. The bright side is that it needs to assembled ONCE and later you don't have to do it at all.
On the other hand, the equatorial mount (always on a tripod) allows you to move your telescope according to the movements of the night-sky objects, BUT it's definitely more difficult to assemble and operate. Moreover the mechanism is much heavier because there has to be a counterweight attached.
No contest – the alt-azimuth mount is MUCH better for a total amateur. Please notice that the equatorial mount with a proper setup allows also the alt-azimuth type of movements, but what would be the point of using such a mount with such a setup? Making the whole setup heavier?
V.8. Low height of a 114/900 Dobson.
My small Dobson is too low for any comfortable seeing, even while sitting on a normal chair. I had to buy some kind of platform to raise my Dobson off the ground.


I had had one folding step in my apartment already, so I had to buy only two more. This solution woks perfectly well for me – I can look into the eyepiece while sitting on a normal chair, no matter which direction my telescope is pointing at.
V.9. Looking almost straight up vs. looking almost horizontally.
I can place my Dobson right next to my balcony guardrail, so I am able to look almost straight up. With a refractor I couldn't do it because the legs of the tripod “pushed” the refractor away from the guardrail.
On the other hand looking almost horizontally through my Dobson is a problem because a balcony guardrail is the way. Even when I place it on the above platform the balcony guardrail still forces me to discard all the night-sky objects that are rather low above the horizon (less then 17 degrees). Well, it has an upside too – I save some time and avoid possible disappointments (when night-sky objects are very low over the horizon – there is simply too much air/atmosphere in the way, so they are much less visible then).
The Dobson is much more versatile as far as eyepiece placement is concerned – no matter which way I point it I can sit on the same chair. Please, just look at these pictures that I took inside my home:


On the second picture I added a normal chair that I use on my balcony. As you can see the Dobson can be used on any target (quite low and quite high over the horizon) with the same chair, while the refractor can't. If I set the tripod for the refractor high enough to sit on the chair while looking at a target that is quite high over the horizon then if I changed for a target that is quite low over the horizon I would have to stand.
My Dobson, being a small one, is UNIVERSAL in this regard, unlike the refractor. Usually people complain about Dobsons, but such complaints are true only for big Dobsons that are very tall – apparently it's the price you have to pay for having a telescope with HUGE aperture.
V.10. Background/foreground color.
When I compared my telescopes side-by-side I noticed that the background (or rather foreground) in the refractor at 4mm exit pupil (more on that later) seemed slightly brighter/more bluish than in the Dobson at 5mm exit pupil (the same eyepiece). I have no idea why – theoretically a bigger exit pupil should make the same background/foreground brighter, not darker (more on that later). I think it had something to do with the refractor being achromatic and “scattering” blue/purple light from the light pollution, but I am not completely sure.
V. 11. Refractor vs. Newton – summary.
If I had to choose only one telescope from the ones that I own, I would choose 114/900 Dobson, simply because it gathers more light than 70/700 refractor (more on that in the next point). It's also much more comfortable when looking at objects that are very high above the horizon.
VI. Numbers and calculations (telescopes, eyepieces and their combinations).
It's important to understand some basic terms because you can describe a particular telescope by giving a few different values. A particular eyepiece can also be described by giving a few different values. Moreover, when you combine a particular telescope with a particular eyepiece you achieve particular results that can be described by giving some additional values. If you want to understand how a telescope works (together with an eyepiece) you have to do some math, like it or not.
A quote comes to my mind: “It was my understanding that there would be no math”.
VI.1. Aperture = objective lens (or mirror) diameter of a telescope.
Aperture describes in a simplified way the light gathering abilities of a telescope (or binoculars), HOWEVER what really matters is the AREA of aperture. Generally the bigger the aperture (area) the better/brighter the telescope (at the same magnification).
You can compare different aperture in a very easy way when you ignore some elements from the formula for the area that get reduced anyway:
(A1/A2)^2
For example let's compare aperture of my two telescopes (114/900 Dobson and 70/700 refractor) one way and then the opposite way:
(114/70)^2 = 2.652
(70/114)^2 = 0.377 (= 1/2.652)
The first value means that the area of the bigger aperture is 2.652 times bigger than the area of the smaller aperture, which means that it's bigger BY 165.2%. The second value means that the area of smaller aperture is 37.7% of the area of the bigger aperture, which means that the area of smaller aperture is smaller by 62.3% (1-0.377 = 0.623).
If you’re interested the math behind this “conversion” is this:
1.652/(1+1.652) = 0.623 (rounded)
0.623/(1-0.623) = 1.653 (rounded)
Please notice that the assumption about the same magnification is very important because brightness would be otherwise different (more on that later – in the part about the exit pupil).
In a bigger telescope you can use bigger magnifications (and the view will be still bright enough) AND the resolution is also better (so you can see smaller details).
VI.2. Focal length of a telescope = distance from the objective lens/mirror to a place where all light rays come together.
In a refractor or in a Newton it's basically the length of the telescope.


VI.3. Focal ratio of a telescope = focal length of a telescope / aperture.
I prefer to describe my telescopes giving both aperture and focal length in millimeters, for example 70/700 or 114/900. Unfortunately many astronomers describe their telescopes using Aperture and Focal ratio. What's worse some of them, especially in the US, give the Aperture in inches instead of millimeters. Even worse, the notation of the focal ratio is always “inverted” (f/…), which makes it even more confusing.
Please notice that it's all about proportions – for example two different telescopes (70/700 and 100/1000) have the same focal ratio of 10 (700/70 = 1000/100 = 10), which is written as “f/10”. I hate this “inverted focal ratio notation” with a passion.
Another thing connected with the focal ratio that annoys me very much is the fact that it is common to describe some telescopes as “slow” (f/8 and “above”, so f/9, f10 and so on) or “fast” (f/5 and “below”, so f/4, f/3 and so on).
Here's a description that I found on the net:
“The terms fast and slow in reference to focal length come from photography and make more intuitive sense when applied to telescopes used for astrophotography. To take an image of the night sky, your DSLR or CCD collects photons of light. The trick to good astrophotography is to catch as many photons as you can as quickly as possible. Speed is important because longer exposures increase the risk of noise in the image sensor and your telescope drifting off target.”
I don't really care about the reference to photography and from my point of view the focal ratio basically tells me if the telescope is “fat” (fast) or “lean” (slow). The only things I have found really useful about the focal ratio are these (I already mentioned them):
1) in a slow/lean telescope light rays are less bent, which minimizes potential problems with aberrations, false colors, coma and things like that,
2) collimating a slow/lean Newtonian telescope is much easier than collimating a fast/fat one, just because the room for error is much bigger.
VI.4. Weight of a telescope.
To me this is by far the biggest limiting factor when buying a telescope. Whenever I start thinking about buying a telescope with bigger aperture, I am stopped by the thought of its weight. The smallest slow/lean Dobson that has bigger aperture than mine weighs TWICE as much! A slow/lean refractor that has bigger aperture than my Dobson needs a very heavy tripod to be stable, so overall it weighs is also TWICE as much as my Dobson!
These are all the numbers that describe a telescope alone. Please notice that things like magnification, exit pupil and field of view don't come from a telescope alone, but from a combination of a telescope and an eyepiece.
VI.5. Different values of an eyepiece.
An eyepiece looks like a small tube with lenses that you insert into the part of a telescope that is called focuser or focus tube.
Every eyepiece has its own values for:
1) focal length of a telescope,
2) apparent field of view of an eyepiece,
3) eye relief of an eyepiece.
Focal length of an eyepiece is similar to a focal length of a telescope and it's the most important value for an eyepiece. Examples are given in the next point (about magnification).
Apparent field of view of an eyepiece basically says if it's a wide-view eyepiece, a standard view eyepiece or a narrow-vie eyepiece. Examples are given in the point VI.6. Field of view (FOV).
Eye relief of an eyepiece says at what distance from the eyepiece you have to hold your eye in order to see the whole field of view. Examples are given in the point VI.7. Exit pupil and eye relief.
VI.6. Magnification.
Magnification = focal length of a telescope / focal length of an eyepiece
The shorter an eyepiece the bigger the magnification. For example my 70/700 refractor came with two different eyepieces:
1) a 25mm eyepiece that gives the magnification 28x (700/25),
2) a 10mm eyepiece that gives the magnification 70x (700/10).
The same eyepieces give different magnifications with a different telescope. For example in 114/900 Dobson:
1) a 25mm eyepiece gives the magnification 36x (900/25),
2) a 10mm eyepiece gives the magnification 90x (900/10).
As you can see, the “longer” a telescope the bigger the magnifications with the same eyepiece.
I have to repeat some things that I already mentioned in the point I (in all the sub-points):
1) at higher magnification the moons of Jupiter can appear much closer to the planet (and much closer to each other) and still be discernible,
2) increasing magnification makes more stars visible,
3) some relatively bright stars appear very close to each other, so they can be separated only at high magnification (otherwise they appear as a single star),
4) the higher the magnification the more details of the Moon you can see.
I used to think that magnification is almost exactly like shortening the distance to a particular object, HOWEVER after I saw the pictures below I realized that this is NOT the case.


So, the amount of light rays entering a telescope does NOT depend on magnification because the real distance doesn't change. Pretty obvious, isn't it? Yes, it is, but it's not obvious why higher magnification makes more stars visible. More on that later – in the part about contrast.
Magnification influences both the field of view and the exit pupil. These three things should be ALWAYS analyzed together!
VI.6. Field of view (FOV).
Some people say/write “true field of view”, but it's the same as simply “field of view”.
Field of view (FOV) = apparent field of view of an eyepiece (AFOV) / magnification
Both my small telescopes use 1.25-inch eyepieces and standard such eyepieces have the AFOV of around 52 degrees:
1) magnification 28x gives the FOV of 1.86 degree (52/28),
2) magnification 36x gives the FOV of 1.44 degree (52/36),
3) magnification 70x gives the FOV of 0.74 degree (52/70),
4) magnification 90x gives the FOV of 0.58 degree (52/90).
Obviously the bigger the magnification the smaller the field of view. It's actually quite natural – when you use bigger magnification you see a smaller part of the whole picture, so you look through a narrower path, hence narrower field of view. As simple as that. This general rule can be slightly “bent” by using wide-view eyepieces (eyepieces with bigger apparent field of view).
Interestingly it's easier to understand and explain narrow-view optics, so wide-view optics are simply a “reversed” case. To generate examples I used this awesome site:
https://www.stelvision.com/en/telescope-simulator/
I simulated what can be seen in a 70/700 telescope. The second picture in the first example is only theoretical because there is no narrow-view 25mm eyepiece available, but it greatly helps to explain the concept.
Please, remember that you can open all the pictures in different tabs and switch between the tabs to see the differences better.
1. The same magnification, but different optics.
Normal-view (AFOV 52 degrees) 25mm eyepiece (magnification: 28x)

NARROW-view (AFOV 43 degrees) 25mm eyepiece (magnification: 28x)

It's like looking at the same picture, but in the narrow-view you are looking through some kind of tube/tunnel (the example pictures are exaggerated in this regard). Some people claim that this “looking through a tunnel” effect is annoying to them, but I myself bought a 40mm eyepiece with apparent field of view of just 43 degrees (after hesitating for several months) and I don't see this "tunnel" effect AT ALL, probably because the field of view is overall very big (for a telescope).
In fact a problem of "tunnel" effect, but for a whole different reason – in some cheap SHORT NORMAL-VIEW (AFOV 52 degrees) eyepieces I can't see the whole theoretically possible field of view simply because the eye relief is too short. It annoys me VERY much because I'm loosing something (that is theoretically possible) and this is the main reason why I stopped using a 10mm eyepiece completely (nowadays I use a 15mm or a 20mm wide-view eyepiece combined with a Barlow lens – more on that later).
When the idea is reversed the second picture could be considered as the normal-view and the first picture could be considered as the wide-view. So, a wide-view is like looking through a shorter tube/tunnel (the example pictures above are exaggerated in this regard), which in practice means that you can see a bigger picture. A daytime example would be like this:

In this example you can see that everything is of the same size, so the magnification in wide-view optics is the same, but you can see a little more. In telescopes it's really important only at high magnifications, when the field of view is really small.
2. Different magnifications, but the same optics.
Normal-view (AFOV 52 degrees) 25mm eyepiece (magnification: 28x)
Normal-view (AFOV 52 degrees) 32mm eyepiece (magnification: 22x)

It's like looking at similar pictures, but taken with different zooms – on the picture taken with less zoom everything is smaller, but you can also see some additional things on the sides of the picture. Pretty natural concept, right?
3. Different magnifications and different optics + wider FOV.
Normal-view (AFOV 52 degrees) 25mm eyepiece (magnification: 28x)
NARROW-view (AFOV 43 degrees) 40mm eyepiece (magnification: 17.5x)

It's like looking at similar pictures, but taken with different zooms AND in the narrow-view you are looking through some kind of tube/tunnel (the example pictures are exaggerated in this regard). In THIS combination on the second picture you can still see some additional things on the sides of the picture, but everything is smaller.
4. Different magnifications and different optics + the same FOV (more or less).
Normal-view (AFOV 52 degrees) 32mm eyepiece (magnification: 22x)
NARROW-view (AFOV 43 degrees) 40mm eyepiece (magnification: 17.5x)
Again it's like looking at similar pictures, but taken with different zooms AND in the narrow-view you are looking through some kind of tube/tunnel (the example pictures are exaggerated in this regard). However in THIS combination it's almost like looking at the same picture (the field of view is almost equal) but the in narrow-view the picture is held farther away from your eyes, so the picture and everything on the picture looks smaller. Strange, isn't it?
So, what's the point of using the narrow-view 40mm eyepiece instead of normal 32mm eyepiece? The difference lies in the exit pupil – in the narrow-view 40mm eyepiece the exit pupil is bigger (the view is brighter) because the magnification is smaller (see the next point).
Theoretically the usefulness of this “move” is very limited under light-polluted skies because magnification is generally more important then, HOWEVER when I bought a 40mm eyepiece with apparent field of view of just 43 degrees (after hesitating for several months) and I compared it to my 32mm eyepiece side-by-side (or rather one after another) I realized that in my 114/900 Dobson I actually prefer the 40mm eyepiece because for some reason it's easier to maintain a proper eye placement. In case of my 70/700 refractor the 32mm eyepiece is a little better because the background is visibly darker (I'm not quite sure why this effect is much smaller in my Dobson – the background is already “dark enough” in the 40mm eyepiece).
VI.7. Exit pupil and eye relief.
Exit pupil = aperture / magnification
The meaning of the exit pupil is by far the most difficult thing to grasp and to explain, so please concentrate.
Basically the exit pupil is a diameter of a “beam of light” that exits a telescope (or binoculars). This “beam of light” enters a human eye pupil, so when the beam is very narrow then the view is very dark. The broader the beam the brighter the view (because more light enters the human eye pupil), BUT there is an upper limit (the size of the human eye pupil).
Please notice that this “beam of light” concept is actually a simplification. Let's refresh the example how the exit pupil works:
Totally mind-blowing! Please notice that every point at the exit pupil contains light rays coming from ALL the objects in view! You can verify this fact by looking through any kind of binoculars while covering half of the objective lenses – you will still see the whole view (NOT half of it), but the whole view will be half as bright. Here is a fascinating discussion on this topic:
https://www.cloudynights.com/topic/603397-a-basic-exit-pupil-question/
This quote is awesome: “And on your part, I want to thank you for your honest and concerted effort to understand this confusing issue. I can tell you in the Astromart thread I referenced earlier, members whose names are well known here gave Alan French quite a battle before they finally grasped the concept. At the time, I was merely a bystander...”
By the way: here's a picture of what happens when light rays enter human eye:

So, ALL light coming from a particular star is concentrated on the retina, where an upside-down image is formed (and then reversed by the brain).
If the eye has a vision defect all light from a particular star is concentrated at the wrong place, so the star gets blurred (more or less, depending on the severity of the vision defect):

There is another cool “experiment” that you can do with a pair of binoculars to further understand the concept of exit pupil and by the way to understand the importance of big eye relief.
Please, slowly move your eyes away from your binoculars (or move your binoculars away from your eyes/head). The view will NOT get dimmer AT ALL (quite surprising), BUT the field of view will get smaller and smaller (kind of natural).
All the examples are for a Newton (the view is upside-down), but binoculars “handle” light rays in a similar way (but the view is not upside-down). In the examples below the “red light rays” go into the objective lens “from above”, but the same light rays go into the exit pupil “from below” and this is why the view is upside down.

The correct distance at which the human eye pupil should be places is called eye relief – you can see all of the “available” field of view ONLY from there. With a yellow line I marked a human eye pupil that is placed incorrectly (very far away from the eye relief).
As you can see when you move your eye very far away from a telescope eyepiece (or from your binoculars) without any up or down movements then you can't see the “blue light rays” nor the “red light rays” at all. On the other hand you can still see ALL of the “green light rays” and this is why what you can still see an object that is straight ahead as bright as possible.
The next step in this “experiment” is to move your eyes (head) upwards – the view will NOT get dimmer AT ALL, but you will see another object in the field of view. In case of binoculars the (narrow) field of view (as a whole) will shift downwards (a natural movement).
In case of a Newton the (narrow) field of view (as a whole) will shift “upwards while the view is upside down” (a counter-intuitive movement):

As you can see when your eye is very far away from a telescope eyepiece and you move it up then you can't see the “blue light rays” nor the “green light rays” at all. On the other hand you can still see ALL of the “red light rays” and this is why what you can still see an object that is at the top of the view as bright as possible.
Please notice that during the movement (eye/head moving up) the “red object” (that is up in normal view) in case of Newton “appears from the bottom” (because the view is upside-down). Moreover during the movement you can see only a part of “red light rays”, so the “red object” is vignetted (not fully bright) at first.
VI.8. Comparing exit pupils = comparing brightness of the view.
ATTENTION! Comparing brightness of the view is all about comparing objects that are more or less diffuse (not stars). Interestingly it includes also the BACKGROUND (and the foreground in the form of light pollution), which is connected with the concept of contrast – more on that later.
Comparing exit pupils (precisely speaking: comparing their areas) is like comparing brightness of the view. This is another thing that is a little counter-intuitive about binoculars and telescopes. Some people think that when aperture is bigger then the view is always brighter, but this is NOT true! It's true when magnification is the same, but changing magnification also changes the exit pupil, so it changes the brightness of the view as well.
When magnification is increased then the view gets darker. Why? Because at bigger magnification any diffuse object looks bigger, so it looks more “stretched”. When an objects looks more stretched all the light rays that come from the object are more “spread out” (the amount of light rays doesn't change), so the object looks dimmer.
If you don't believe me then look at a diffuse object (for example the Moon) with a long eyepiece (small magnification) and then change the eyepiece for a much shorter one (much bigger magnification). The object will definitely look dimmer, which is actually good for very bright objects like the Moon or the planet Jupiter.
Let's repeat the formula for exit pupil:
Exit pupil = aperture / magnification
It's actually a little time consuming to first calculate two different exit pupils and then to compare their areas, but there is a much easier way to compare brightness of equipment (even between telescopes and binoculars):
EBC – equipment brightness comparison
M – magnification
A – aperture
EBC(M1xA1; M2xA2) = (M2/M1)^2 * (A1/A2)^2
I used the notation MxA just like it is used in binoculars (for example 12x60). My formula works also for a telescope because it’s just a different (greatly simplified) way of comparing exit pupil areas. I described it in detail here:
Binoculars and spotting scopes brightness comparison
Any combination is possible – let's see some examples with round values:
1. Bigger aperture (200 vs. 100) + THE SAME magnification (M1=M2) = brighter view.
(M2/M1)^2 * (A1/A2)^2 = 1^2 * (100/50)^2 = 4
So, when aperture is twice as big, with the same magnification, then brightness is 4 times bigger.
2. The same aperture/telescope (A1=A2) + lower magnification (50x vs 100x) = brighter view.
(M2/M1)^2 * (A1/A2)^2 = (100x/50x)^2 * 1^2 = 4
So, when magnifications is 50% smaller, with the same aperture, then brightness is 4 times bigger.
The points 1 and 2 show that theoretically instead of buying bigger telescope you can simply use lower magnification (the brightness increase is the same), HOWEVER any target looks 50% smaller in BOTH dimensions (height and width), so 75% smaller as far as area is concerned. Moreover in a bigger telescope you can use bigger maximum magnification (when the view will be still bright enough) AND the resolution is also better (so you can see smaller details).
3. Bigger aperture (200 vs. 100) + bigger magnification (100x vs 50x) = the same brightness.
(M2/M1)^2 * (A1/A2)^2 = (50x/100x)^2 * (200/100)^2 = 0.25 * 4 = 1
This is why bigger telescopes are clearly better – you can see with the same brightness a target twice as big in BOTH dimensions (height and width), so FOUR times bigger as far as area is concerned!
VI.9. Brightness of the view (in a telescope) vs. brightness of a night-sky object (surface or total).
The term brightness is very broad, so you have to watch out which brightness you are talking about. Let's analyze this issue on the example of the Moon – the naked eye view vs. a telescope view.
As far as total brightness is concerned the Moon is brighter, especially at low magnification, but as far as surface brightness is concerned the Moon in a telescope is NEVER brighter (it can be only equally bright).
Imagine the Moon as a bright spotlight (ONE spotlight). By using a telescope at magnification of just 20x you see the Moon (its AREA) bigger by 400x (20x20). At such a low magnification (20x) the exit pupil in any telescope should be quite big, so it’s like looking at 400 spotlights right next to each other. This is why the Moon looks/is brighter – the total brightness is MUCH bigger, even if a single “telescope spotlight” is a little less bright than the naked-eye (ONE) spotlight.
Here's a double example that works best when it’s dark and the pictures are enlarged (preferably opened in new tabs):


The big Moon on the second picture above is much more “blinding” (much brighter as far as total brightness is concerned), even though its surface brightness is actually a little lower than on the first picture.
VII. Contrast.
The meaning of contrast is one of my newest “discoveries” as far as astronomy is concerned. It explains why increasing magnification makes more stars visible, but why it works this way is not really obvious.
VII.1. Contrast – general info.
I will start with some things that you can verify yourself, even in a city with big light pollution. For example the brightest planets and the brightest stars can be seen even around sunset when the sky is still quite bright. There is no light pollution at that time but the sunlight is still scattered in the Earth's atmosphere all around you. The brightest planets and the brightest stars can be seen even then simply because they are so bright that they stand out from the still bright early-evening sky.
The same planets and the same stars (plus some other stars too) can be seen in the middle of the night even in biggest cities with huge light pollution for exactly the same reason – they are so bright that they stand out from the relatively bright night-sky.
It's all about contrast – the brighter a planet/star the easier it can be seen on a given background. In case of sunlight (around sunset) or light pollution (during the night), that is scattered in the Earth's atmosphere, the background is rather the foreground – it's like a thin curtain of scattered light that is IN FRONT of the stars and other night-sky objects.
A weak contrast is when a star is not much brighter than the background/foreground – it's much harder to spot such a star then. When the brightness of a star is the same as (or weaker than) the brightness of a background/foreground you cant's see it at all because it can't be “singled out” from other light rays.
VII.2. Space is never completely black.
Another concept hard to grasp is that even in space (without the atmosphere) the background (not foreground) of the night-sky is never completely black. There are always some light rays that come from stars, galaxies or other space objects that are very far away, so they can't be seen individually. Let's refresh these two pictures:
Human eye can't see a particular star when there are too few light rays from the star going into the eye. It's true both while looking at the night-sky with the naked eye and while using a telescope. Even though very distant stars can't be see on their own, their light rays accumulate to some extent. A perfect example is the Milky Way, understood not as our whole galaxy but as a patch of light on the night sky. Unfortunately it can't be seen from light-polluted cities, so I have to show you a picture:

This patch of light is actually the disc of our galaxy, seen from within along the plane of the disc, while the biggest part of this patch of light is the central part of our galaxy. Most of the stars in our galaxy are so far away from the Earth that individual stars can't be seen, but you can see the accumulated light coming from billions of stars that are there.
The number of stars in other directions of our galaxy (not along the plane of the disc, but a little above or a little below the main disc) is much smaller, so you can't see any accumulated eye with the naked eye, but some stars are still there.
By the way: I think that naming our galaxy as the Milky Way was a moronic idea because now we have two different things that are called exactly the same way. One thing is the patch of light on the night-sky (the original meaning of the phrase Milky Way) and the other thing is our whole galaxy, that consists not only of the stars along the galactic plane, but also of stars located above or below the disc, including stars that are relatively close to the Earth that can be seen all over the night-sky as “normal” (single) stars. I HATE this name for our galaxy!
In other directions than the Milky Way, understood as a patch of light on the night-sky, there are not only “invisible” stars from our galaxy, but more importantly there are other whole galaxies. In fact there are MANY more galaxies than you can even imagine! One of the most famous space photos (“Hubble Ultra-Deep Field”) was actually taken in a direction that was practically EMPTY and this is what was hiding there (click to enlarge!):

Most of the objects on the picture are galaxies! Totally unbelievable! But it's not the point. The point is that the background of the night-sky is NEVER completely black. It's more like a “soup of light” consisting of light rays coming from many different sources.
Light pollution makes the background (or rather the foreground) of the night-sky MUCH brighter and it resembles a “soup of light” even more. The (many different) sources of artificial light are much closer to the observer, but you can't see particular street lamps in the sky. What you see as light pollution are light rays that were sent upwards (for example by a street lamp), then they were scattered in the atmosphere and then some of them returned back downwards.
VII.3. Contrast when increasing magnification.
When you increase magnification two things happen simultaneously:
1) the background/foreground gets darker,
2) field of view gets smaller, so you can see a smaller portion of the night-sky.
Both things are important as far as contrast is concerned, but for different reasons.
VII.3.1. Contrast when increasing magnification – darker background/foreground.
When you increase magnification (in a particular telescope) all the different individual sources of light (that are too far to be seen individually) are stretched away from each other, so all the light rays (from different sources) become less concentrated and the background gets darker.
The stars that are relatively close to the Earth that previously were equally bright as the background now (after increasing magnification) become visible simply because their light rays are still concentrated in a point (the stars are too far away to see their disks even at very high magnifications), so they are not stretched (they don't dim), while the background gets darker (because it's stretched).
Here's a visual double example – the “star” is equally bright on both pictures, but background is different:


Please notice that increasing magnification under light-polluted skies gives more “visible” results because there are more “random” light rays there, so the background (or rather the foreground) gets visibly darker. Under very dark skies (without light pollution) the effect is still there (more stars appear) but the difference is not as big because the background is already very dark even at low magnification.
Please remember that under very dark skies you can see MUCH MORE stars OVERALL (even at low magnification) because the background is much darker and this is why astronomers LOVE dark locations.
VII.3.2. Contrast when increasing magnification – smaller field of view.
Increasing magnification (in a particular telescope) can be problematic as far as relatively large night-sky objects are concerned. I will show it on the example of the Andromeda galaxy.
Here's a very good picture of M31 that represents an awesome view under very dark skies:

The whole picture shows what can be seen at a very low magnification of around 20x. The yellow square shows what can be seen at magnification 5 times bigger (100x).
When magnification is increased from 20x to 100x than the drop in the brightness of the view is 96% ((20x/100x)^2 = (1/5)^2 = 0.2 * 0.02 = 0.04 = 4%). Here's a rough simulation:

At the higher magnification the background is not really a background, but just a part of the galaxy (even the area in the bottom right part of the second picture) and the difference in brightness between the core and the part of galaxy around the core is relatively small – this is why the contrast is weak.
Please notice that the drop in brightness is so big that under light-polluted skies, especially in a small telescope, you would see ONLY the core and the part of galaxy around the core would look almost completely black (it would look like a “classic” background). At low magnification under light polluted skies the view of the galaxy is destroyed by the bright foreground, so you can see only the core anyway.
VII.4. The same contrast when increasing aperture without increasing magnification.
When aperture is increased (when you use a bigger telescope) and magnification stays the same everything is brighter, including the background/foreground, so the contrast theoretically stays the same. HOWEVER, when a star is brighter it's easier to see it even on equally brighter background/foreground:


Increasing aperture DOES make more stars visible even if the contrast (the ratio of brightness) stays the same. Why? Because the ABSOLUTE difference becomes bigger. For example the difference between values 3.0 and 2.0 (1.0) is bigger than the difference between values 1.5 and 1.0 (0.5), even though the ratio stays the same (3.0/2.0 = 1.5 = 1.5/1.0).
VII.5. Contrast at the same exit pupil = comparing contrast of different telescopes.
As far as stars (and other point-like objects) are concerned, comparing contrast of different telescopes is like comparing their apertures, but it's a little complicated why.
Let's refresh calculations from the point VI.1. Aperture = objective lens (or mirror) diameter of a telescope for comparing 114/900 Dobson to 70/700 refractor, using my full formula for brightness from the point VI.8. Comparing exit pupils = comparing brightness of the view:
(M2/M1)^2 * (A1/A2)^2 = (1/1)^2 * (114/70)^2 = 1 * 2.652 = 2.652
As far as brightness is concerned this value means that at AT THE SAME MAGNIFICATION the brightness of the view in the bigger telescope is 2.652 times bigger.
As I already mentioned in the previous point, at the same magnification everything is brighter, including the background/foreground, so the contrast theoretically stays the same. However, in the bigger telescope you can greatly increase magnification before the brightness of the view falls down to the level of the smaller telescope. For example almost exactly the same brightness is achieved:
1) in 70/700 refractor at magnification 28x,
2) in 114/900 Newton/Dobson at magnification 45x.
(28x/45x)^2 * (114/70)^2 = 0.3872 * 2.6522 = 1.0269
At such combinations the difference in brightness of the view is ONLY 2.7% which is completely undetectable as far as diffuse objects are concerned. HOWEVER, as I described in the point VII.3.1. Contrast when increasing magnification – darker background/foreground, the stars (and some other point-like objects too) are so far away that they are not stretched even at very high magnifications, so they don't dim.
It means that the stars in the bigger telescope at the magnification 45x are still 2.652 times brighter, while the background gets as dark as in the smaller telescope at magnification 28x. This is why the contrast in the bigger telescope is 2.652 times bigger (at the same exit pupil).
This effect is much better than the effect that I described in the previous point VII.4. “The same contrast when increasing aperture without increasing magnification” – brighter stars are easier to see even on a brighter background/foreground (with the same contrast). So it's best to increase aperture (use a bigger telescope) AND increase magnification at the same time.
VII.6. Contrast with diffuse objects.
As I already described, increasing magnification improves contrast by darkening the background/foreground, but the effect is best with stars and other point-like objects.
However, there are numerous diffuse objects that are “improved” by higher magnification. Most importantly there are globular star clusters that usually have a very bright core. There are also some galaxies with a very bright core, but there are less of them. Some nebulas also handle improved magnification well, but only a few of them are visible in a small telescope.
VIII. Various tips and comments.
I described many things in details in previous points, but here I would like make some additional tips and comments.
VIII.1. Long eyepiece = the most important eyepiece for a newcomer.
I myself, even with my decent experience, still use the longest eyepiece the most, simply because the filed of view is the biggest then. For a newcomer it's a must! It's either 32mm eyepiece or 40mm eyepiece – the filed of view is almost exactly the same because the 40mm eyepiece has a smaller AFOV (search above).
VIII.2. Good “medium” eyepiece = the best eyepiece overall.
From my experience I can say that the best medium eyepiece for a small telescope is a wide-view medium eyepiece that allows a good enough magnification (of around 45x), but still gives an exit pupil of around 2.0mm +/- 0.5mm. Such an eyepiece should also have a comfortable eye relief (of at least 14mm). It's either a 20mm or a 15mm eyepiece.
In my 114/900 Dobson either eyepiece is very good, but in my 70/700 refractor a 15mm eyepiece is clearly better because it offers higher magnification (47x), while a 20mm eyepiece is “not powerful enough” (only 35x).
VIII.3. No good “high power” eyepiece.
As far as short eyepieces are concerned there two big problems. The most obvious one is very small exit pupil – only the Moon and the brightest planets look enjoyable then. To me even stars (point-like objects) look worse – the brightest ones look kind of weird, kind of “hazy”(it probably has something to do with my own eye defect).
The second problem is actually more important – very short eye relief. I myself literally HATE standard 10mm eyepieces – the eye relief is so small that I am afraid that I will touch the objective lens with my eyelashes. This is why I hold my eye farther than the eye relief, so the “real field of view” is actually smaller than theoretically possible. And this is why I stopped using 10mm eyepieces completely!
Instead of using “high power” (short) eyepiece I use a “medium” (wide-view) eyepiece together with a Barlow lens (2x, 2.5x or 3x, depending on the Barlow). This way I obtain high or very high magnification (for a small telescope) with a relatively big field of view AND I still retain good (long enough) eye relief! Perfect!
VIII.4. Small telescope vs. expectations.
Some people have some unrealistic expectations about small telescopes because some Internet sites, including some online astronomy shops, state that you can see many Messier objects (object from the Messier Catalogue) even in small telescopes. It's true, HOWEVER please remember that the word “see” in this context should be understood as “I see that I can see something”, which is better than “I can’t see the object at all”.
What’s worse some Internet sites give you “examples” of what you can see by showing pictures taken with long exposure time (that are additionally stacked and processed), which is is extremely misleading for total amateurs! On the picture below there is a comparison how the M13 (Hercules Globular Cluster) looks in binoculars (the very first example) and several different telescopes.

By the way: the vast majority of the photos of night-sky objects you can find on the net are not really “true photos” but they are hundreds or even thousands of different photos averaged/stacked together and heavily processed. There is NO WAY to see anything like this with your own eyes even in a big telescope.
Please notice that the most famous catalog of astronomical objects – the Messier Catalogue was created only because these objects were blurry and could be mistaken for a comet! Moreover there was hardly any light pollution in those times (18th century), so they were blurry under very dark skies!
VIII.5. Angular sizes/distances given in arcminutes and/or arcseconds.
I regularly have trouble imaging an angular size/distance given in arcminutes and arcseconds, so I prepared a cheat sheet with basic examples. I did it for myself, but it may be useful also for total newcomers, so I post it here. Click to enlarge.

VIII.6. Filters.
In short: filters are fun little gimmicks that get boring pretty quickly and there are two worth buying.
By far the best overall filter for visual use is the green/light green #56 filter (light transmission 53%). I enjoy this filter very much while looking at Jupiter (best details, at least to me) and also at the Moon (very relaxing color). Unfortunately it's a little weaker for astrophotography with a smartphone.
The only other color filter worth buying is the dark yellow #15 filter (light transmission 66%) – in my 114/900 Dobson the color is actually light-orange. The Moon looks a little like Mars and the view was much more interesting than the typical gray view of the Moon. It's great both for visual use as well as astrophotography with a smartphone.
The most important goal of using a filter is too make the view dimmer without changing magnification (gray filters) OR to block some light wavelengths (color filters). The views are much more interesting at much higher magnifications, so a gray filter is in fact almost completely useless in a small telescope. The only exception is the planet Venus seen in a Newton/Dobson – the planet is so bright that the diffraction spikes may spoil the view even at high magnification, especially if the phase of Venus is relatively “poor”. I think the green filter (plus a high magnification) should be enough, but I actually didn't try it because for Venus I used my Mak or my refractor.
Here's some info about other inexpensive filters:
1. Out of curiosity I combined the dark yellow #15 filter and the yellow #12 filter (light transmission 74%), but the results were quite similar to the dark yellow #15 filter alone (some examples below were made with this combination). The problem was that I didn't like how long an eyepiece is when it's combined with two filters at the same time
2. The blue #80A filter (29% light transmission) is too "cold" for visual use, especially while looking at the Moon. The color is actually piercing light-blue and it's much brighter than the light transmission 29% suggests. Even while looking at Jupiter it's worse than the green/light green #56 filter. It's not great for astrophotography with a smartphone either because there is lots of dark noise. Only the Moon looks good on smartphone pictures with this filter, but the view is still kind of cold. As I prefer visual observations I stopped using the blue #80A filter completely.
3. The "orange" #21 filter (light transmission 46%) looks rather red-orange (instead of pure orange), even while looking at the Moon, but I realized this fact only after buying the dark yellow #15 filter. In fact my "orange" #21 filter looks more red than orange during daylight, but I have to point out that on the net I found some pictures of other orange filters that look actually truly orange during daylight, so they should be better also during night. My "orange" #21 filter is simply terrible for astrophotography with a smartphone because the pictures are even more red than orange. I stopped using the "orange" #21 filter completely.
Below there are my own photos of the Moon (most of them cropped and/or resized) taken with a smartphone at very low magnifications (this is why they lack details).
The filters green/light green #56, blue #80a, combination of dark yellow #15 and yellow #12 (light orange) and “no filter” – click to enlarge:
%20and%20no%20filter.jpg)
The dark yellow #15 filter (shorter exposure time is helpful to achieve the orange color) – click to enlarge:

My #21 “orange” filter with different settings for ISO and/or exposure time (it's impossible to take a single good picture with a smartphone with this filter) – click to enlarge:
.jpg)
VIII.7. Forget about a toy finder scope!
Seriously, you should forget about a toy finder scope that comes with a small telescope. I attached it to each of my telescopes once and I will never do it again. It's simply too weak when looking from my balcony, with all those street lights blinding me. Moreover I have no patience for aligning a finder just to realize that it gets misaligned again. All that matters to me is the telescope itself.
As my finder scope I use my 8x42 binoculars, but the truth is that ANY binoculars should be good enough. If you don't have any binoculars then you should rely only on the stars that are visible with the naked eye. You have to rely on them even while using binoculars because you have to use some kind of reference point anyway.
The problem is that it's very hard to point a telescope in exactly the same direction as binoculars just a moment ago. The angles are totally different unless you sit down with your butt on the ground and aim binoculars along the tube of the telescope. It's relatively easy to do with a refractor and much more difficult with a Dobson. Either way, a total amateur needs a long eyepiece that gives the maximum (or almost maximum) field of view. I think that a 32mm eyepiece OR a 40mm eyepiece is a must buy.
In the last point I showed you how to search for some objects with the naked eye even in big light pollution.
VIII.8. Aiming a telescope at the brightest objects.
Even under light-polluted skies there are numerous stars (plus a few planets) that can be seen with the naked eye, so you can find your way without binoculars. The first step is obviously to aim at a bright object. In case of a refractor it's a little easier when the bright object is relatively low above the horizon, but when the object is higher above the horizon I actually prefer the Dobson.
I can zero-in on a bright object almost instantly – I simply rest my head against the lower part of my 114/900 Dobson tube and look along the tube. The way I do it, I have to see the object more or less here (I couldn’t find a better picture on the net – the angle should be more horizontal):

Works like a charm because the finder slot never gets “misaligned”. And aiming my Dobson at stars that are high above the horizon is MUCH easier than aiming my refractor.
VIII.9. Use a comfortable chair!
Generally it's a very good idea to place a normal (relatively heavy, but comfortable) chair next to your telescope. To me it was like a God-sent idea because I tried it out when I was looking at the rings of Saturn for the first time ever. The view was simply hypnotizing and I spent LOTS of time in the same position! And right after that I switched to watching Jupiter and its belts and its moons from the exact same spot! It was in 2021, so the planets appeared quite close to each other on the night sky. What a night! Unforgettable!
VIII.10. Stray-light shield.
From my own experience I can say that in case of a Newton/Dobson there are some rare cases when a light from a nearby street lamp reflects from the secondary mirror, or maybe its holding parts, and goes into the focuser tube, washing out the view completely. It's all about pointing a telescope at some particular angles in reference to the street lamps.
On a balcony, with some street lamps close by, it's unavoidable, but a stray-light shield deals with this problem perfectly. Here's my shield that is a total overkill, but I like it:

My shield is very easy to made and very light – it's made from black technical/Bristol paper + a rubber band.
VIII.11. Watch out for differences in temperatures.
1. Cold air + warm telescope.
The cold air that “touches” the warm telescope gets warmer (making the telescope colder), but this warmer air instantly mixes up with the cold air that is farther away from the telescope, so the air close to the telescope is constantly “moving”, similarly to the air over a very hot object during summer. So, it's important to cool down the telescope as a whole.
2. Warm air + cool telescope.
If you wear glasses then you know that when it's cold outside and you go into a warm building the glasses will instantly fog up. If you don't wear glasses then fill an empty glass with ice water – on the outside side of the glass small drops of water will appear. It's all about water condensation. Please, read the long answer on this site:
https://www.reddit.com/r/Astronomy/comments/9c94nu/why_does_my_telescope_get_so_much_condensation/
Please remember that you should AVOID wiping the dew off your eyepieces! You don't want to scratch the eyepieces by accident – there can be some dust or grit on the eyepiece besides the dew that you won't be able to see in the darkness.
VIII.12. Observing conditions are not only about the light pollution!
One night I used my telescope and even though there were no clouds the observing conditions were much worse than previously! I couldn't even clearly see the Orion's Belt with the naked eye! To be honest I had never thought that there could be such a big difference independent from the light pollution. On the net I found the info that “Bad transparency is caused by pollutants in the air, either artificial, natural, or (most often) both.” and “Bad seeing is caused by turbulence combined with temperature differences in the atmosphere”. On this site:
https://www.cloudynights.com/topic/487715-why-does-poor-seeing-happen-or-is-it-poor-transparency/
there is an interesting discussion on this topic.
I found a great site with a complex astronomy forecast:
https://clearoutside.com
This site is great for another reason – you can check at what time starts and ends the astronomical darkness AND you can also see a picture for the whole year! Just click the button “Annual Darkness”.
Los Angeles:

Seattle:

My home city:

Please notice that in my home city during the summer months there are “astronomical white nights” when the night sky is never fully dark because the Sun is too little below the horizon and the astronomical twilight never ends.

A site that is even better for checking the exact times for twilight end, nautical twilight end and astronomical twilight end is this:
https://sunrise-sunset.org
VIII.13. How much are your “astronomy hours” skewed?
Have you ever wondered what does the word midnight mean? The word midnight means literally the middle of a night. Unfortunately in the vast majority of cases the true (astronomical) middle of a night is not at midnight local time. And I am not even talking about daylight saving time!
“Astronomy hours” at some places are simply ridiculous. At some places they are ridiculous only during the DST (daylight saving time – summer time), but in some other places, like the western China, they are ridiculous all year long. On the other hand there are some places where the astronomy hours are perfect all year long.
Here's a very interesting solar noon map that I found on the net (click to enlarge):

The picture is for standard/winter time, but when the DST starts many places go “more red”. In the western Spain during the DST the Sun is highest above the horizon around 2:30PM, so the middle of the astronomical night is around 2:30AM. Interestingly the Great Britain lies at the same longitudes as Spain, but it is in a different time zone, which is much more reasonable.
In China there is no DST, but there is one whole big time zone, so in the western China the Sun is highest above the horizon around 3:00PM, so the middle of the astronomical night is around 3:00AM. Oh, man.
On the site sunrise-sunset.org (link given above) there is info also about solar noon, so you can calculate the true (astronomical) middle of the night right away (+12hours from the solar noon).
VIII.14. Apparent magnitude and limiting magnitude.
Apparent magnitude is a number that shows how bright a particular object appears from a particular place. The lower the number the brighter the object. Here are examples of apparent magnitude as seen from the Earth at maximum brightness:
– full Moon: -12.9
– planet Venus: -4.92
– planet Jupiter: -2.94
– planet Mars: -2.94
– star system Sirius: -1.47
– star Canopus: -0.72
– planet Saturn: -0.55
All the night-sky objects above are extremely bright and can be easily seen with the naked eye even in the worst light pollution. From my own experience I can say that in a small telescope even stars of magnitude around 0.5 still look literally like diamonds in the sky and stars of magnitude around 2 still look relatively bright. Unfortunately weaker stars (magnitude 3 and above) are more and more negatively influenced by light pollution.
The magnitude of the weakest stars that can be seen with the naked eye depends on light pollution and it varies greatly. Without any light pollution the maximum magnitude is 7 or 8 and in the worst light pollution it's less than 4. Interestingly, a small telescope in significant light pollution even at low magnification will show you stars of magnitude clearly over 9 – more than you could ever see with the naked eye even in darkest locations on Earth! The catch is that the field of view in any telescope is extremely small when compared to the field of view of the naked eye, so the “WOW effect” is greatly diminished. But it's cool anyway!
My own record for the weakest star that I saw in my 114/900 Dobson at medium magnification (45x) is barely above 11. I could push that record using higher magnifications, but I don't like the view when the exit pupil is very small.
The maximum magnitude of stars that can bee seen in a telescope is called limiting magnitude and it depends on many different things, not only light pollution. A fantastic telescope limiting magnitude calculator can be found on this site:
https://www.cruxis.com/scope/limitingmagnitude.htm
There is one additional thing to remember – the apparent magnitude of a galaxy, a nebula or a star cluster is NOT the same as the magnitude of a single star (a point-like object). On the net I found these quotes (a question and an answer):
“Is it possible, that I can see apparent magnitude stars of 10 or 11 in my ten inch dob, and not be able to see AM 8 and 9 DSOs?”
“A 1'x1' galaxy at magnitude 10 has a surface brightness of 10 and would be easily seen in a small scope. A 20'x20' face-on galaxy of magnitude 10 has a surface brightness of magnitude 16.2. That 2nd one would be tough in a big scope.
Both have the same Total Integrated magnitude, but radically different surface brightnesses. Since the background sky behaves like a large object and also has a surface brightness, it is the contrast between the object and the sky we see. In the first example, we'd see a white dot against a charcoal background. Easy. In the 2nd example, we'd see a large charcoal patch against a charcoal background. Tough.”
IX. How to find bright night-sky objects.
This point is rather long and old, but the next one is much shorter and it's actually more helpful for finding objects at the threshold of visibility. Here, in this point, I show only a general direction where to look.
In most of the pictures below I used the site stellarium-web.org to simulated the night sky seen with the naked eye in big light pollution by setting the time to an early hour, so most of the stars are NOT visible.
IX.1. Orion's Sword with the Orion Nebula (M42) in the middle.
It's a little below the Orion's Belt. To be honest I didn't notice the Orion Nebula in a small telescope the first time I looked at it, probably because my expectations were too big after I had seen some pictures of the nebula on the net. The nebula can be seen even in binoculars, but only as a little glow (that actually looks cool).

IX.1b. Trapezium.
The Trapezium is a tight open star cluster in the heart of the Orion Nebula. In a small telescope you can see it's main 4 stars even at the magnification 45x, but this asterism (a pattern of stars on the night sky) is very small then. At the magnification 60x (or more) it's much easier to see.
IX.2. Pleiades (M45).
The easiest way to locate them is to find the bright star Aldebaran to the right and a little above of the line of the Orion's Belt and then look 50% farther to the right, roughly in the same direction, but a little lower. The Pleiades are quite spectacular even in binoculars.

IX.3. Hyades (Aldebaran region).
Hyades are right next to the star Aldebaran. Not as spectacular as the Pleiades, but in bigger magnification you can see many more stars.

IX.4. Lambda-Lambda asterism.
The name of this asterism comes from the fact that its shape resembles the letter lambda, and its central star is Lambda Orionis (Meissa) – the “head” of the Orion constellation.

By the way, this asterism is a great way to verify what is the current range of your observing tool. When you buy a telescope you are given its theoretical range, but in the middle of a city with big light pollution you will never see such weak stars. Thanks to this asterism (or rather its main part) you can judge the current range yourself. It works also for binoculars that are NOT given theoretical range at all.
When I was playing around on the site stellarium-web.org I noticed that when very few stars are visible this asterism looks like a mirrored letter L. What's more important the brightest stars appear almost one by one, which is very important to my idea. Here's the crucial part of the asterism seen with a very deep range.

I noted the magnitudes of most the stars in the crucial part of the asterism AND I numbered the 11 brightest ones.

In my 70/700 refractor with the magnification 28x I could see clearly more than 11 stars, so the then range of my telescope was definitely over 9.
IX.5. Andromeda Galaxy (M31) – my first “faint fuzzy”.
In this post:
Binoculars and spotting scopes brightness comparison
I described how to find the Andromeda Galaxy in detail, but you need a big part of the night sky to do it that way. Please notice that I made that post in a totally different time of year, so now this part of the night sky looks almost upside-down, like this:


IX.6. Alpha Persei Cluster (Mirphak region).
The star Mirphak is bright enough to be visible to the naked eye. The first time I have ever looked in that direction in my small telescope the observing conditions were very weak, but the view was interesting anyway.

IX.7. NGC 869 (h Persei) and NGC884 (chi Persei).
Outside a city, under relatively dark skies and through binoculars the Double Cluster looks very good, but it's very small. From my balcony I can't see it with binoculars at all. I did find it in my 114/900 Dobson and it looked better than I expected.
IX.8. M34.
From my balcony I can't see this open star cluster with binoculars at all. I did find it in my 114/900 Dobson. To me M34 looks like a flying bird with a long neck.


IX.9. M35.
From my balcony I can't see this open star cluster with binoculars at all. M35 is high “above” the constellation of Orion. Seeing M35 in my 114/900 Dobson gave me a true WOW effect. Even in my wildest dreams I would never imagine that an open star cluster can look so good from my balcony. The best descriptions that comes to my mind is “rich in stars”.

IX.10. Praesepe (M44).
There is a very easy way to find Praesepe. First of all you should go to the site stellarium-web.org and search for the constellation Gemini (Twins). In big light pollution you won’t be able to see most of its stars, but when you know in what direction to look then you can find the 2 crucial stars – the heads of the twins.


Imagine a line between these two stars and extend this line by around 300% to the left and a little above this line there is Praesepe.

This open star cluster is quite interesting, but the stars are not as bright as in the Pleiades. I found Praesepe with my 12x60 binoculars (magnification x12 and FOV of 5.3 degree), but the view was shaky.
This open star cluster is even better to verify what is the current range of your observing tool than the Lambda-Lambda asterism, especially in my 114/900 Dobson.
IX.11. Coma Berenices Star Cluster (Melotte 111).
This star cluster is rarely mentioned on the Internet, but in the binoculars it's SPECTACULAR! When I saw it in my 12x60 binoculars for the first time I was stunned! I was not prepared for what I saw – it was totally a WOW effect!
Go to the site stellarium-web.org and search for the constellation Leo. In big light pollution you won’t be able to see most of its stars, but when you know in what direction to look then you should be able to find the 4 crucial stars.


Imagine a line between the two top stars and extend this line by around 130% to the left and a little above this line there is the Coma Berenices Star Cluster.

Please notice that the star Gamma Comae Berenices (“15 Comae Berenices”), which is a part of the star constellation Coma Berenices, is on the edge of the Coma Berenices Star Cluster. The best part of this cluster is a little BELOW this star!

In my 12x60 binoculars I could see the whole area above, but in a telescope the FOV is smaller, so you won't be able to see everything at once.
IX.12. Coathanger asterism (Collinder 399)
This asterism really looks like a coathanger! It's relatively easy to find even from my balcony. Go to the site stellarium-web.org and search for the stars Vega and Altair. These stars are one of the brightest stars in the sky, so they are easily visible even from my balcony. The Coathanger asterism is between them, closer to the star Altair, as shown below. There is also a third relatively bright star (marked with yellow circle) that can be helpful, if you can see it.

The third star (marked with yellow circle) is called Albireo and it's actually a double star with a striking colour contrast between the brighter yellow star and its fainter blue companion. It was visible even in my 114/900 Dobson!
IX.13. Hercules Globular Cluster (M13) – another “faint fuzzy”.
The M13 is the first night sky object that I found after simulating light pollution for a particular hour of observations thanks to the free program Stellarium. Previously, when I was using the website stellarium-web.org, I was simulating light pollution by setting the time to an early hour, but the star constellations were tilted then.
To find the M13 you have to start with the stars Vega and Altair.

The yellow circle marks a crucial star that is “the point of an arrow”. The arrow is very easy to locate in 8x42 binoculars because the field of view is “almost big enough” then. A little below to the left there is the M13.

IX.14. Bright stars.
Even if there is a time of year when you can't see “anything interesting” from you balcony, you can simply look at bright stars. Some of them look literally like diamonds in the sky and some other show some strong colors (blue, yellow, orange or almost red). They all look cool in a small telescope.
IX.15. Scan the night sky in a totally random way.
You can scan the night sky in a totally random way and still have fun! Well, there are so many interesting night sky objects, including relatively bright stars that I hardly ever do it, but sometimes when I try to locate a specific target I find a cool small unnamed asterism by sheer accident and I say to myself: “Wow, it looks cool!”
PS. There are many other interesting night-sky objects that can be seen in a small telescope, but finding some of them is quite a challenge. From my own experience I can say that every observing session teaches you something new and month after month you can feel more and more comfortable at using your telescope.
X. How to find very weak objects or very rare phenomena.
X.1. How to find very weak objects.
Aiming a telescope in a rough direction of a target and scanning the area while looking for that object is not a good idea as far as weak objects are concerned. It's very easy to miss them this way. Moreover to be 100% sure if an object is beyond your reach you have to identify the proper place with 100% certainty.
The only way to be 100% sure is to start with a very bright star and then star-hop to the proper place/target. Moreover, you have to find the place and STOP. Sometimes it takes some time to notice a very weak object that may seem invisible while the view is moving.
Here’s how I prepare for star hopping:

I focus on bright star patters that fit into the field of view (the circles are 1.5 degree). If there is no such pattern I focus on a bright lone star. The last circle, marked by yet another bright star pattern, is where you should either see the M81 right away OR where you should change to a medium eyepiece.
Then I use the program GIMP and simulate the “night mode” (red color doesn't kill your dark adaptation). I use this program because in some cases the “night mode” on the site Stellarium-web.org is less readable than mine simulation and I also prefer to look at normal colors during the day (while I plan for star-hopping):


I download such an annotated and colorized screenshot to my smartphone and use it as my “mobile map”. Obviously I prepare several different maps for a given night, not just one.
The only problem is that at a different date and/or time the whole view/picture will be skewed, so it's better to plan for a particular day AND hour.
X.2. How to find very rare phenomena.
X.2.1. How to find the exact date and time of a Ganymede shadow transit.
Even in a small telescope you can see a shadow of Ganymede (the biggest moon of Jupiter) cast on the surface of Jupiter! The problem is WHEN to look at Jupiter because such a shadow transit usually lasts very short time (up to 3 hours, but on average much less than this).
Another problem is that your part of the Earth may be facing in opposite direction when a shadow transit happens, so Jupiter won't be visible at all then. This is why it’s very important to search for transits visible at a particular observing site. It's a complete waste of time to analyze ALL the possible moon/shadow transits because there are too many of them (every 7 days and 3.7 hours).
My method is basically all about finding moon transits, while corresponding shadow transits must be “sometime near”. I gather the needed data at this site:
https://ssd.jpl.nasa.gov/horizons/app.html#/
1. Ephemeris Type: Observer Table
(It allows crucial table settings in the point 5.)
2. Target Body: Ganymede (JIII)
3. Observer Location: … [pick a particular city]
4. Time Specification: Start=2022-07-12 UT , Stop=2023-08-18, Step=1 (hours)
(From the time when Jupiter is right behind the Sun in 2023 to the time when Jupiter is right behind the Sun in 2024, but the observing window is further limited in the point 5.)
5. Table Settings: custom => EDIT => Observer Table Settings => None => mark only these settings:
* 12. Satellite angular separ/vis.
* 23. Sun-Observer-Target ELONG angle.
Below (in the part Additional Table Settings) I additionally set these values:
* Elevation cutoff: 15 (deg)
(The “hidden” goal of this cutoff is limiting the number of hours/lines AND limiting “false results” – it's not perfect, but it's good enough.)
* Solar elongation cutoff: 85 : 180 (deg)
(The cutoff at 85 degrees is all about Jupiter being close enough to the Earth, so the planet's angular size is at least 80% of the max. The observing window is still very long: almost 6 months.)
To make your life easier I decided to make calculations for 6 cities spread all around the world for the Jupiter season 2023-24. I picked some well-known cities that are roughly 60 degrees longitude apart: Houston, Rio De Janeiro, Rome, New Delhi, Tokyo and Honolulu.
I checked some random results and it seems to me that latitude is important only when it’s very high or very low. Either way you have to check the results for your own precise local time and also for possible false results, by using for example the site stellarium-web.org set exactly for your own location. I will show an example for the first city.
Please notice that if you live/observe close to the middle of a gap between two cities you may want to check the results from both sides of your location.
Houston: -95 degrees longitude (west)

The original data is a little bigger, but it's easy to discard unneeded columns (or unneeded parts of columns) while importing it into a spreadsheet. Alternatively you can simply search the data for “/t” (small letter t).
The times in the results are always given in the Universal Time (UT), so you have to know your time zone that may be IN ADDITION skewed by the daylight saving time (DST). For example my own local time (on the screenshots below) is UT+2 (during DST), but it will be UT+1 during winter/standard time.
Before Jupiter's opposition the code at the end of a line is L (Jupiter “leads Sun”), but it also means that a shadow transit leads a moon transit – you have to change the clock to an earlier time (quickly in 1-hour steps), up to 6 hours earlier. After Jupiter's opposition the code is T (Jupiter “trails Sun”), but it also means that a shadow transit trails a moon transit – you have to change the clock to a later time, up to 6 hours later.
When Jupiter is close to opposition (close to the solar elongation angle of 180 degrees) there is hardly any time difference at all. A particular solar elongation angle is given in every a line, for example in the first line above it's 86 degrees.
Let's verify the start of the first transit above (first line with the date 2 August 2023), but for a different city: Portland in Oregon that is at a much higher latitude than Houston and, more importantly, as many as 28 degrees more to the west (at -123 degrees longitude west).


The moon transit will happen already during daylight, but shadow transit will happen 6 hours earlier – still during the night, but Jupiter will be already 29 degrees above the horizon. A perfect example!
Rio de Janeiro: -43 degrees longitude (west)

Rome: 13 degrees longitude (east)

New Delhi: 77 degrees longitude (east)

Tokyo: 140 degrees longitude (east)

Honolulu: -158 degrees longitude (west)

X.2.2. Comets.
The best site for planning for comets is this – one sub-site is for current comets and the other is for future comets:
http://aerith.net/comet/weekly/current.html
http://www.aerith.net/comet/future-n.html
In a small telescope only the brightest comets can be seen. Currently I am waiting for the comets 12P/Pons- Brooks (March and April 2024) and C/2023 A3 (Tsuchinshan- ATLAS) (October and November 2024).
XI. General info and some trivia.
XI.1. Celestial sphere and other basic terminology.
All the night-sky objects from outside of the Solar System are so far away from the Earth that they appear almost completely stationary in reference to each other. The Earth rotates around its own axis of rotation, so (almost) all night-sky objects seem to be moving through the night sky, but the distances between them on the night sky don't change.
Some tiny movements of the closest stars, that can actually be measured when the Earth circles the Sun, are not important from the point of view of amateur astronomy. Search the net for “Stellar parallax” if you’re interested – basically it “works” like this:

The Earth is round, so a person standing at the North Pole will see almost completely different night sky than a person standing at the South Pole. For example the North Star (also called Polaris), that is often used to find a northern direction, can be seen only from the Northern Hemisphere (and from a latitude of less than 1 degree south, to be precise):

When looking from the Southern Hemisphere the Earth itself obscures the North Star. On the other hand at the North Pole the North Star is (almost exactly) at zenith – it’s (almost exactly) overhead.
So, the night sky is actually seen not as a flat surface, but as a sphere. And this sphere is called a celestial sphere. The crucial parts of the celestial sphere are named according to the names used when describing the Earth – there are: the north celestial pole (overhead the North Pole), the south celestial pole (overhead the South Pole), the celestial equator (overhead the Equator), the northern celestial hemisphere (overhead the Northern Hemisphere) and the southern celestial hemisphere (overhead the Southern Hemisphere).
XI.2. Observing possibilities – latitude and declination.
A person at the North Pole (a latitude of 90 degrees north) can see only the northern celestial hemisphere and a person at the South Pole (a latitude of 90 degrees south) can see only the southern celestial hemisphere. A person standing at the Equator (a latitude of 0 degrees) can see the WHOLE celestial sphere (not on every night, but throughout a year).
However, there is a big problem with observing night-sky objects that are very low over the horizon – there is simply too much air/atmosphere in the way, so they are much less visible then. A relatively good minimum threshold is around 20 degrees above the horizon, so you have to discard some parts of the celestial hemisphere.
At the Equator you have to discard 40 degrees in total (20 degrees above the northern horizon and 20 degrees above the souther horizon), so you are still left with a view of 140 degrees: from a declination of +70 degrees to a declination of -70 degrees.
Please notice that a declination for the celestial sphere “works” exactly the same way as a latitude for the Earth – a positive value means “north” on the celestial sphere and a negative value means “south” on the celestial sphere. In other words a positive declination points at the northern celestial hemisphere and a negative declination points at the southern celestial hemisphere.
At the North Pole there is only one horizon – the southern horizon, so you have to discard only 20 degrees, BUT because you can see only the northern celestial hemisphere from there you are left with only 70 degrees of view (from a declination of +90 degrees to a declination of +20 degrees).
Interestingly at the North Pole there are no directions north, west nor east. Every direction is south. It's like standing at the very summit of a mountain – any step you take means you are going down. When the Sun moves (or rather when the Earth rotates) you have to keep turning your eyes towards the Sun, but you keep looking south anyway (all day long and all night long).
So, at the North/South Pole there isn't any visible day-night difference, but the Sun gets lower and lower above the horizon (and then below the horizon) hour by hour, day by day and month by month – the Sun is going down in a spiral.
Please, notice that at the North Pole during the times when the Sun stays below the horizon all through the day, the night-sky objects just move around in full circles and no “extra” night-sky objects are visible then. The lower a latitude is the smaller circles around a celestial north pole can be seen in full. At the Equator you can't see anything going in circle and you can see all the night-sky objects moving in celestial half-circles (the one directly above the Equator actually looks like a straight line).
Most astronomers agree that the best latitude is a little below the Equator because the southern celestial hemisphere is generally more interesting. Unfortunately most people in the world can’t change their latitude in any significant way, so we have to live with a particular night sky.
TRIVIA: The stars that are close to the celestial equator can be seen both from the Northern Hemisphere and from the Southern Hemisphere, but they are upside-down on the opposite Hemishpere. Here's a picture of the constellation Orion seen from the Northern Hemisphere:

Here's a picture of the constellation Orion seen from the Southern Hemisphere:

Please notice that the Earth rotates around its own axis of rotation, so when you look from the Southern Hemisphere in the north direction the Sun and all the night-sky objects move from right to left – in opposite direction than on the Northern Hemisphere when looking south. The reason is the same – a person standing on the Southern Hemisphere is upside-down when compared to the person standing at the Northern Hemisphere.
X.3. Observing possibilities – calculating possible declination from latitude.
Let’s focus on the Northern Hemisphere and calculate what can be seen from there. If your latitude is at least 20 degrees north then you can see the North Star at least 20 degrees above the horizon, which is good enough. A latitude of more than 20 degrees north doesn't really improve anything as far as the northern celestial hemisphere is concerned.
The crucial question is this: “How far south can I see?” It’s very easy to calculate: take your latitude and subtract 90 degrees for the objects seen at the horizon or 70 degrees for the objects seen at 20 degrees above the horizon. I live at a latitude of 52 degrees north, but the view from my balcony is blocked by a nearby apartment building (around 10 degrees from the horizon), so I subtract 80 degrees for what I can see at all (I get a declination of -28 degrees) or 70 degrees for what I can see at 20 degrees above the horizon (I get a declination of -18 degrees). Pretty weak.
X.4. Observing possibilities – seasons.
The Earth not only circles the Sun, but it also rotates around its own axis of rotation that is tilted in reference to the Earth’s orbital plane:


First of all, there are some objects that can’t be seen for some part of the year – they either “hide” behind the Sun or are too close to the Sun, so they are (in)visible only during days. Half a year later the Earth is on the other side of the Sun and such objects can be seen during the night.
Second of all, the bigger a latitude the shorter/longer the nights are (depending on the season). At the Equator the night is (almost exactly) 12 hours long throughout a year:

At latitudes that are “too far” north during late spring and early summer the night sky is never truly dark because the Sun is too little below the horizon. so you miss additional part of the southern celestial hemisphere. Interesting at the North Pole you don't actually miss anything when there are white nights because you can see only the northern celestial hemisphere from there anyway.
X.5. Aperture vs. magnification (in telescopes used for visual).
I HAVE to write about this topic somewhere. It pisses me off very much when people speak about one thing, but think about another thing! There is a never-ending discussion on the topic of “What is more important in a telescope – aperture or magnification?”, but most people give arguments that “Big aperture is better than small aperture”, ignoring magnification completely. Morons.
I have to give you a crucial example – a comparison to the naked-eye view. Please, notice that this example is for telescopes used for visual.
Imagine that you have a telescope with a HUGE aperture, but without ANY magnification (magnification 1x). The exit pupil in such a telescope would be equal to aperture (aperture/1), so it would be HUGE. Such a HUGE exit pupil would be much bigger than the size of human eye pupil at night (around 7mm), so most of the vast majority of the gathered light would be wasted. Using such a telescope would be like looking at the night-sky with the naked eye through a big barrel. It means that a HUGE aperture is totally MEANINGLESS without any magnification!
Now imagine a telescope with a tiny aperture of around 7mm (the size of human eye pupil at night) with magnification 3x. The exit pupil in such a telescope would be 2.3mm (7mm/3 = 2.3mm). Such an exit pupil would be still big enough to see night-sky objects comfortably, but the increased magnification would make more stars visible. Moreover it would make bright non-point-like objects look three times bigger, so you would see more details, especially on the Moon. It proves that increased magnification is BETTER than naked-eye view.
Please notice that increasing magnification much further without increasing aperture (of 7mm) would make the exit pupil too small (would make the view too dark). This is why you HAVE to increase aperture in order to PREVENT the exit pupil from getting too small (to prevent the view from getting too dark). Magnification and aperture work in an almost perfect harmony, but in SLOW telescopes used for visual magnification is ALWAYS a little more important because the exit pupils are ALWAYS smaller than 7mm (smaller than the size of human eye pupil at night).
It seems to me that some people confuse the contest "aperture vs. magnification" with the contest "big telescope vs. small telescope". It's not the same! Obviously a bigger telescope is better than a smaller telescope, but the example above proves that magnification is actually a little more important overall. Not much, but still.
The end of the never-ending discussion! Yeah, I am kidding myself – some people will never learn.
XI. More astronomy fun.
You can find plenty of interesting things about astronomy on the net, but here I HAVE to point at two fantastic things – a great Youtube video and a beautiful free Android app.
XI.1. Great timelapse of a night sky.
I enjoy timelapses of the night sky and this Youtube video is by far the best I have ever seen! It's best to watch it at full-screen!
What’s especially good:
1. There are numerous timelapses (combined into one movie) from the same place and almost from the same time (all were recorded in a span of 10 days), but aiming at different parts of the (same) night sky.
2. It’s the southern sky, which is mostly alien for a person from the central Europe like me.
3. All the timelapses are at least very good and some of them are simply fantastic.
4. Some night-sky objects are named and there are also some other comments.
5. The timelapses are not too fast, but not too slow – simply perfect.
6. The music is beautiful on its own and fits the timelapses perfectly.
7. You can see that night-sky objects move in a very curious way, especially when you look in a relatively narrow field of view – “from right to left” when looking in one direction and “from left to right” when looking in another direction. The catch is that the night-sky objects always set (hide behind the horizon) going in the same direction – “from right to left” on the southern hemisphere and “from left to right” on the northern hemisphere.
XI.2. Beautiful free Android app with cool travel through space, even to other stars.
Solar System Scope is a free Android app with cool travel through space, even to other stars! It's not perfect – for example the positions of some Messier objects seem to be incorrect, but I don't care about it because there is no “visit” option to travel to them anyway.
It's very hard to describe this beautiful app with words, so I made a video focusing on the travel aspect:
It's 14 minutes long, so it's easy to miss some things if you randomly jump through the movie, so I made some screenshots (you still have to watch the video to see the actual travel):


XII. Astrophotography with a smartphone.
Astrophotography with a hand-held smartphone is extremely rewarding for an enthusiastic amateur like me. Over time I realized that some little things greatly improve the end effect, so I will describe them separately.
XII.1. Forget about a smartphone adapter.
I bought and tried to use a smartphone adapter myself, but there were several things I didn't like. First of all I was afraid that I would damage a telescope eyepiece by tightening the adapter hold too much. Moreover the combined weight of my smartphone and the adapter was quite big, so I was afraid that the eyepiece AND the focuser tube could get damaged/skewed. Setting my smartphone (through the adapter) in a proper position in reference to a telescope eyepiece was quite troublesome. During the use my smartphone got misaligned anyway. The adapter had to be combined with a particular eyepiece and when I thought about changing to another eyepiece and going through all that trouble again, I happily gave up.
XII.2. Hand-held smartphone.
Obviously there is a little shakiness when you take pictures with a hand-held smartphone, but it's not as bad, as it may seem. The (not that big) shakiness can be seen on my videos – two of them (of Saturn and Venus) you can see in the point I and more of them are below.
A hand-held smartphone is GREAT for additional reasons – you can record a video where the view “zooms out”. Here are two examples:
XII.3. Crucial settings in a smartphone camera app.
As far as normal (daytime) pictures are concerned the standard Camera app in my smartphone works great, but it doesn't have these important features, even in the “pro” mode:
1) manual focus,
2) ISO setting,
3) shutter setting.
This is why I had to install another one. Well, I installed several free apps, but the one that worked for me was Lumio Cam. Here's a screenshot from a video I found on the net:

I always set the manual focus at “Far”, but not at maximum (not focus at infinity – some smartphones/apps apparently allow focus “beyond infinity” and it messes things up). I also manually set ISO and shutter, but the settings vary from photo to photo.
Typical settings for smartphone pictures/photos:
1) the Moon: ISO-200, shutter-250 (which means 1/250th of a second)
2) Jupiter belts: ISO-400, shutter-120
3) Saturn with rings: ISO-400, shutter-60
4) Jupiter with moons: ISO-2500, shutter-25
5) relatively weak stars: ISO-3200, shutter-8 (which means 1/8th of a second)
Any shutter setting longer than 1/8th of a second makes my pictures blurred because my hand-held smartphone shakes a little. Some of my pictures of stars taken with the setting shutter-8 are blurred too.
The same settings are important when recording a video. In general videos yield surprisingly similar results to pictures, but the size/resolution is smaller, so some details may be lost OR some very close stars are not properly separated on a video.
On the other hand it seems that there is a little less noise in videos, especially in the background (probably some different kind of processing is used from the one for taking pictures), so they often look better than single pictures. Not to miss anything I always take some pictures AND record some videos of the same object.
The app Lumio Cam also has an ADDITIONAL great setting that allows taking a series of photos with one press of a button! The symbol of this setting is three rectangles overlapping each other. This symbol replaces the single rectangle that can be seen on the picture above – second from the right at the bottom. Simply press this symbol to change the setting.
XII.4. Cropping videos (and pictures too).
Even at very high magnifications the planets look very small in a telescope eyepiece, so they also look small on pictures and videos. With pictures it's not really a problem because you can magnify them on the computer screen as much as you want, but it's worth to crop them anyway.
Cropping videos is a MUST, because, for some reason, you can't magnify videos on the computer screen and, what's even WORSE, they are always squeezed to fit into the screen! It means that if you recorded a video at a resolution higher than your monitor/computer screen resolution then everything looks SMALLER than it should!
When you crop a video (only crop, not resize) then an object appears bigger in the normal mode and magnified in the full screen mode! For example in this video, from 2:02 till 2:26, you can see the same video of Saturn twice – first original/squeezed and then cropped (not resized), but stretched by the full screen mode:
XII.5. Averaging/stacking photos.
Let's refresh the pictures from the point I.1.2. The darkest belt(s) of Jupiter:
To average several photos I toyed with the free program GIMP (GNU Image Manipulation Program) combined with the free plug-in G'MIC (GREYC's Magic for Image Computing).
Here's an example of the most primitive, but also the easiest way to average/stack photos (it's a different set of photos than were used to create the picture above):
Please, notice that all the photos that are to be average/stacked in the program GIMP/G'MIC have to be taken AT THE SAME ANGLE! When you move your hands, even slightly, between photos then a planet/belt may get a little tilted, so averaging such pictures would produce a mess. This is why it's good to take a series of photos with one press of a button.
Averaging numerous photos is the main part of what some people call “stacking”, but they combine averaging/stacking with lot's of processing. In the video above I did some color processing, so you can see that the end result can be completely different than what you (or rather your smartphone) can see – more on that in the next point.
XII.6. Processing = cheating?
Averaging numerous photos to reduce noise is clearly OK, but color processing or sharpening (which is also a kind of processing) may seem like “cheating”. I used to think that ANY processing is definitely cheating until I made, by accident, the following example.
I dedicate this example to people like me who can't even imagine how much processing is done by a smartphone/digital camera “behind your back”.
To finally understand all this talk about processing (usually referred to “raw files/pictures”) I needed a good example, namely a DAYTIME picture with TOO MUCH light, recorded simultaneously as a JPG file and as a raw DNG (Digital Negative) file. A daytime picture is much better because everybody knows what the “correct” picture should look like.
I used the free Smartphone app Lumio Cam and set the option “RAW + JPG”. I took the crucial picture a little “by accident” (I had intended to analyze a raw file of a picture taken with little light) and only later realized that it's simply perfect (because there was actually too much light). All the pictures below are only a part of this crucial picture. I had to censor the picture anyway because my wife was breastfeeding our little daughter.
To process the raw DNG file I used the free program GIMP, but to load the file to GIMP I had to install yet another free program – RawTherapee.
1. Smartphone JPG looked like this:

I took the picture when the Sun was shining from the back and when I saw the JPG I thought: “The conditions were poor, so the picture is far from perfect”.
2. Smartphone raw DNG file (without any processing) looked like this:

I was surprised by two things. First – on the raw image I could see flowers on the curtain behind my wife. Second – the raw picture was kind of bland. Further inspection revealed that there was also less noise on the raw picture, especially on my wife's face. What I didn't notice at first was that it was clearly less sharp than the smartphone JPG file.
These two pictures alone show how much processing is done by a smartphone/digital camera “behind your back”.
Please notice that what you can see above is not a raw DNG file, but this JPG looks almost exactly like the raw DNG file, even though some digital info was already lost.
3. Smartphone raw DNG file after some processing, but without any sharpening looked like this:

With two quick steps I greatly improved the raw DNG file – the picture is now more lively (less bland) AND you can still see flowers on the curtain behind my wife.
The biggest surprise to me was that the newest picture was still clearly less sharp than the smartphone JPG, which can be seen especially on the flowerpot. It means that my smartphone somehow made the raw image more sharp.
If you're interested, the steps I took so far were these:
In the first step I used the option Adjust Color Levels (menu Colors => Levels) and moved the left slider 10% to the right:

In the second step I used the option Adjust Color Curves (menu Colors => Curves) like this:

4. Smartphone raw DNG file after some processing and with the filter Sharpen (Unsharp Mask):

To achieve a “correct” image from the raw DNG file I was literally FORCED to do something that I had used to considered as cheating – I was literally FORCED to do some sharpening. Well, the smartphone JPG is still a little sharper, but my picture is overall MUCH better!
I used the filter Sharpen (Unsharp Mask) that can be found in the menu Filters => Enhance => Sharpen (Unsharp Mask), but with a little “weaker” values than the default values:

The second name of the filter (“Unsharp Mask”) made me curious and on this site:
https://thegimptutorials.com/how-to-sharpen-image/
I found these quotes:
“This slightly confusing name dates back to a technique created for darkroom film development, where a blurred positive version of a photograph is used to enhance the negative film copy of the image you’re working on. Somehow.”
“The Sharpen filter uses a digital version of the unsharp masking technique, so extra credit if you have a basic understanding of unsharp masking.”
Unsharp masking is described here:
https://en.wikipedia.org/wiki/Unsharp_masking
The crucial thing to me was that I realized that sharpening was possible even during the times of the darkroom! I had NO idea!
Please notice that stronger sharpening would increase the amount of noise (I tried it).
Summing up:
1. The overall amount of automatic processing in smartphones/digital cameras is VERY significant.
2. Automatic sharpening of digital images is a STANDARD procedure in smartphones/digital cameras.
3. The automatic processing in smartphones/digital cameras can be pretty WEAK in some cases.
4. Processing raw files yourself can bring much better (more “correct”) results.
These facts significantly changed my view on picture processing, especially on sharpening.
On a side note: I tried to process the smartphone JPG “backwards”, but the results were very poor. Now I understand that most of the (automatic) processing is irreversible. “Like my raincoat!”
One thing was bothering me: if my smartphone overdid the sharpening in this case, is it possible that in some other cases my smartphone can understate the sharpening? Out of curiosity I processed a cool picture of the Moon that I took myself earlier – it was the smartphone JPG (not the raw file), but the end results was clearly better anyway:
Smartphone JPG (a part of it):

Smartphone JPG with the filter Sharpen (Unsharp Mask):
.jpg)
The picture with the filter Sharpen (Unsharp Mask) is clearly better, but it still looks natural. I think that my original picture was sharp because the shutter speed was only 1/250th of a second, so my smartphone apparently did a poor job with sharpening.
My view on picture processing has been completely altered and now I sharpen slightly even my “normal” daytime photos – they look better while still looking natural.
The best (most universal) settings for sharpening pictures of the size up to 2600x1700 pixels are: Radius 1.000, Amount 1.000 and Threshold 0.000:

I used these exact settings to sharpen the part of the picture of the Moon above.
As far as photos of Jupiter are concerned I “cheat” by over-doing color processing (and sometimes sharpening) to make more details visible – astrophotography with a smartphone is very limited, so nothing looks completely natural anyway.
XII.7. Averaging/stacking video frames.
The number of averaged/stacked pictures should be as high as possible, but it's impossible to obtain large number of similar photos with a hand-held smartphone. HOWEVER there is a way to stack hundreds of VIDEO FRAMES from a single video recorded with a hand-held smartphone.
For example this is the final “picture” created from a video recorded on a different occasion (with a telescope eyepiece combined with my favorite color filter for visual use – green/light green filter #56) – the number of stacked video frames was 300:

To obtain the picture above I used the program RegiStax 6 – the processing tools, especially the sharpening tool, in this program are simply fantastic! The man problem is that it can't handle MP4 files, so I have to convert my videos to AVI files first.
When everything works then the end result is like magic! Here's a video showing how I obtained the above “picture” (read my Youtube description for details):
XII.8. Averaging/stacking screenshots of MP4 video frames.
Unfortunately the program RegiStax 6 is a little unpredictable and sometimes the results come up completely wrong for no apparent reason. Moreover converting MP4 files to AVI files worsens the quality of the video, so it's bad by definition.
A “desperate” alternative is to average/stack screenshots of chosen (best) MP4 video frames (read my Youtube description for details):
XII.9. Digital zoom.
Please notice that it's actually good to use a little digital zoom while taking/recording pictures/videos of the planets (or even of the stars), so they appear slightly bigger (or more separated in case of close stars). Generally all the objects, except for the Moon, look quite small in a small telescope.
XII.10. Visual keepsakes.
Nowadays I always take same pictures AND record some videos of bright objects, to have fun stacking and processing them later, when there are clouds in the skies and I can't use a telescope. They also remind me how some of the objects look in a small telescope when it's a different season and they hide behind the Sun.
XII.11. Best telescope for astrophotography with a hand-held smartphone.
Most of my pictures and videos were taken/recorded with my 114/900 Dobson simply because its base is more sturdy and there is a little less shaking when I press my smartphone against a telescope eyepiece. It's not really important for visual use because you don't touch a telescope eyepiece with your own eye, so the view is perfectly steady then.
Clear skies!
Subscribe to:
Posts (Atom)